TG Pro User Guide
Essential Guide for Mac Temperature and Fan Management
Extend the life of your Mac with TG Pro, whether you have an older one or brand a new MacBook Pro. It supports all models from 2008, right up to the latest ones in 2024, including the brand new MacBook Pro M3 Max, Mac Studio M2 Ultra, the 14-inch & 16-inch MacBook Pros, and the 24-inch iMac. It's compatible with macOS 10.13 High Sierra up to macOS 14 Sonoma, and is native on both Intel and Apple Silicon (M1, M1 Pro, M1 Max, M1 Ultra, M2, M2 Pro, M2 Max, M2 Ultra, M3, M3 Pro & M3 Max).
Quickly view CPU, GPU, logic board or hard drive temperatures, check battery health and the other hardware diagnostics. If it's getting hot, manually boost the fan speeds, or allow TG Pro to do it automatically to help keep the Mac cool and running fast. Get local or email notifications for temperature events along with full logging for further analysis.
This tutorial will guide through all the features and options of TG Pro. If you don't have a copy yet, download it for free now. All features are available with the free download with the exception of the hardware diagnostics.
Save 50% - was $20.
One-time payment.
Requires macOS 10.13 or later
Supported macOS versions:
macOS 10.13 High Sierra - macOS 14 Sonoma
Latest Version:
TG Pro 2.92
Release Date:
March 11, 2024
Table of Contents:
- Getting started
- Monitor all internal temperatures
- Monitor fan speeds
- Controlling the fans
- Use diagnostics to find defective hardware
- Saving information to a log file
- Get notifications when it's too hot
- Reset to factory default
- FAQ
Getting started
Open up TG Pro and the first thing you'll notice is the main window showing temperatures, fan speeds and diagnostics. This is one of the two areas of the app that you'll interact with. Each Mac model has a different list of temperature sensors and fans, so the window may look a little different, depending on the Mac model.
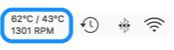
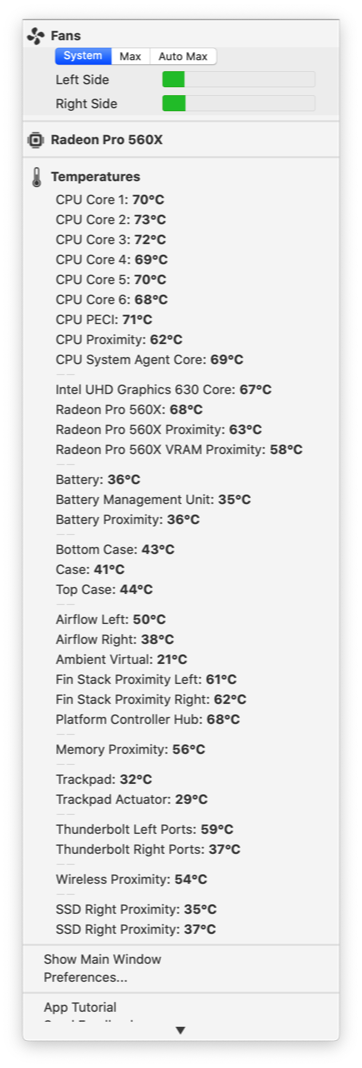
The other main area is the drop down menu which is always available in the menubar, located in the top right of the screen. It's a quick way to use the fan control and check all temperatures.
It will look similar to the following, depending on how the app preferences are set and the Mac model:
Here's an example of how to click the menubar icon and get back to the main window. In this case, a temperature is chosen which is a quick way to open the window.
Preferences
To start, let's check out some of the different options that TG Pro provides and what they do. To open the preferences, click the menubar icon, scroll down a bit and choose the "Preferences" menu item. It will look like this:
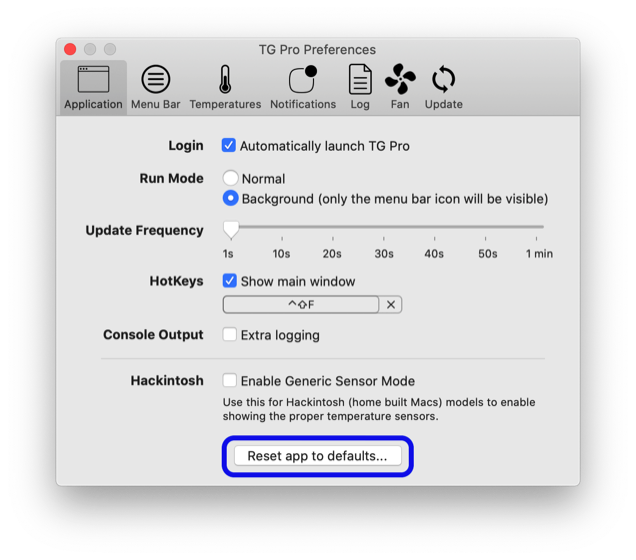
Application
Settings that affect the app overall
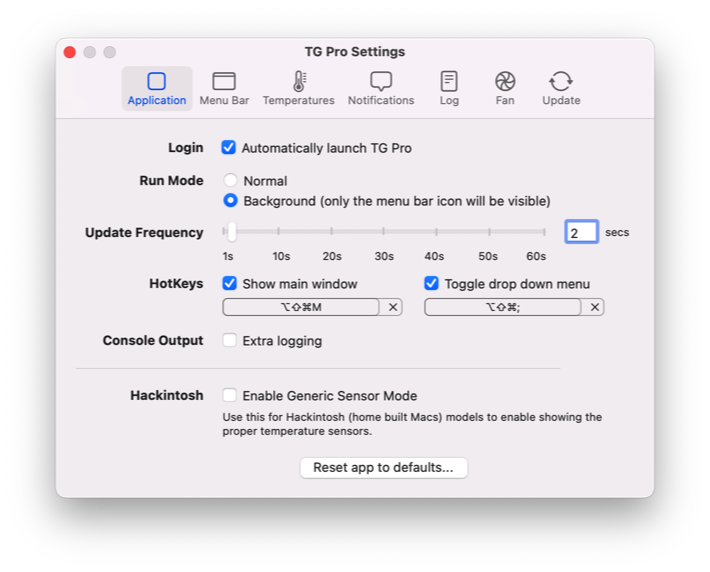
Login - To have the app started automatically when starting or logging into your Mac, check the "Automatically launch TG Pro" checkbox.
Run Mode - To have the app run in the background with no dock icon or menu bar, choose "Background". This is the most common setting since it allows the app to run in the background and still provide the status menu (and from there the main window as well).
Update Frequency - This is how often TG Pro checks temperatures and fan speeds. The default is 2 seconds which will update frequently so the temperatures and fan speeds shown are close to real time. It is possible to lower it to 1 second, or go as long as 60 seconds. The time can also be added in seconds to the text field on the right. Even though TG Pro will use close to zero CPU power between the updates, it does require a small amount to query the hardware and update the values, which is why this option is adjustable.
HotKeys - These are user settable global keyboard combinations that will work regardless of which app is currently in use. They can be set to show the main TG Pro window, and well as toggle the drop down menu. To use either one, check the checkbox if it's not already enabled, click the "Record shortcut" button, then press the keyboard combination you'd like. In this example, we've set it up so Option-Shift-Command-M will show the main window, and Option-Shift-Command-; will toggle the drop down menu. The icons for the key combinations are as follows:
⌘ - Command (or Cmd)
⇧ - Shift
⌥ - Option (or Alt)
⌃ - Control (or Ctrl)
Console Output - This is for debugging purposes and you generally not be checked unless requested to do so by Tunabelly support.
Hackintosh - Use this option to enable the generic sensor mode which will dynamically determine which sensors are available instead of by Mac model. This is very useful for Hackintosh models (homemade Macs) since they need a valid Mac model name, but don't always have the proper sensor list to match it.
Reset app to defaults - Completely reset the app back to its original state. This will reset all Auto Boost rules and preferences. Read more about it here.
Menu Bar
Change the appearance of the drop down menu

Menu Bar Content- Choose which temperatures and fan speeds are displayed.
Stacking Order - How the text in the menubar will be stacked.
Horizontal can use a larger font and is easier to see, but takes up more room:![]()
Vertical uses a smaller font, but takes up significantly less room:![]()
Options - A few choices to customize how the information will be displayed. Note: The "Use smaller font" is not available for the Vertical stacking order since it already uses a fairly small font.
Fan Controls - Move the fan controls either above the temperatures to the top of the menu, or below near the bottom. Having them at the top makes it quicker to access.
Show Main Window & Preferences - Move the menu items to show the main window and preferences to either above the temperatures to the top of the menu, or below near the bottom. Having them at the top makes it quicker to access.
Active GPU - Enable to show the active GPU name. This is only used if there is more than one GPU (ex: 15 and 16-inch MacBook Pros have both a discrete and integrated GPU).
Temperature
Options related to the displayed temperatures
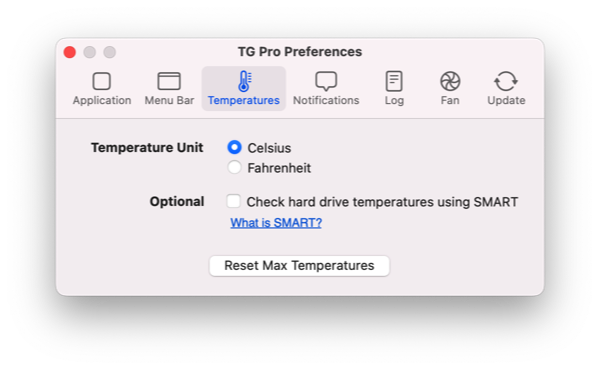
Temperature Unit - Choose between displaying either Celsius (C) or Fahrenheit (F).
Optional - Enable this to also check internal drive temperatures through S.M.A.R.T. To enable support for external drives, a 3rd party solution is required since macOS does not have built-in support for this. Note: On some Macs with older style HDDs, using this option may slow down the system and should be disabled.
Reset Max Temperatures - Reset all the maximum temperatures that have been recorded. These are shown in the main window when hovering the mouse over a particular temperature as well as a vertical black bar at the end of each row.
Notifications
The settings for notifications is more in-depth, so it has a separate section under Get notifications when it's too hot.
Log
The settings for logging also has a separate section under Saving information to a log file.
Fan
One of the main features of TG Pro is fan control, whether it's simply increasing the speeds, or using Auto Boost rules to completely replace the fan curve. The details on how to use fan control start in the Using fan control to cool down the Mac section.
Update
Configure how updates are checked for
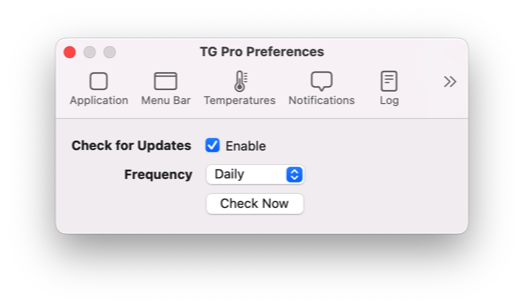
Check for Updates - Choose whether or not TG Pro will periodically check for updates.
Frequency - How often to check for updates. It can be configured between Hourly, Daily, Weekly and Monthly.
Check Now - Check right away if there is an update available to install. If there is, a prompt will appear with the change log and the option to install it. If there isn't, a dialog showing that the app is up-to-date will be displayed.
Monitor all internal temperatures
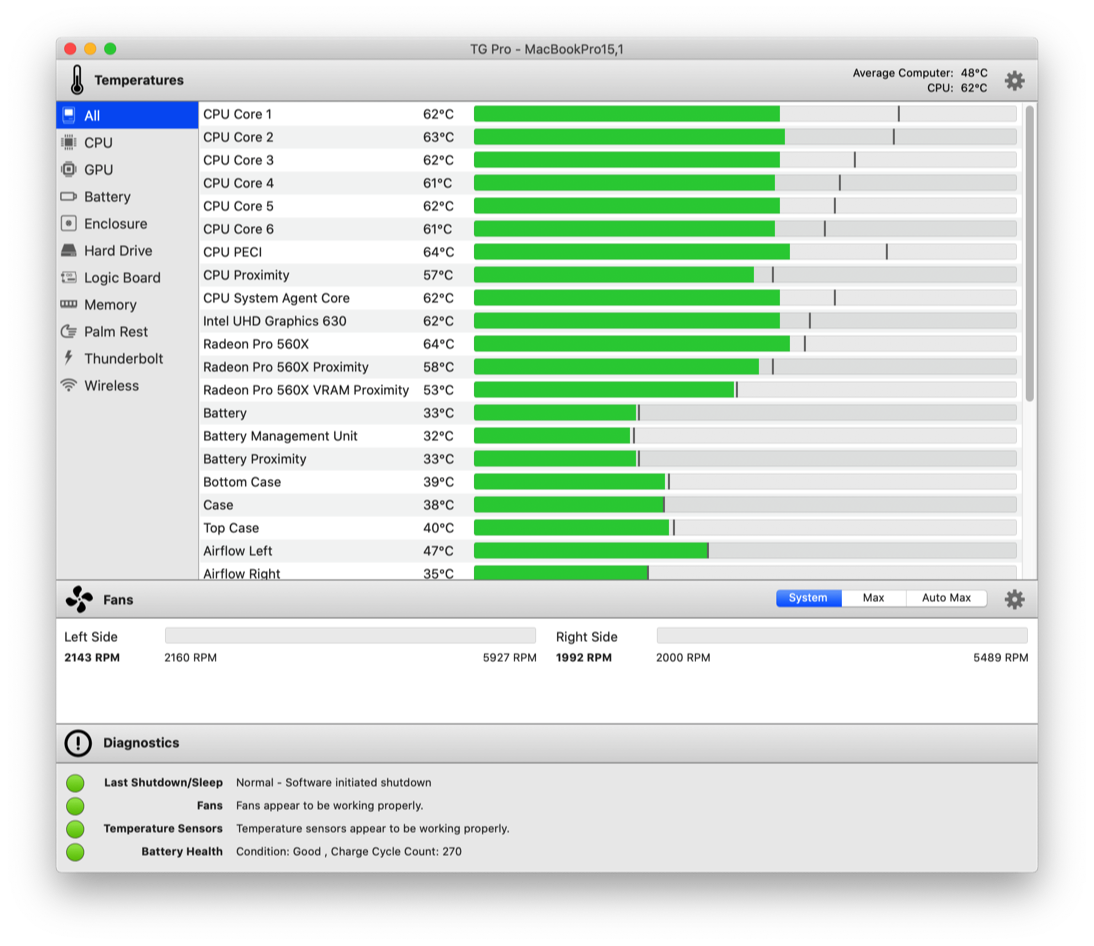
One of the main features of TG Pro is the ability to view and monitor all the internal temperature of the Mac. It can be for curiosity of what's going on inside the machine, or it could be because there's an overheating issue and this will help to track down where it's occurring. To view the temperatures, click the TG Pro menubar icon and view them in the drop down menu, or choose the "Show Main Window" menu item, which is what we'll be using for the screenshots.
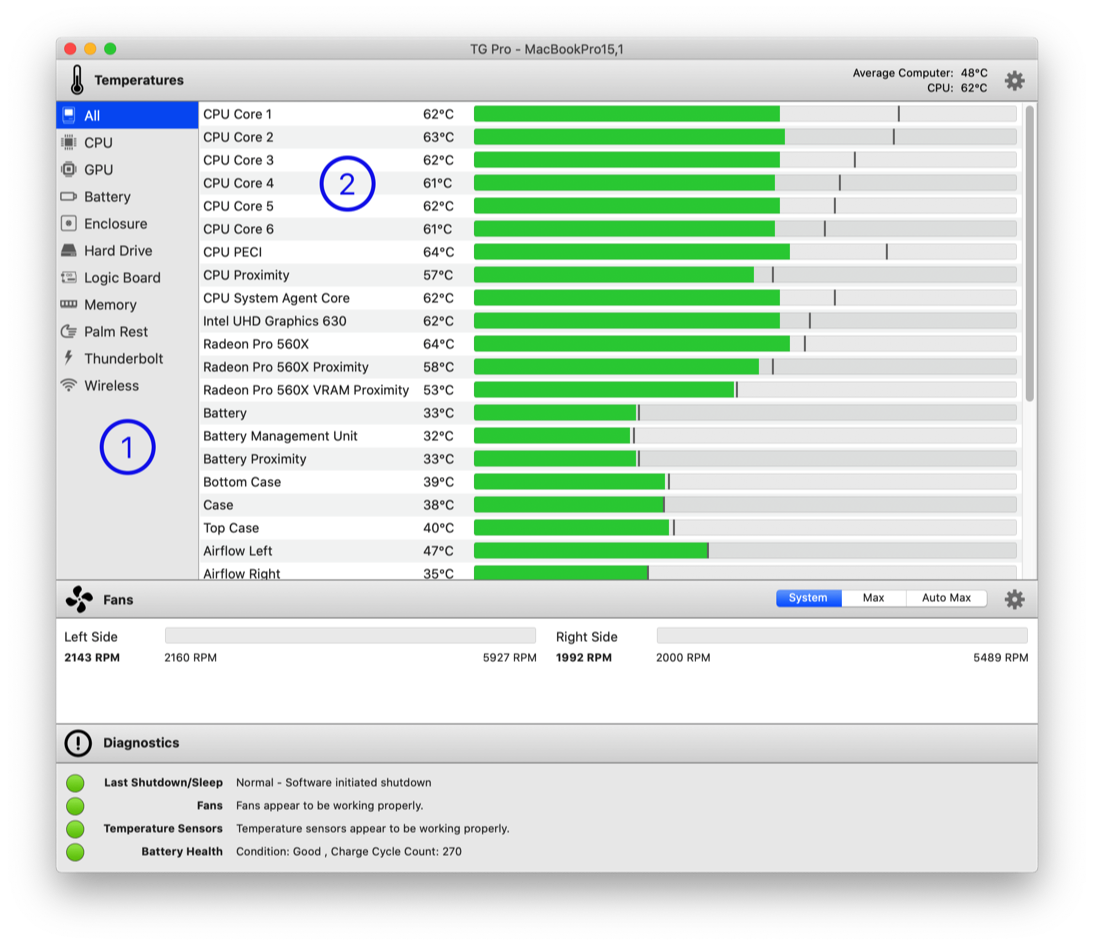
(1) - The list of hardware areas along with a row at the top labeled "All", which will show all the available temperature sensors together. To show only the temperatures for a particular area, for example, just the CPU, click on the appropriate row to filter them.
(2) - All the temperature sensors for the chosen area. Each sensor has the name, current temperature and a horizontal bar showing where the temperature is between 0°C to 105°C (32°F to 221°F). The further to the right the bar is, the hotter the temperature is. The maximum recorded temperature is indicated by a small vertical bar. How to view the actual value is shown in section below.
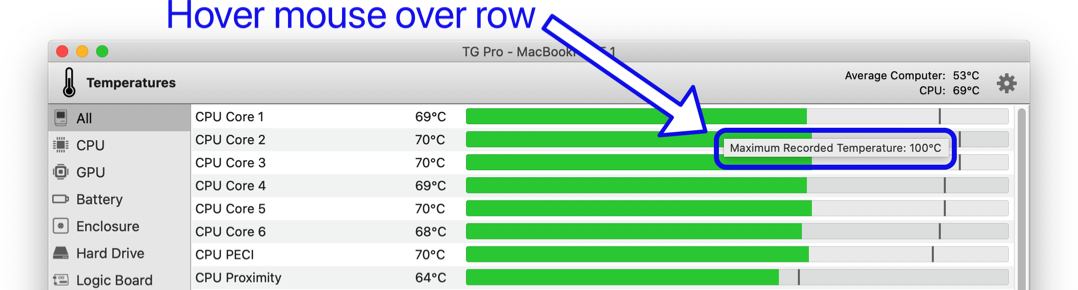
Viewing maximum temperatures
For each temperature sensor, the maximum recorded temperature is indicated by a small vertical bar. To view the actual temperature, hover the mouse over the row and a popover will appear.
Note: The popover may not appear if the update frequency is set to lower than 2 seconds. This is because macOS waits a few seconds when hovering the mouse before displaying a tooltip/popover, and when the temperatures are updated, it seems to reset this internal timer. At higher update frequencies, the popover will appear although it may flash briefly when the temperatures are updated.
To change this, open the app preferences, click the Application tab and move the Update Frequency slider to the right past the 1 second marker.
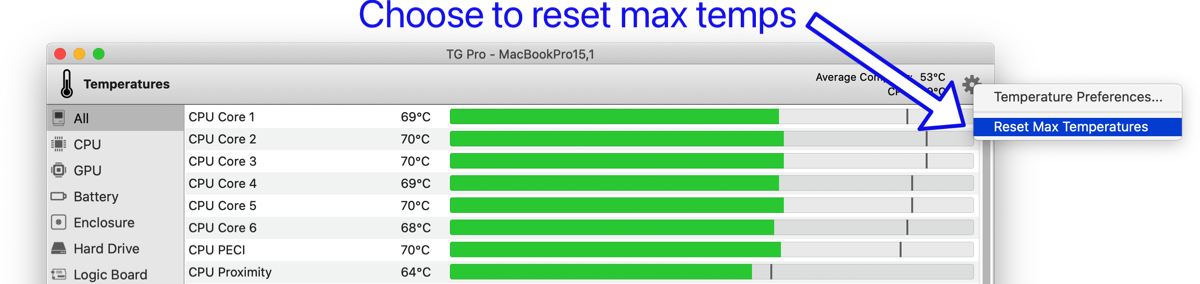
To reset the maximum temperature markers, click the gear icon in the top right of the main window and choose "Reset Max Temperatures" from the contextual menu that appears.
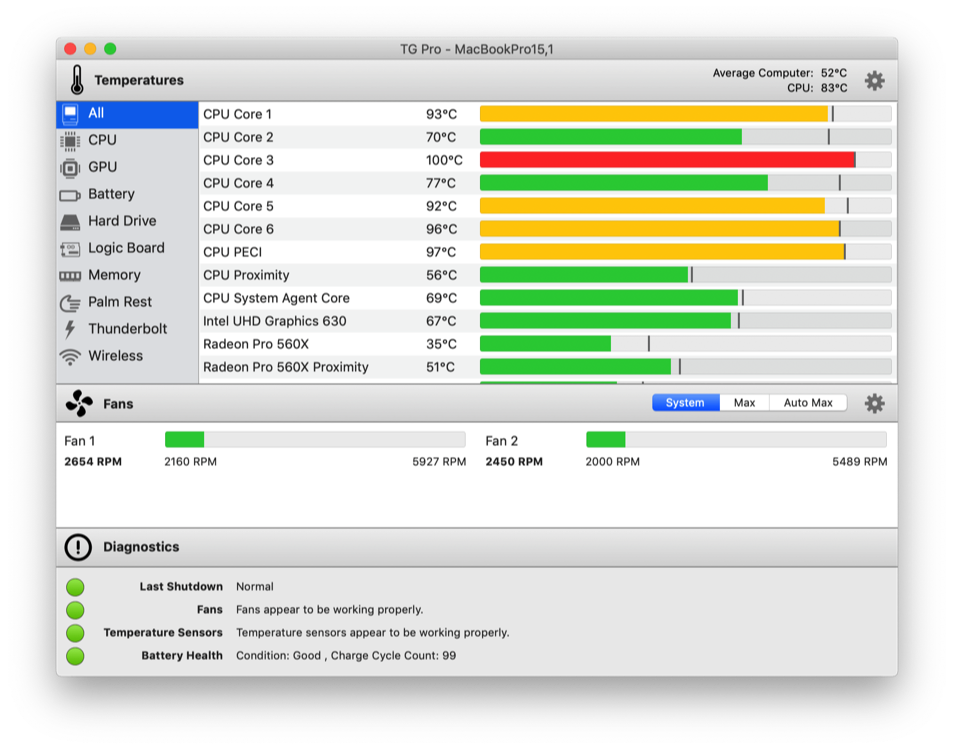
What do green, yellow and red mean for temperatures?
The temperature bars in the main window will be one of three colors, each one representing a range of values. Here are the details of each color:
Green: Temperature is between 0℃ to 89℃ (32℉ to 192℉). This is generally nothing to be concerned about since most hardware can handle this without any issues.
Yellow: Temperature is between 90℃ to 99℃ (194℉ to 210℉). This is getting closer to the thermal limit of the hardware.
Red: Temperature is at or above 100℃ (212℉). This is very close to the thermal limit. If it's a CPU temperature in this range for an extended period time, and there isn't enough cooling, the system will force a slowdown and throttling. In extreme case, the system will force a shutdown to avoid damaging the components (this will show up in the hardware diagnostics).
If you find components are continuously showing orange or red, and the fans are not running at full speed, please see the section on using fan control to cool down the Mac.
Different types of sensors
TG Pro provides access to a variety of temperature sensors specific to each Mac model, including common areas like CPU and Memory. Below is a detailed list of these areas, accompanied by explanations of their functions.

CPU - Sensors inside the CPU (Central Processing Unit). These are usually the hottest ones out of any areas since the CPUs are essentially the "engines" of the machine. The harder they work, the hotter they get.

CPU Relative - Available on some Macs with Intel Xeon CPUs, which at the time of this writing is only the Mac Pro. These are special sensors that manage the ProcHot temperature. ProcHot is interesting because it's actually the reverse of a normal temperature. It starts at a negative number and increases as the temperature goes up. When it reaches 0, the CPU will begin to throttle to cool it down.

GPU - Sensors inside the GPU (Graphics Processing Unit). These can be for either an integrated graphics chip (ex: Intel Iris) or for a discrete card (ex: Radeon 560). Note that only GPUs that are part of the main motherboard will be shown, user added PCIe and external GPUs are not currently listed.

Battery - Only available for Mac laptop models, since they are the only ones with internal batteries. This includes MacBook, MacBook Pro and MacBook Air.

Enclosure - Available on some Mac models where there are temperature sensors inside the case although not on any particular component. This also includes the HD drive bays for the older model Mac Pros.

HD - Temperature readings from the hard drives, obtained either through S.M.A.R.T (when enabled in the Temperatures tab of TG Pro settings) or via built-in sensors in certain models. For Macs featuring 'out of band' temperature data, this refers to temperature measurements acquired through direct commands to hardware components, independent of the operating system.

LCD - Temperatures from the LCD screen on certain iMac models.

Memory - Temperatures from the memory slots, banks or in some models memory that has been soldered to the motherboard.

Logic Board - Temperatures from the logic board which contains controllers that connect the disparate components of the computer together.

Northbridge - Chip on the logic board that integrates the CPU, memory and PCIe expansion. For more information, please see here.

Optical - Temperatures from around the built-in optical (CD or DVD) drive in some older iMac models.

PCI - Temperatures from around the PCI/PCIe slots in some Mac Pro models.

Palm Rest - Temperatures from around the trackpad / palm rest on some MacBook, MacBook Pro and MacBook Air models.

Power - Temperatures from around the power supply, or power adapter port in some MacBook, MacBook Pro and MacBook Air models.

Thunderbolt - Temperatures from around the Thunderbolt port(s).

Wireless - Temperatures from around the Airport (Wi-Fi) chip.
Monitor fan speeds
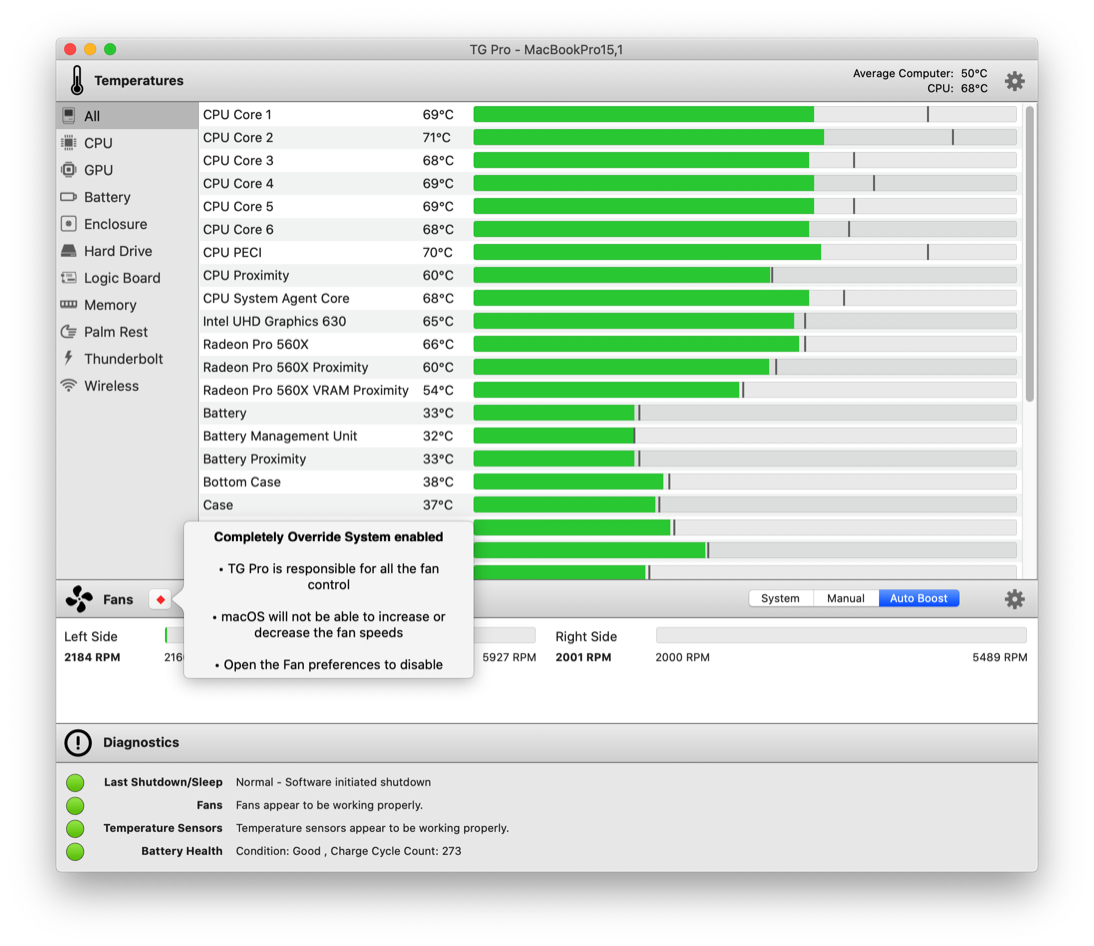
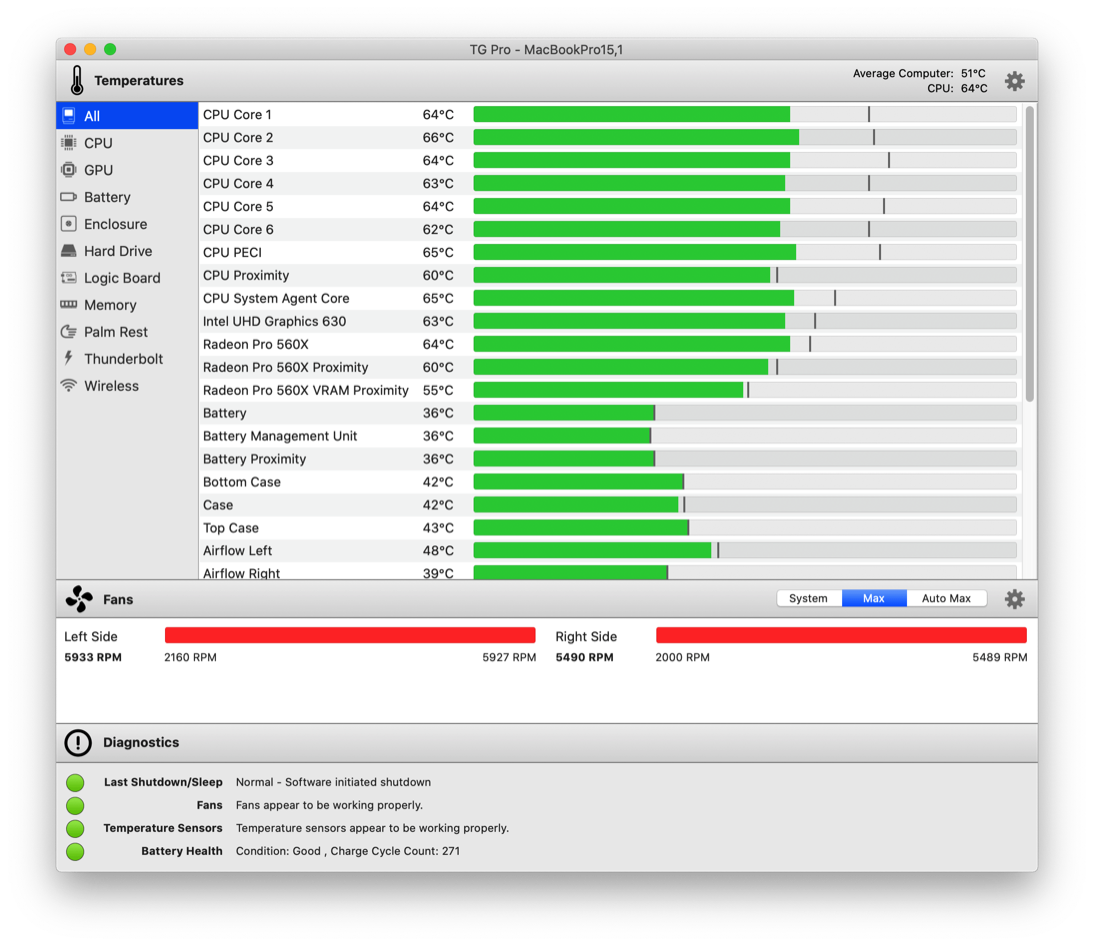
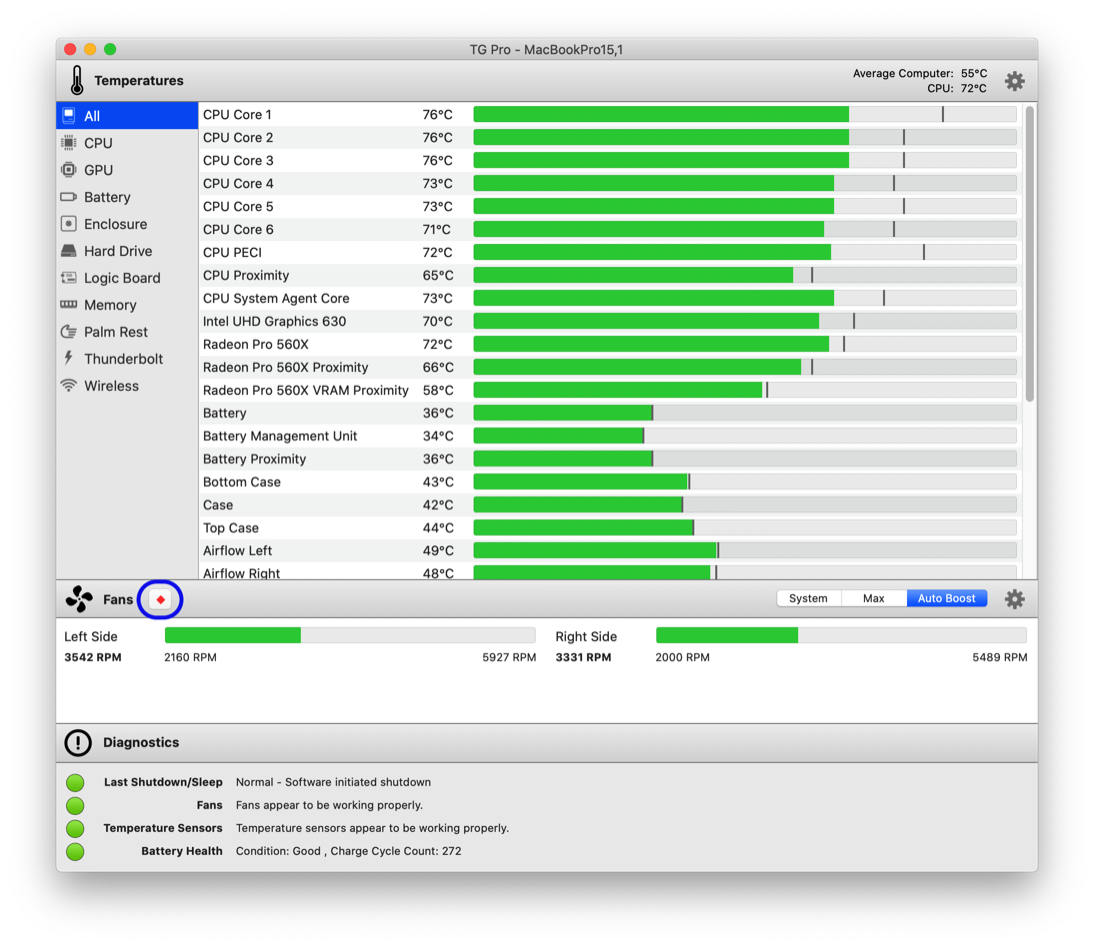
Fan control, as well as monitoring speeds, is one of the hallmarks of TG Pro, so let's dive into how the fans work first. Open up the main window (click the TG Pro menubar icon, then click "Show Main Window" if it's not already open), Check out the screenshot below along with explanations of what each part of the Fans area is for:
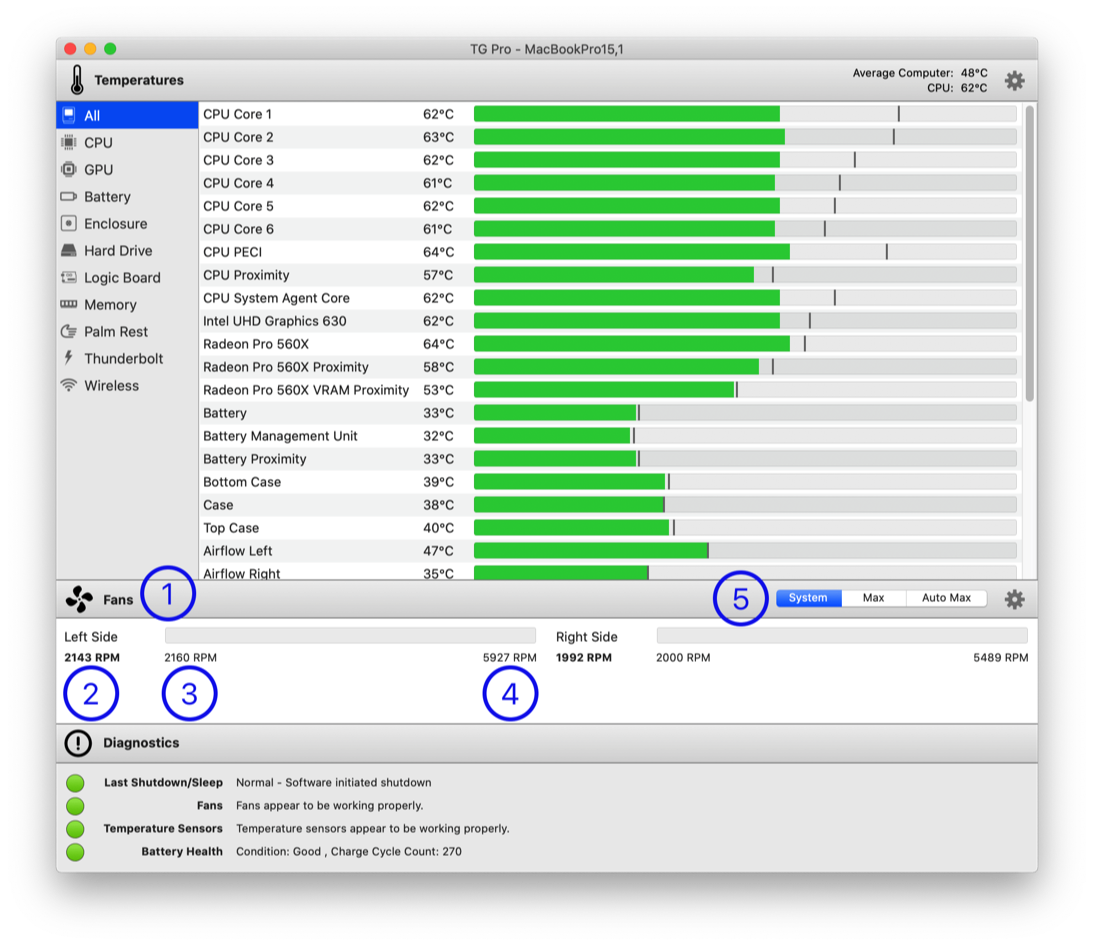
(1) This is the Fans area, where all fan related information and controls are located.
All the fans inside the Mac will be shown here. In this example for a MacBook Pro (15-inch, 2018), there are two fans. The fan speed units are displayed in RPM, which stands for Revolutions Per Minute. If the speed is 2000 RPM, that means the blade inside the fan does 2000 complete turns in one minute. The higher the RPM, the faster the fan is spinning along with more airflow, which equates to better cooling. To learn more about how computer fans work, check out the Wikipedia article.
(2) displays the name of the fan, which for this model is "Left Side", since it's physically located on the left side. It also displays the current speed, which is 2143 RPM.
(3) displays the minimum speed of the fan, which in this example is 2160 RPM. The fan speed will never go below this, although it's possible to temporarily see a slight variation where it's a few RPMs lower. This can occur if the fan speed is being lowered before it settles to the minimum value.
(4) displays the maximum speed of the fan, which in this example is 5927 RPM. The fan speed should never go above this, with the same caveat as in (3).
(5) shows the available fan modes for fan control. These are detailed in the section Using fan control to cool down the Mac.
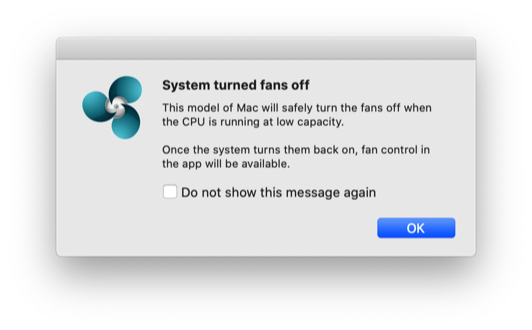
Note: Some Mac laptop models have the ability to turn off the fans when the temperatures are low and the CPU is relatively idle. For a list of the models, click here. When this occurs, TG Pro cannot control the fans (since they are off) until the hardware turns them back on.
Here are two screenshots showing what will appear in TG Pro when this happens:

What do green, yellow and red mean for fan speeds?
Similar to the temperature colors, the fans will also be one of three colors, depending on the speed:
Green: The fan speed is between 0-74% of the maximum. For example, if it was 50% the green slider would be exactly half way between the minimum and maximum speeds. The fans are normally in this range when the Mac is under a normal load.
Yellow: The fan speed is between 75-89% of the maximum. In this range, the fans are getting close their maximum speed and is usually caused by the CPU working hard, which correlates to higher temperatures.
Red: The fan speed is between 90-100% of the maximum. This means the fan is pretty much maxed out. This will usually occur when the CPU is working very hard, with high temperatures. However, if a fan is always running red, even under a light load, it's possible that the fan is defective or it's dirty and has restricted airflow.
To check for a defective fan, see the check for defective hardware section.
To clean a fan, try using compressed air around the air vents to help clear out any dust and debris. If you're really adventurous and know how, open up the Mac and use the compressed air inside to give it a really thorough cleaning. For information, search on Google for "cleaning inside Mac" or check out the MacWorld article Why is my Mac fan so loud? How to fix an overheating Mac (which also happens to recommend TG Pro).
Controlling the fans
The premier feature of TG Pro is the ability to have full fan control. It's a user's special weapon against overheating Macs and stubborn fans that seem to have a mind of their own.
Fan control can be used for a variety of scenarios, including being a way to quickly cool down a hot Mac. For example, we've seen Macs where the CPU temperatures have reached 95℃ (203℉), yet the fans were at less than half of their maximum speeds. Increasing the fans to 75%, the CPU temperatures dropped to 65℃ 149℉). That's a significant reduction in temperature, which will help to prolong the life of the Mac.
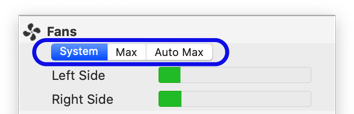
For fan control, there are three default modes, depending on the Mac model:
Apple Silicon & Intel with T2 chip: System. Max, Auto Max
Legacy Macs: System, Manual, Auto Boost
Each mode is described in detail in he following sections, or use the links above to jump to them now.
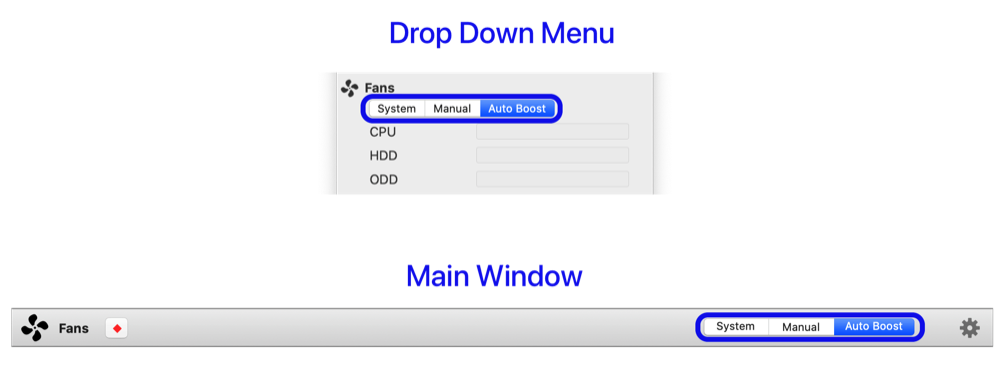
To switch between the fan modes, either open the main window, or click the drop down menu. The controls will looks like these:
Main Window

Drop Down Menu
System
In this mode, fan control is completely the responsibility of the system (macOS) and TG Pro will only monitor the speeds. If TG Pro was previously controlling the fans in any way, it will be reverted and complete control passed back to the system.
This is the default mode when TG Pro is first launched.
Manual
This mode provides a slider for each fan to quickly increase the fan speed to help cool down the components inside the Mac.
By default, TG Pro will only increase the fans speeds and will still allow the system to increase them if necessary. However it is possible to lower them if necessary, by enabling a specific option.
When adjusting the fan speeds, TG Pro will not allow them to go below what the system requires as a safeguard. With manual control, it is also possible to adjust each fan individually, although because this is an advanced feature, it is off by default. To learn how to turn this on, see the section on completely overriding the system.
Here's how to enable and use the manual mode:
Main Window

Drop Down Menu
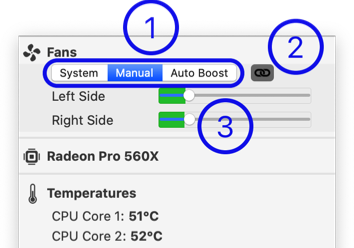
(1) - Turn on manual mode by choosing the "Manual" button from the three choices.
(2) - If there are multiple fans, there will be a button to link the speeds together. If the button is toggled, they will be linked, if it is un-toggled they will not be linked and will need to be adjusted separately.
(3) - Drag the knob in the slider towards the right to increase the fan speed and to the left to decrease it. Note that by default TG Pro will never allow the fans to go below what macOS sets the minimum to be. This is a safe guard to prevent unintentional heating up of the hardware.
Auto Boost
Auto Boost is an extension to the Manual mode, with the improvement of having rules to determine when and how the fan speed increases should occur.
It uses the rules to decide what speed the fans should be increased to. When the predicate for the rule becomes true (ex: increase the fans when any temperature goes above 75°C), it will boost the appropriate fans to the speed specified. More examples will follow in the sections below.
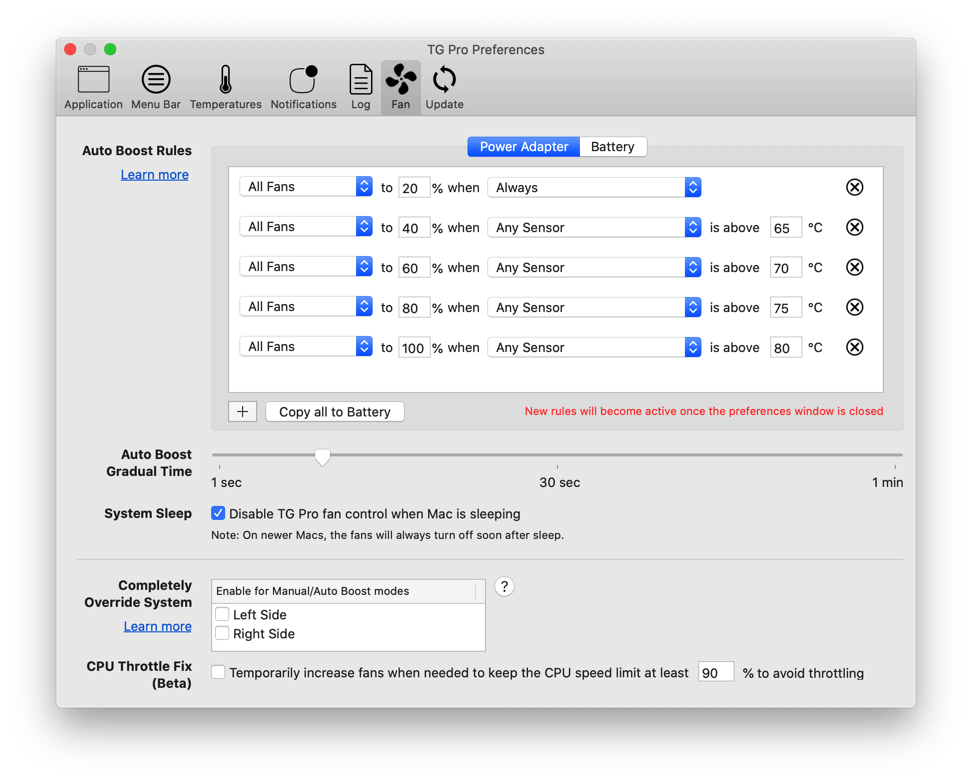
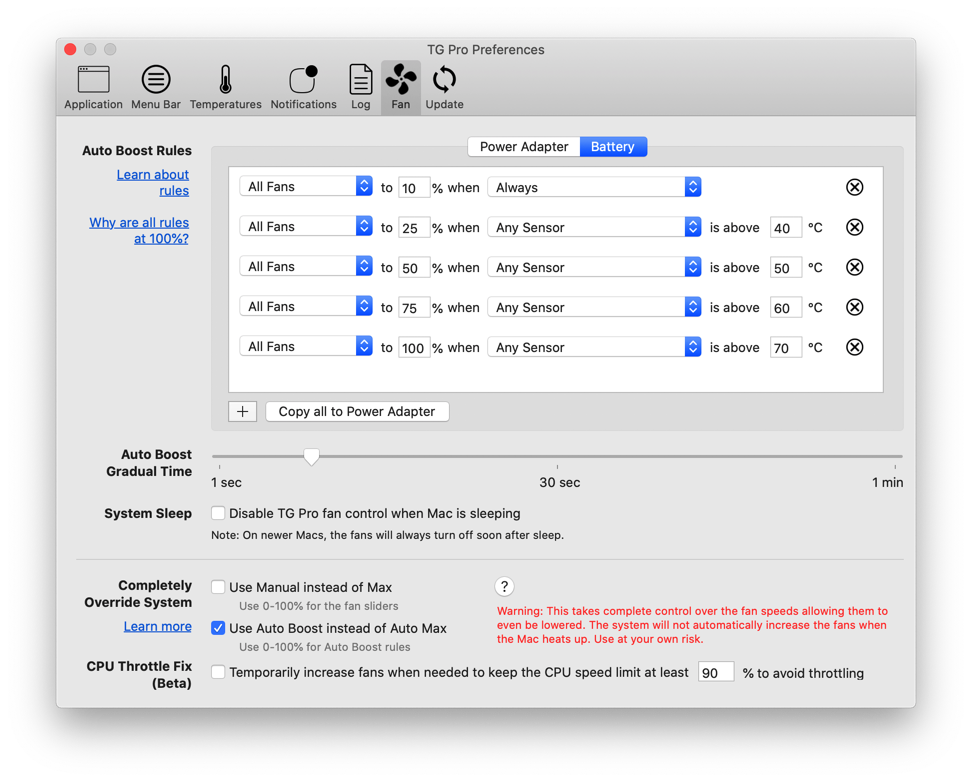
In the case where multiple rules are triggered, Auto Boost will choose the one with the highest fan speed. To start, open the Fan tab of the preferences, where the rules are created and stored. The different options are described below:
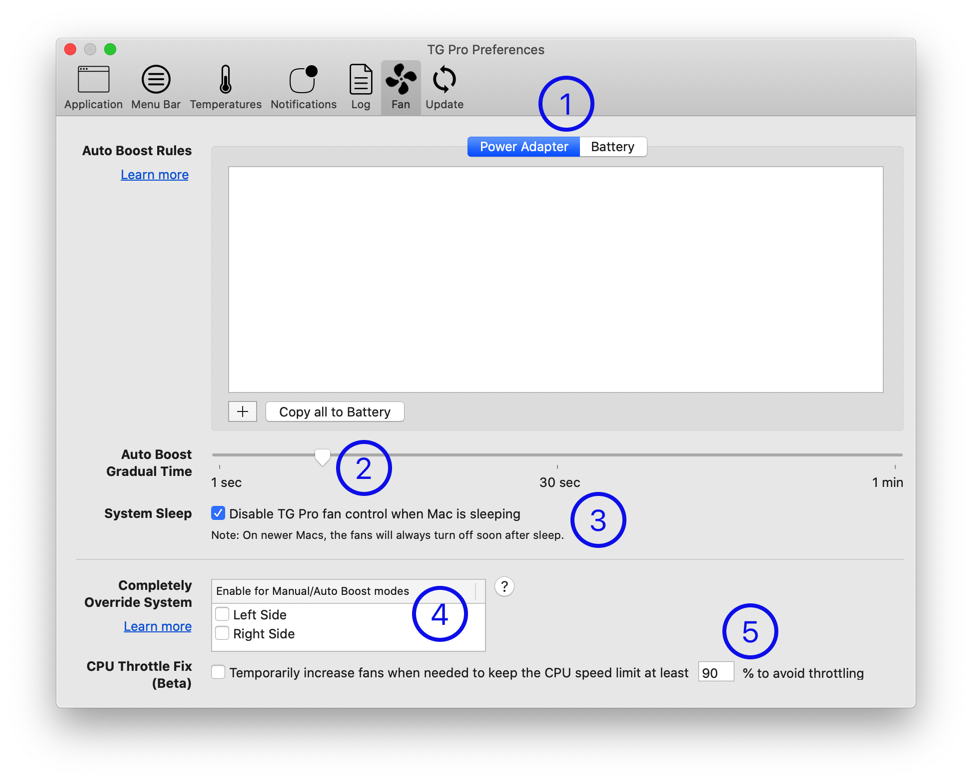
(1) - On Macs with an internal battery, there are two tabs are available: Power Adapter and Battery. Depending on the current power source, Auto Boost will use rules from the list with the same name. This allows the flexibility of having different sets of rules depending on whether the Mac is plugged in or running on battery power.
(2) - The time (in seconds) that the change in fan speeds will take when Auto Boost switches the active rule.
(3) - If the fan control should be turned off when the Mac goes to sleep. Note: This may only work on older Macs since the newer ones always turn off the fans shortly after sleeping.
(4) - Option to completely override the fan control so that the system cannot control them at all. Normally, the system can still increase the fan speeds if necessary (even in Manual or Auto Boost mode), although with this enabled, it can't. This will be explained more in detail in the section on completely overriding the system. On Apple Silicon and T2 Intel based Macs, this area will look slightly different.
(5) - Enable to monitor different parameters to try and stop the CPU from being throttled when the override option from (4) is enabled. This is also explained in detail in the avoid CPU throttling section. This feature is only available on Intel based Macs.
Next up is how to create Auto Boost rules!
Using a single rule
First, choose the power source the rule should be used under, indicated at (1).
Next, to create a rule, click the plus button (2), which will add a new rule. Once the rules are in place, they can be easily copied between the power sources by clicking the "Copy all to Battery" or "Copy all to Power Adapter" as shown by (3).
The contents and options for the rule are described below the screenshot:
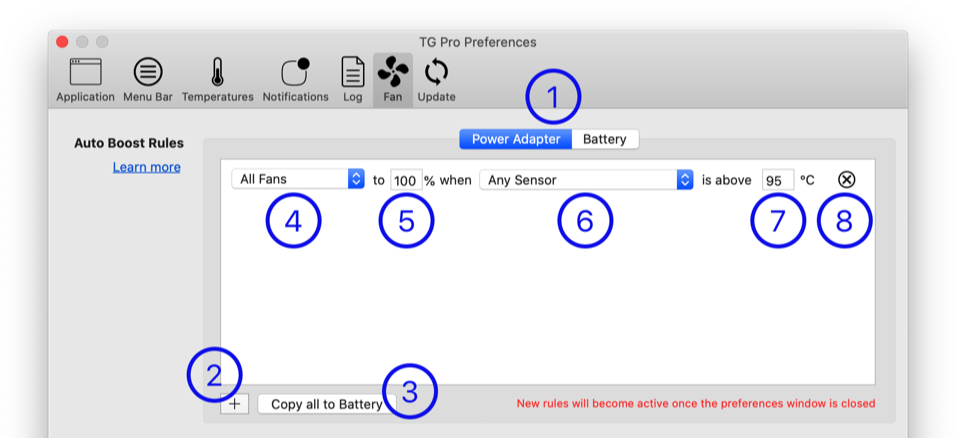
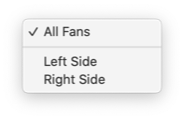
(4) - Which fan the rule will apply to, along with an option for "All Fans". For Macs with more than one fan, the option to choose which one will be available.
Note: The list may be different depending on the Mac model.
(5) - The percent, relative to the maximum rpm that the fan will be boosted to when the rule becomes active. This means 0% will be the minimum speed and 100% the maximum. The formula is this:
SPEED = MIN + ((MAX - MIN) * PERCENT)
For example, for a fan where the minimum is 2000 RPM and the maximum is 6000 RPM, 20% would give:
2000 + ((6000 - 2000) * 0.20) = 2800 RPM
(6) - The sensor that the rule will use for the temperature comparison. If the temperature is above the threshold set in the rule, then that rule will be triggered.
There are four built-in types that encompass certain sensor types, along with a list of all temperature sensors. Note: The list will be different depending on the Mac model.
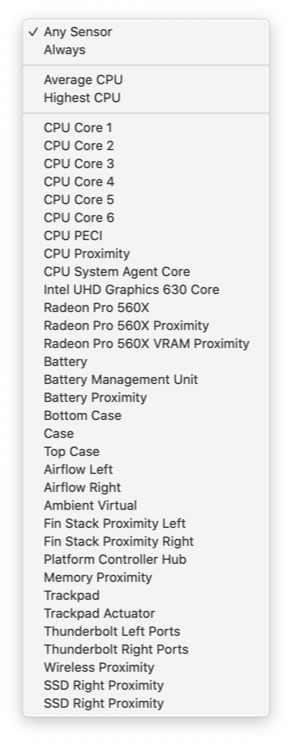
Any Sensor- The temperature threshold will apply to any sensor. For example, if the rule has the temperature set at 50°C and any of the sensors goes above this, the rule will be triggered.
Always- The rule will always apply, unless another one with a higher fan speed is triggered.
Average CPU - The temperature threshold will be the average temperature of all the CPU sensors combined.
Highest CPU - The temperature threshold will be the highest temperature of all the CPU sensors. This is probably the most commonly used option, since the CPU sensors are usually the hottest.
(7) - The temperature threshold that would cause the rule to be triggered. It will be in either ℃ or ℉, depending on what was set in the app preferences for temperatures.
(8) - Button used to remove the rule.
Using multiple rules
The real power with Auto Boost is using multiple rules with incrementing fan speeds, or "steps" as the temperatures rise. This also allows for greater flexibility and fine tuning with the fan speeds, and even for individual fans, depending on the setup.
Regardless of the number of rules, there will only be one active rule per fan. In the case where multiple rules are triggered for the same fan, the one with the highest fan percent will be used.
The best way to show how this works is to show an example where the fan speeds will start at 20% and will be incremented every time the hottest CPU temperatures gives up by 5°C (9°F):
In this example, there are five rules, with the first one ensuring that the fan is always running at at least 20% of the maximum. For an exact RPM value, recall the formula used to determine the fan speed from a percentage.
Each of the other remaining rules are all similar; they increase the fan speed by 20% each time the highest CPU temperature increases by 5°C (9°F). This allows the fans to ramp up in steps depending on the CPU temperatures. This covers the cases where the temperatures are increasing. What happens when they begin to decrease? The answer is the rules with lower temperature thresholds will be triggered.
Let's use an example to show how the rules are triggered:
• Highest CPU temperature is 62°C, none of the "Any Sensors" rules are triggered, so it defaults to the "Always" rule of 20%. The fans are now set to 20% of the maximum speed.
• Highest CPU temperature is 68°C, the rule for 40% when above 65°C is triggered. The fans are now set to 40% of the maximum speed.
• Highest CPU temperature is 86°C, the rule for 100% when above 80°C is triggered. The fans are now set to 100% of the maximum speed.
• Highest CPU temperature is 73°C, the rule for 60% when above 70°C is triggered. The fans are now set to 60% of the maximum speed.
With this type of setup, it's possible to keep a Mac considerably cooler compared to letting the system handle the fans.
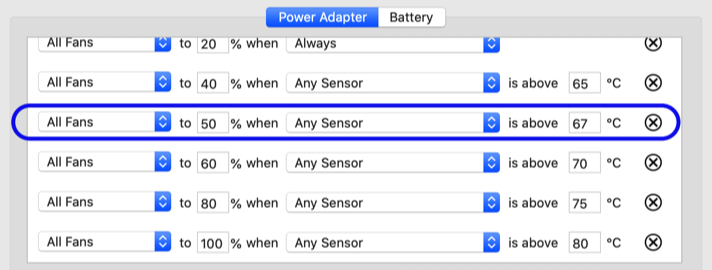
Reordering rules
In addition to being able to create multiple rules, they can also be reordered. To move a rule to a different row for easier viewing, just click anywhere in the rule, drag and drop the rule to the new row.
The order of the rules does not affect the way in which they are triggered. It's simply to provide an easy way to keep them organized.
Before
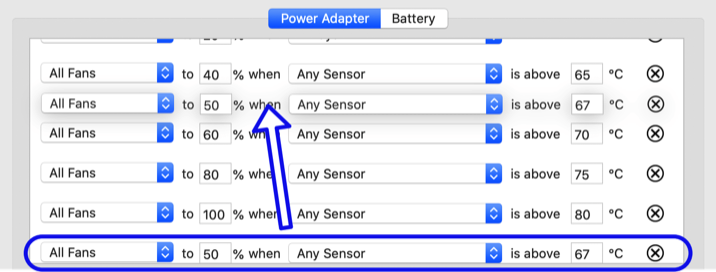
After
Overriding system fan control
By default, TG Pro is able to increase the fan speeds through the different fan control modes. In order to also lower the fan speed, the option to completely take over the fan control form the system needs to be enabled. This is an advanced feature, so only use it if it's necessary.
Once this is turned on, TG Pro has complete control over the fans and the system will no longer be able to raise or lower them. This will occur once the fan mode is switched to either Manual or Auto Boost and a fan speed is set. To avoid any potential issues with overheating / throttling, it's important to setup a full fan curve if using this feature with Auto Boost, and also to turn on the CPU Throttle Fix, which will monitor the thermal levels, and temporarily boost the fans if necessary.
Only use this if you need to lower the fan speeds temporarily using Manual mode (ex: for audio recording) or to completely replace the fan control using Auto Boost mode (ex: replaced HD in older iMac, noisy fan in 16-inch MBP).
To enable this feature, open the Preferences and choose the Fan tab. At the bottom there will be a checkbox for each fan in the Override System Control area. This provides the ability to override the control for one particular fan and leave the rest to be managed by the system. Once the checkbox is checked for a fan, TG Pro will have complete control of it when the fan mode is set to either Manual or Auto Boost.
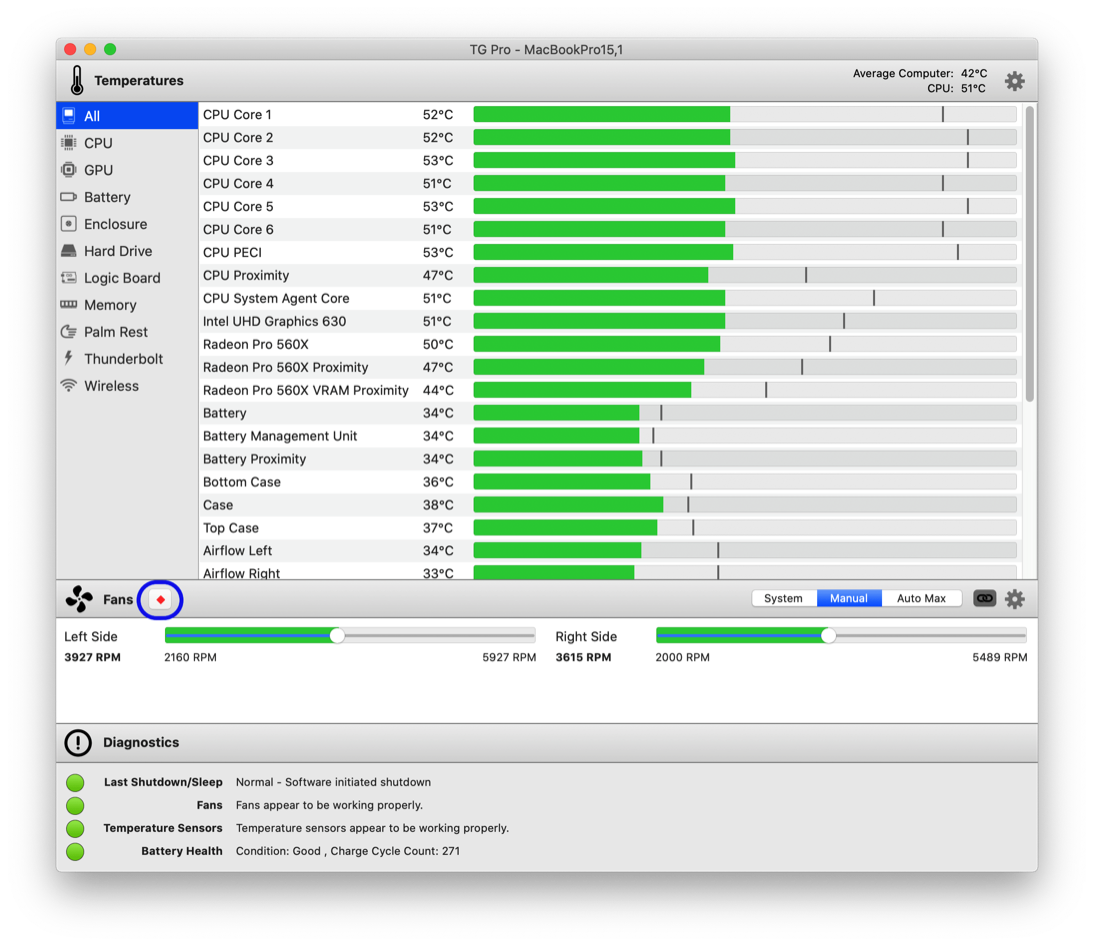
When at least one fan is checked, there will be a ◆ symbol in both the main window and status icon to show it's active and TG Pro has control.
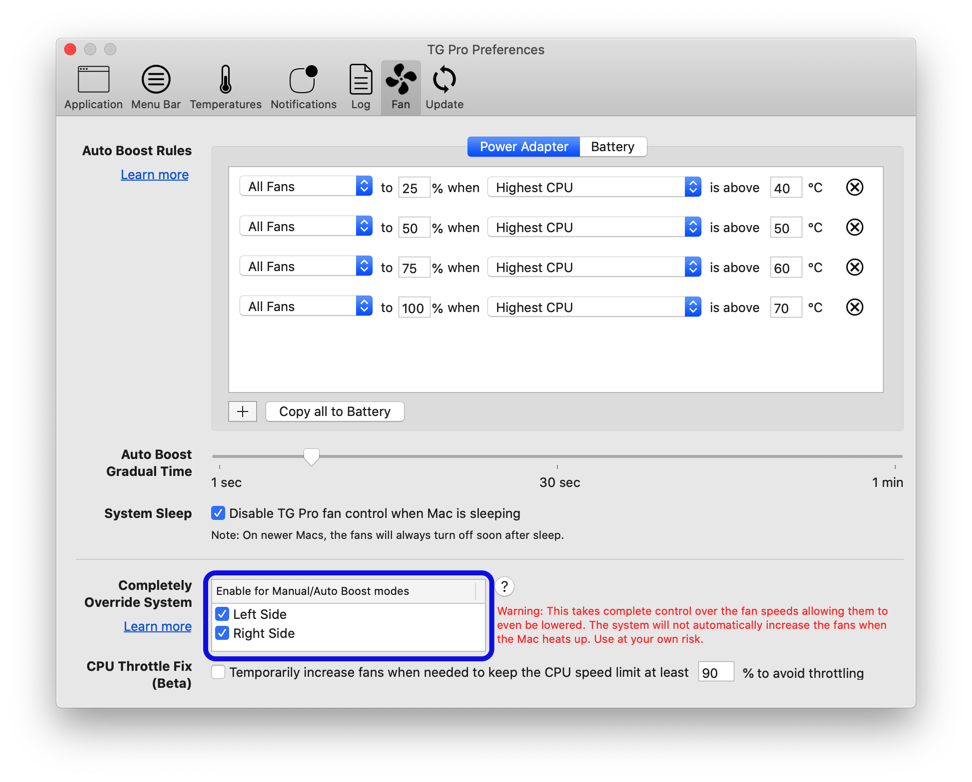
Menu bar Icon

Main Window
Override with custom fan curve
In some cases, it may be desirable to completely override the system fan control and use a custom algorithm. This is possible using TG Pro by combining the power of Auto Boost rules with the override system feature.
Please keep in mind doing this will completely replace the system fan control when the fan mode is set to Auto Boost. The system will not be able to increase or decrease the fan speeds which can cause the Mac to overheat if the fan speeds are set too low, and the CPU Throttle Fix is disabled.
While this can be a very powerful feature, use at your own risk.
Step 1 - Turn on override
To set this up, first enable the override system feature for all the fans. Depending on which Mac model you have, it will look like on of the two examples below.
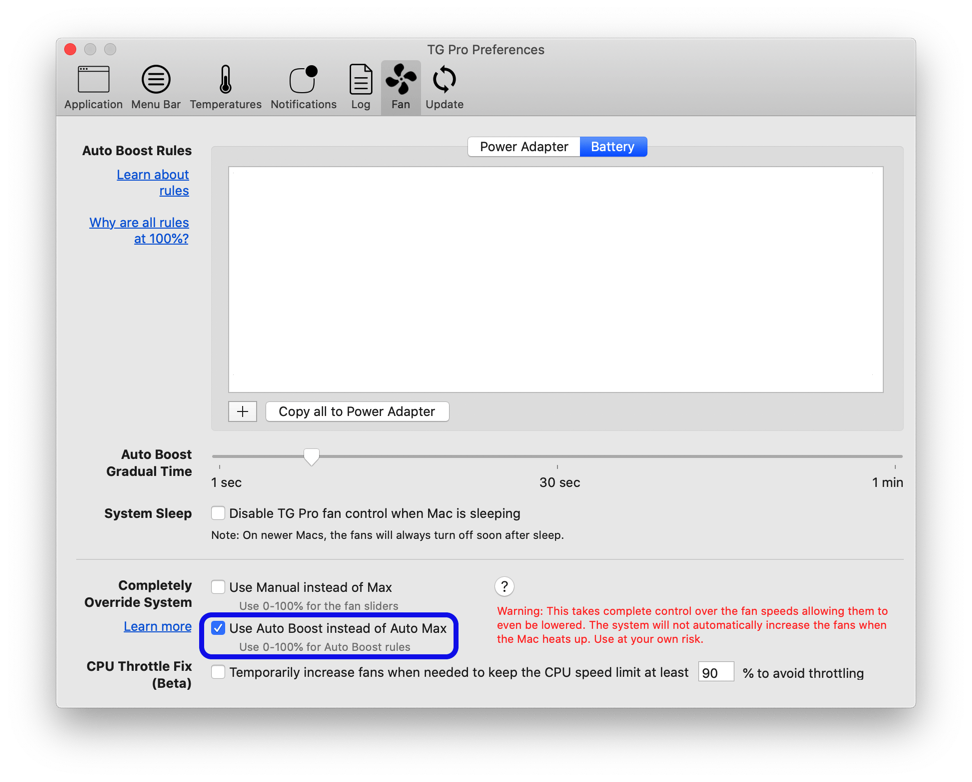
T2 based Macs
Enable the Use Auto Boost instead of Auto Max feature to allow full control of the fan speeds.
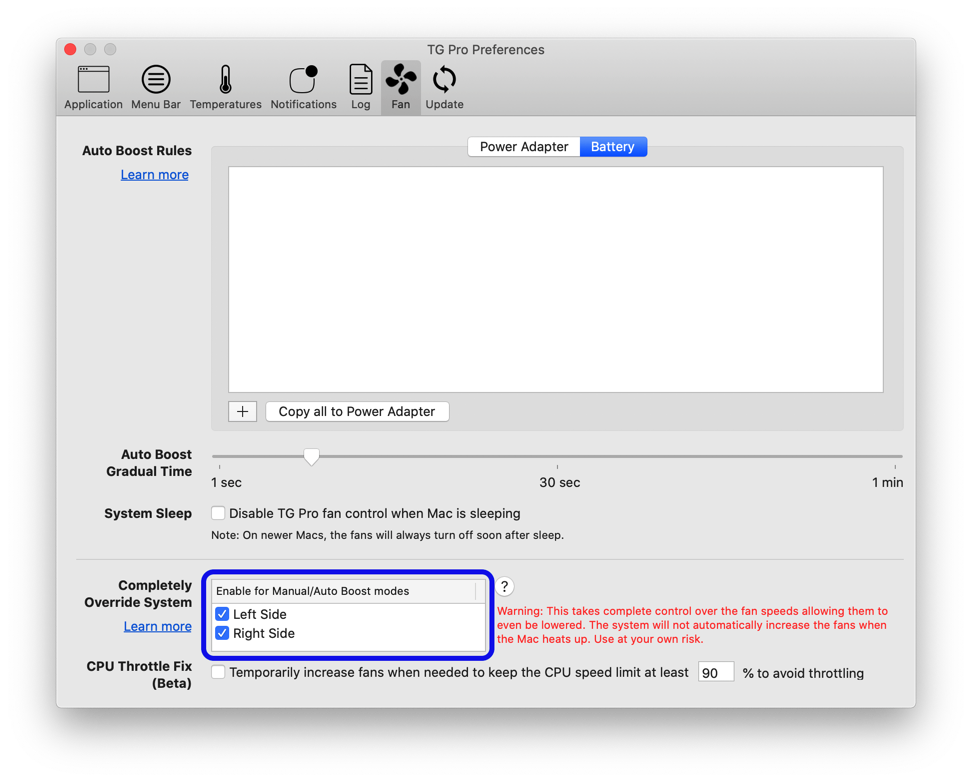
Classic Macs
Enable the override feature for each fan, to allow full control of the speeds.
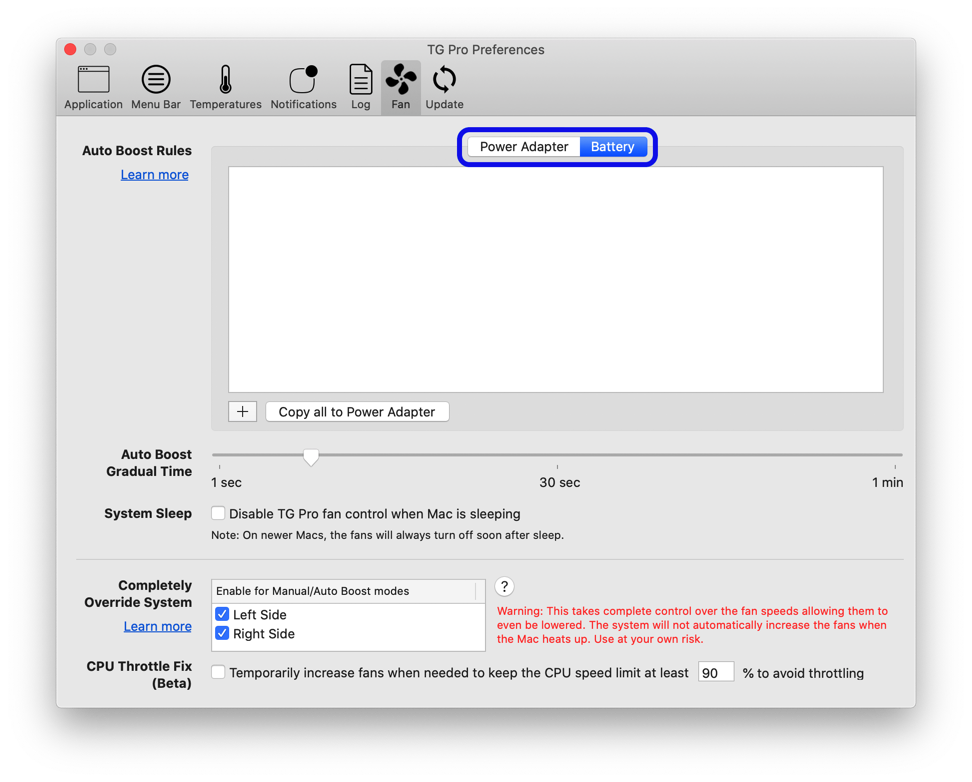
Step 2 - Choose the power source
Next, choose which power source the fan curve will apply to. It's possible to have two different fan curve, depending on if the Mac is running off the battery or the power adapter.
The rules can also be copied between the two power sources, by using the "Copy all" button, just below the list of rules.
Note: This is only available for Macs with internal batteries.
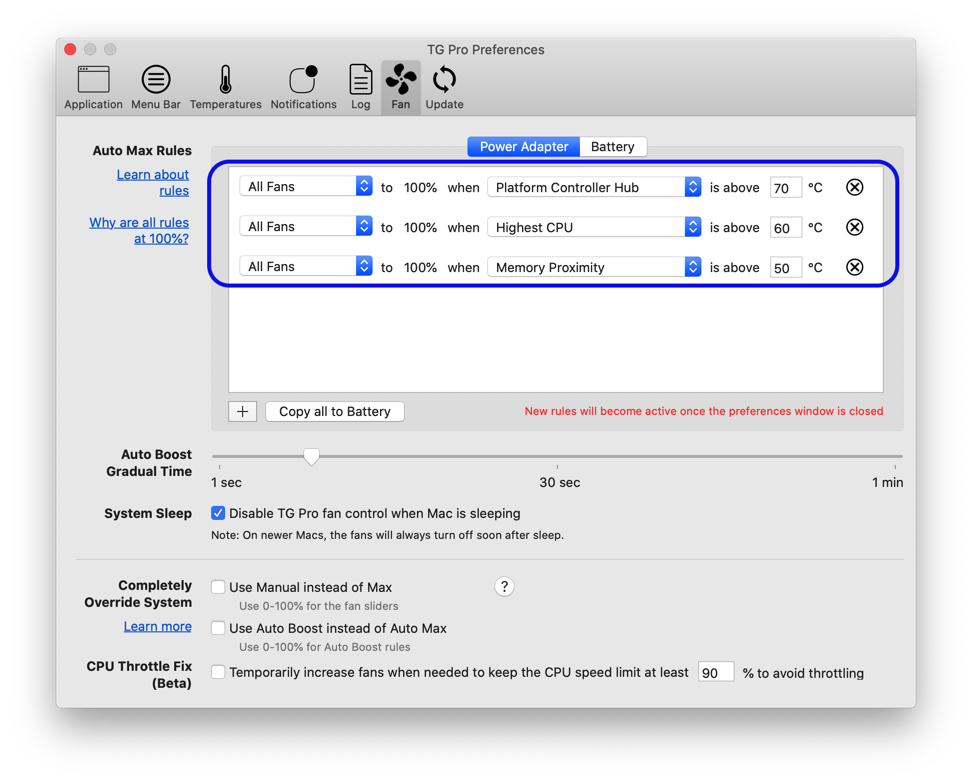
Step 3 - Create the rules for the custom fan curve
Now that it's setup to override the system and for the correct power source, it's time to add the Auto Boost rules to create the custom fan curve. This is very similar to the explanation in the Multiple Auto Boost Rules section with the addition that the rules must cover the range from 0-100% (0=minimum speed, 100=maximum speed).
The following is an example set of rules that makes a complete custom fan curve. These values can be tweaked to suit the environment and the goal (ex: quieter fans, better cooling, etc).
In this example, the custom fan curve will be:
• Fan speeds will always be at least 10%
• Fan speeds will be 25% if any sensor is above 40C
• Fan speeds will be 50% if any sensor is above 50C
• Fan speeds will be 75% if any sensor is above 60C
• Fan speeds will be 100% if any sensor is above 70C
Step 4 - Switch the fan control mode to Auto Boost
Finally, the last step is to change the fan control mode to Auto Boost if it's not already set. This allows TG Pro to use the rules that have been setup to control the fans.
Avoid CPU throttling when lowering fan speeds
Intel only
On newer models, especially the T2 based Macs, lowering the fan speeds can cause throttling with the kernel_task process taking all available CPU resources (ex: 900-1000% usage). It seems to be fairly common on the 16-inch MacBook Pro when using the option to completely override the system and have TG Pro always control the fans. This combination is popular (even more if it has the Intel Core i9) since this model likes to run the fans very high (ie: loud), even when the temperatures are fairly low.
Having TG Pro completely control the fans works very well, however on the newer hardware, if the system detects that the thermal values are getting too high for its liking, it will lower the CPU speed and/or cause the kernel_task process to use all available CPU resources. This is why the Mac will suddenly slow down to a crawl until the fan control is given back to the system.
We worked on a solution by studying how macOS handles the fan control as well as how the different thermal levels are used. After spending a lot of time on research along with trial and error, we came up with a fix that seems to work well. The feature is available in the Fan tab of the preferences and is called CPU Throttle Fix. It's currently beta-level quality, so if it doesn't work exactly as expected or there's a particular setup that works well (or not), please let our support team know.
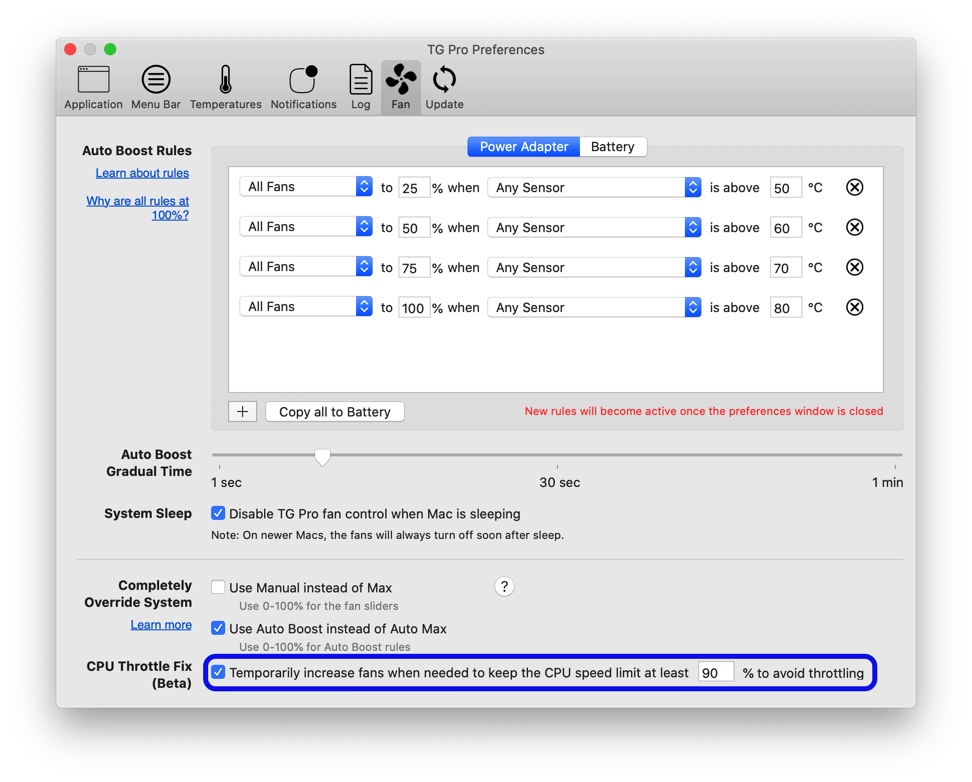
Example is from a T2 based Mac with the option to use Auto Boost instead of Auto Max so the fan speeds can be set to the entire range.
When any of the scenarios below are active and this option is enabled, it will slowly increase the fan speeds when it's necessary to avoid the CPU throttling. It will continue until the thermal levels are such that it's safe to keep the fan speed as-is. Once the thermal levels start to drop back down, it will lower the fan speeds back to what they set at.
Classic Mac: Manual and Auto Boost fan modes when at least one fan is using the Completely Override System option.
T2-based Mac: When either Use Manual Instead of Max or Use Auto Boost Instead of Auto Max is enabled.
Changes for T2 / Apple Silicon Macs
Apple changed the way the SMC is implemented in the 2018+ Mac models, including the MacBook Air, MacBook Pro, Mac Mini, iMac Pro, Mac Pro and Mac Studio models. Instead of using the way it's been since 2007 with a separate chip, it is now integrated into the iBridge/T2 chip (Intel) or M1 chip (Apple Silicon). The result of this, is the existing methods TG Pro uses for fan control didn't work. We did extensive R&D to determine how to control the fans for these models along with the safest way to do it. We discovered is that is it possible to change the fan speeds although this completely overrides the system where it is not able to increase or decrease them.
After going through a few different ideas on how to safely implement fan control for these models, we came up with a solution that we believe is the best one for now. This involved making a few changes to the way the fan control works for these models to ensure that they can't be accidentally set low.
The following fan control modes have changed for T2 & Apple Silicon based Macs:
Manual -> Max
Auto Boost -> Auto Max
However, there is an option to revert this with Override System, with the caveat that TG Pro will be completely responsible for the fan control and the system won't be able to increase them.
All other features, such as logging, temperature sensors, fan information, notifications, etc are all the same as with previous models.
Max

Given the way the fan control works with the T2 & Apple Silicon based Macs, the fan modes had to be modified. The first one to change was Manual, which becomes Max. When switching to this mode, TG Pro will automatically boost all the fans to their maximum speeds. This is because in order to control the fans for these Macs, TG Pro has to completely take over, which doesn't allow the system to boost the fans if it needs to. By using the maximum speed instead of a slider, there's no chance of accidentally setting the fan speed too low in this mode.
Auto Max

It's the same as the Auto Boost fan control mode, except each rule is set to the max fan speed (100%). The reason it's set to the max speed, is because TG Pro has to completely take over, which doesn't allow the system to boost the fans if it needs to. By using the maximum instead of a lower speed, there's no chance of accidentally setting the fan speed too low.
Enable complete override

In addition to the Max and Auto Max fan control modes, it's also possible to modify them to have complete control over the fan curve. With this option enabled it means only TG Pro will be able to control the fans for both increases and decreases. This is essentially the same as the option to completely override the system, with the addition that it's for T2 & Apple Silicon based Macs.
Only use this if you need to lower the fan speeds temporarily using Manual mode (ex: for audio recording) or to completely replace the fan control using Auto Boost mode.
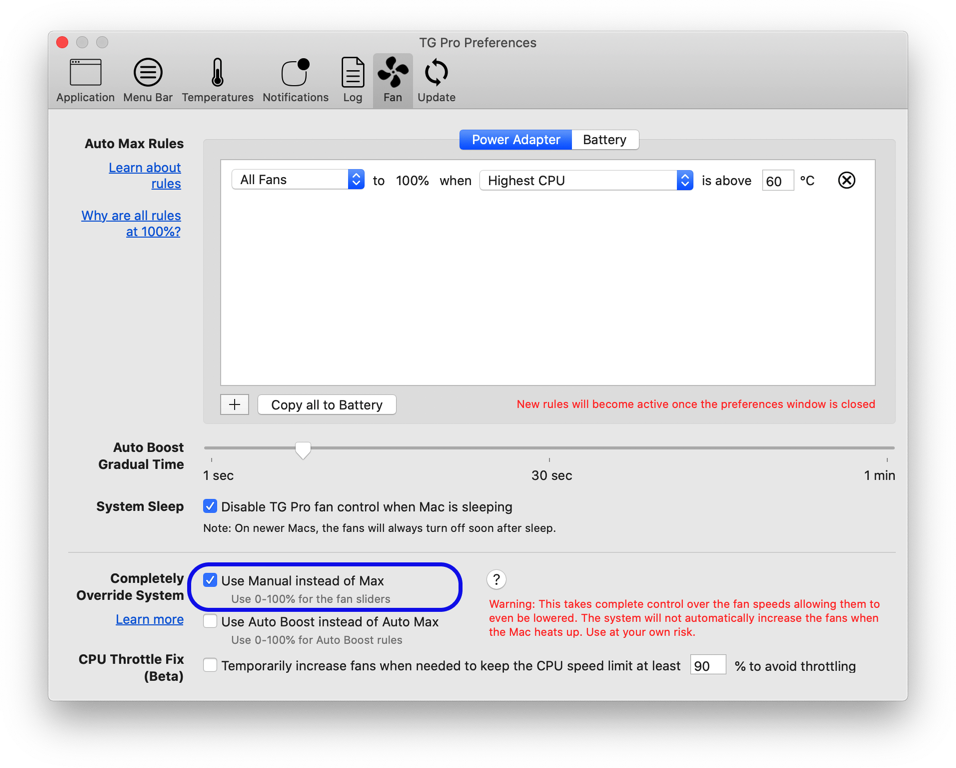
Using Manual

Enabling this option will turn the Max fan control mode into Manual, which provides sliders to set the fan speeds.
The one difference between the normal Manual and this is it will completely override the fan control, so only TG Pro can control them. To avoid setting the fan speeds too low by accident and having the CPU throttled, try turning on the CPU Throttle Fix option (only available on Intel).
This is what the Fan preferences look like after it's enabled:
Notice that in the main window (and menubar icon) the system override indicator is visible:
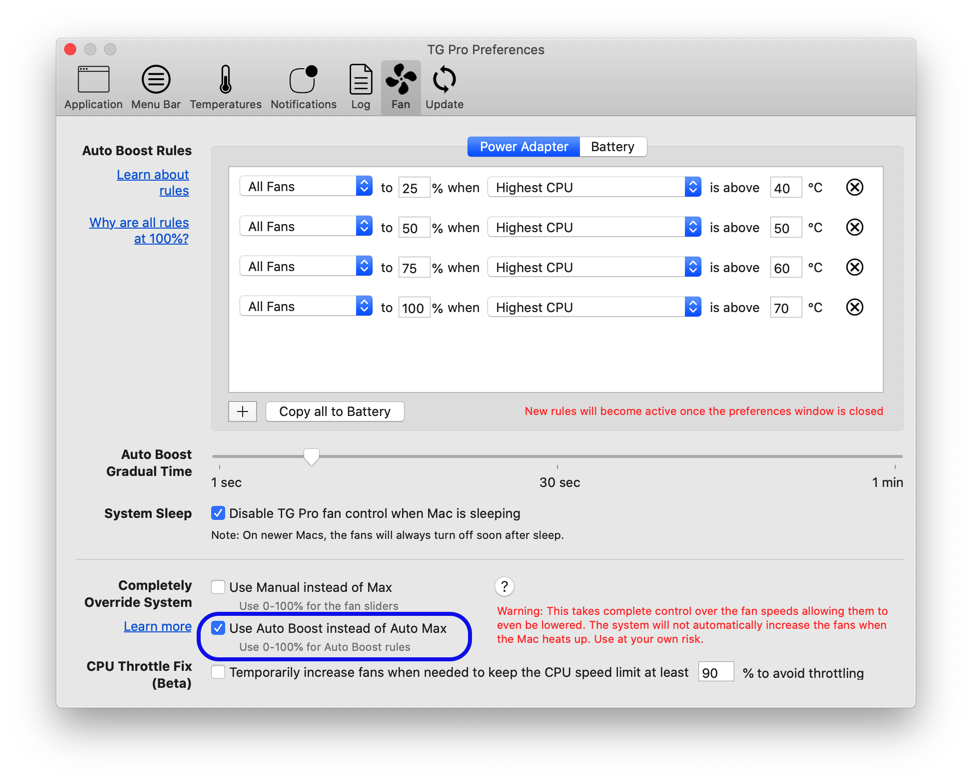
Using Auto Boost

Enabling this option will change the Auto Max fan control mode into Auto Boost, which provides the ability to set the fan speed for each rule.
Using this will completely override the fan control, so only TG Pro can control them. Because of this, there must be enough rules setup to properly increase the fan speeds as the temperatures increase. To learn how to setup a complete fan curve profile, see the section on how to completely override the system using Auto Boost rules.
In addition, to avoid setting the fan speeds too low by accident and having the CPU throttled, try turning on the CPU Throttle Fix option (only available on Intel).
Here's a screenshot to show what the Fan preferences look like after it's enabled:
Just like with the T2 & Apple Silicon Manual mode, the main window (and menubar icon) the system override indicator is visible:
Specific model setups
TG Pro is a versatile tool and can be used on every single Mac model from 2008, all the way up to the present day, as long as it can run macOS 10.11 or higher. In addition, there are some specific setups that can greatly benefit owners of certain Mac models to resolve specific issues. Here are a few common ones:
iMac - If the hard drive fan always runs at the maximum speed (which is quite loud) after replacing the drive with a new one, either an older style HDD or newer SSD, check out Fix fan speed after HD replacement.
Mac Pro 2013 - If it's crashing or the screen is freezing randomly after being used for a while, see Fix random GPU crashes/freezes.
Mac Studio - If it's important to have it running as quietly as possible, we've got a section on how to Lower fan speeds to the minimum.
iMac - Fix fan speed after HD replacement
After replacing the hard drive in some late model iMacs with a new SSD or HDD, the fan labelled "HDD" may always run at maximum speed. If this happens, it's most likely from the temperature sensor on the drive that's been damaged by the replacement, which is fairly common. When this happens, the system gets no response from the sensor responsible for the drive temperature and therefore decides to run the fan at full speed. This can be very annoying (and loud).
The good news is this is fixable with TG Pro. It can use a custom fan curve for the HDD fan and adjust the speed based on the temperature of the drive, while leaving the rest of the fans to be controlled by the system. Depending on if the replacement drive is a SSD (Solid State Drive) or a traditional HDD, the settings will be different as detailed in the next two sections.
To setup it up, start by opening the Preferences and choosing the Fan tab. Make sure the "Disable fan control when Mac is sleeping" checkbox is unchecked, as shown in (1) below. This will ensure that the HD fan speed will continue to be lowered in sleep mode.
Note: Regardless of which type of drive is used as the replacement, the iMac fan will still be labelled "HDD".

Next, we'll the following Auto Boost rules, depending on which type the new drive is:
Using a SSD
SSDs run a lot cooler than traditional drives since they have no moving parts. Because of this, it's usually safe to set the HDD fan to a value close to the minimum and leave it there.
The value used for the fan speed can be adjusted to be a bit higher or lower depending on the environment.
Remember to enable the checkbox for the "HDD" fan under "Override System Control" so TG Pro can lower the speed.
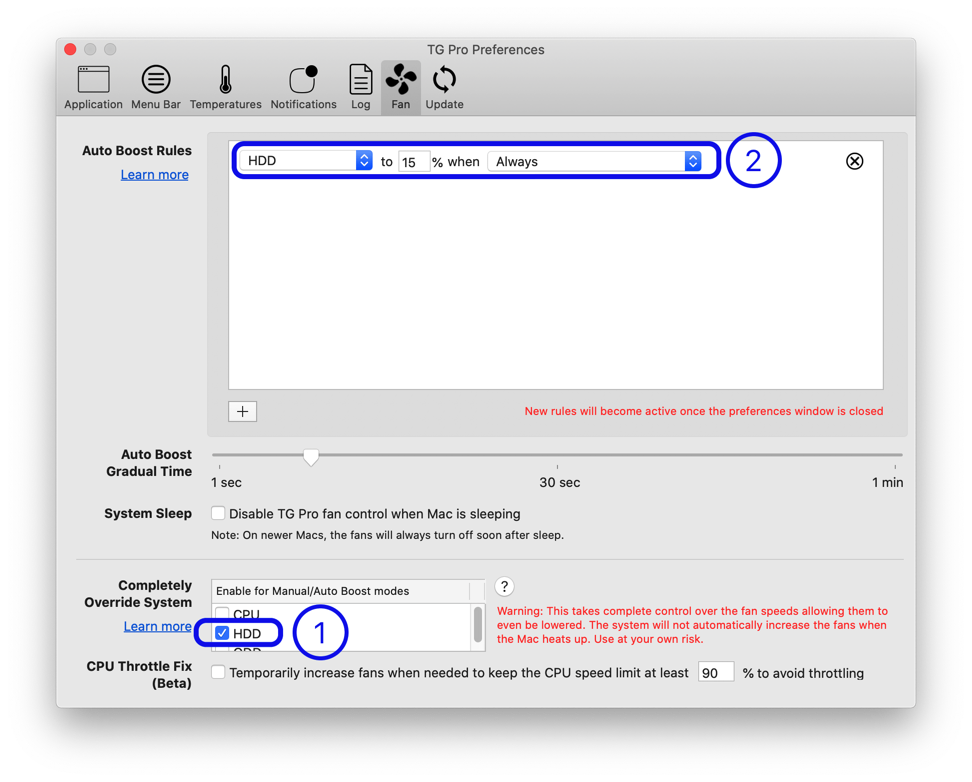
(1) - The "HDD" fan checkbox is checked, which allows TG Pro complete control of the fan, including to lower it to 15% instead of continuously running at the maximum speed.
(2) - One Auto Boost rule has been added for the "HDD" fan which always keeps it at 15%.
Now that this is complete, make sure to change the fan control mode to Auto Boost in either the drop down menu or the main window, if it's not already so it can use the new setup.

Using a HDD
Traditional HDDs can produce a lot more heat than a solid state drive (SSD) since they have platters inside that spin very fast. Due to this characteristic, it's not enough to just have one rule; it's necessary to add a few so the "HDD" fan ramps up as the drive heats up.
To get started, first enable the option to check drive temperatures using SMART:

Next, we'll add multiple Auto Boost rules, so the "HDD" fan can increase in speed when the drive temperature increases. This will be done in steps, with one step per rule. The opposite is also true, in that the fan speed will decrease when the temperature also decreases.
Remember that if necessary, the rules can be reordered by dragging them to make it easier to read.
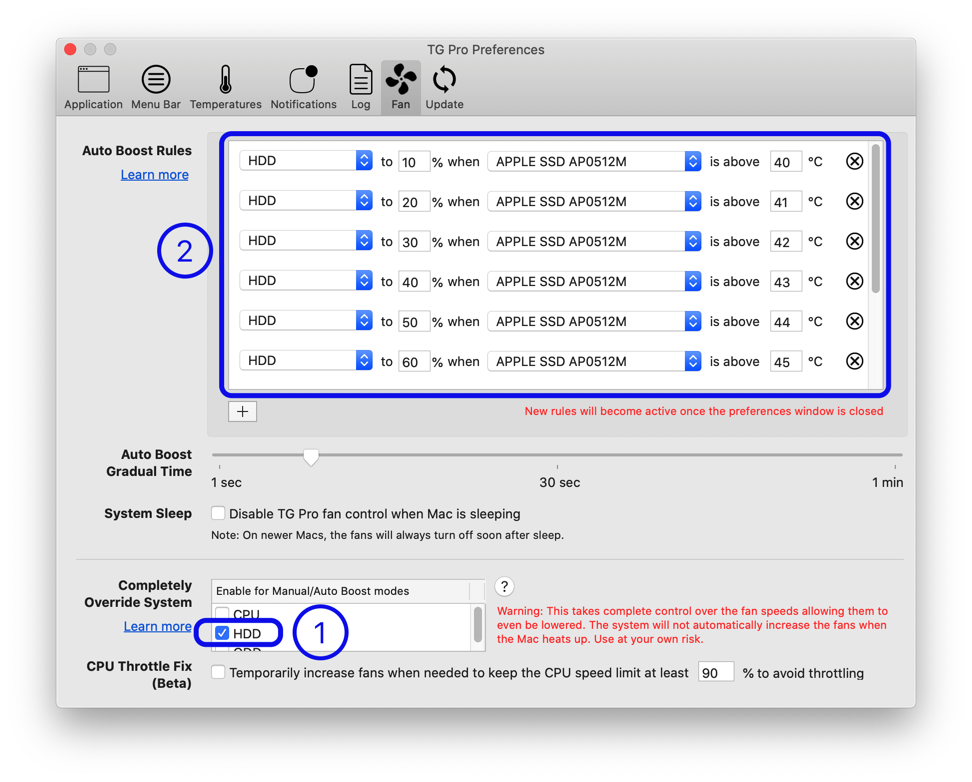
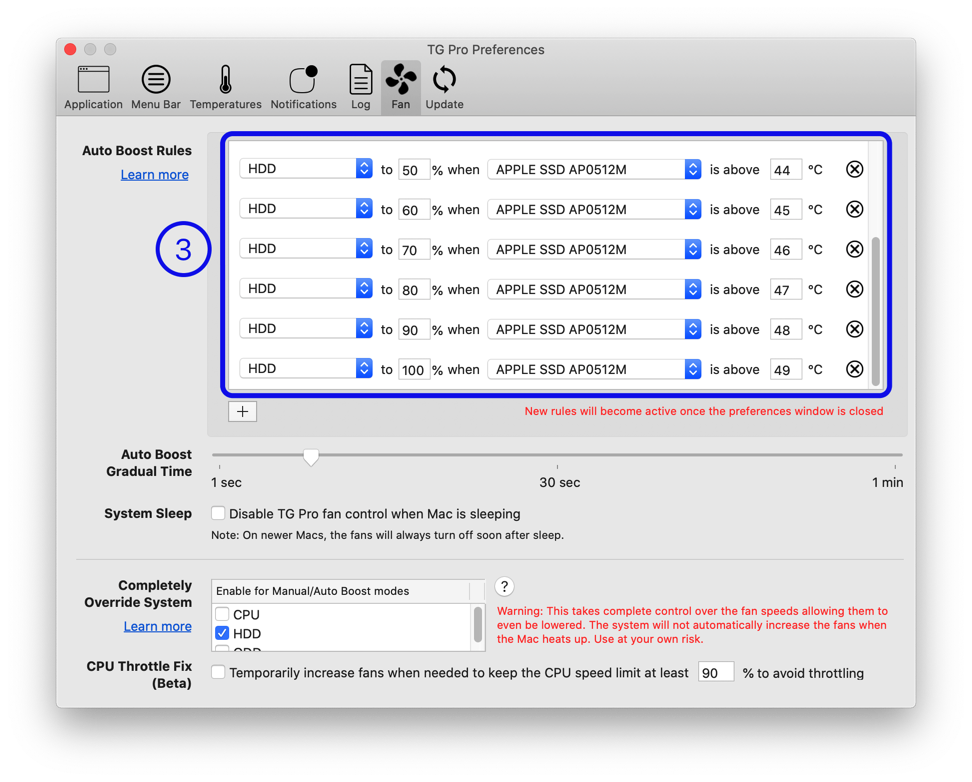
(1) - The "HDD" fan checkbox is checked, which allows TG Pro complete control of the fan, including being able to increase and decrease it according to the rules from (2).
(2) & (3) - The Auto Boost rules which form a complete fan curve from:
0% (minimum speed) when the drive temperature is equal or below 40°C.
10-90% when the drive temperature is between 41-48°C.
100% (maximum speed) when the drive temperature is above 49°C.
Each rule increases the fan speed by 10% for every 1°C rise in the temperature.
Note: If using Fahrenheit, increment by 2°F in each rule.
Finally, make sure to change the fan control mode to Auto Boost in either the drop down menu or the main window, if it's not already so it can use the new setup.

Mac Pro 2013 - Fix random GPU crashes/freezes
Quite a few users have reported that on their Mac Pro 2013 (model identifier MacPro6,1), it will randomly freeze, lockup or restart. The common theme seems to be that there is something going on with the GPU that's causing these issues. It most likely is due to the GPU heating up beyond what it is capable of and turning itself off as an emergency thermal shutdown.
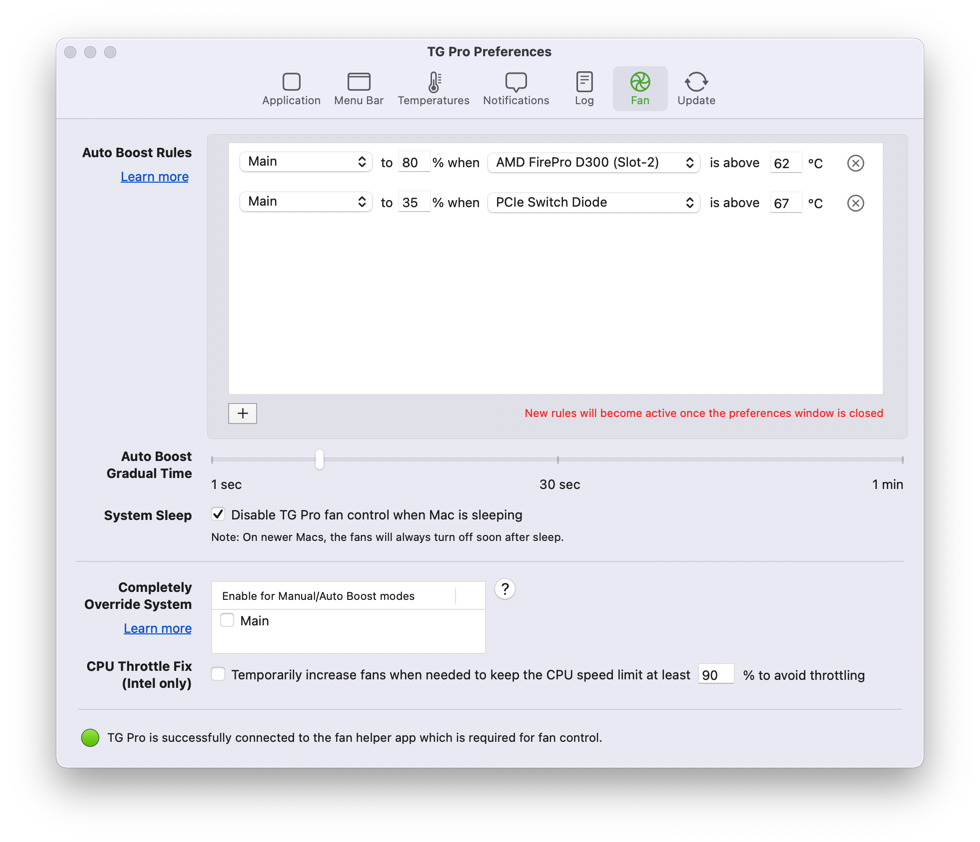
Using TG Pro to increase the fan speed seems to resolve the issue for users. The idea is to boost the fan before the GPU card overheats. All that needs to be done is to use the Auto Boost fan mode with two rules. Here's how it should be setup:
- Open the app preferences and choose the Fan tab.
- Create two rules if only one GPU is being used, or three rules if both are in use.
- Main Fans to 80% when AMD FirePro D300 (Slot-1) is above 62℃
- Main Fans to 80% when AMD FirePro D300 (Slot-2) is above 62℃
- Main Fans to 35% when PCIe Switch Diode is above 67℃
- Close the preferences window.
- In either the main window or drop down menu, change the fan mode to Auto Boost.
Note: The name of the GPU may be different depending on which cards are installed in your Mac Pro. Below is an example for a setup with only one monitor plugged into the second GPU card.
Mac Studio - Lower fan speeds to the minimum
A common request has been to be able to lower the fans in the Mac Studio to the minimum to reduce the audible noise as much as possible. Apple has done a fantastic job with the thermal design with this model and it seems that no matter how hard it runs, even with the fans at the minimum, it runs perfectly.
This can be easily done using TG Pro in one of two ways, both of which are shown in the sections below.
Manual Mode
The first and quickest way is to use the Manual fan mode by following these steps:
- If Manual mode hasn't already been enabled, the available fan mode will be System / Max / Auto Max. If this is the case, open the app preferences and choose the Fan tab.
- Check the "Use Manual instead of Max" checkbox at the bottom.
- Close the preferences window.
- In either the main window or drop down menu, change the fan mode to Manual.
- Move one of the fan sliders all the way to the left. By default the fan speeds are linked and both will move to the same speed.
Please keep in mind in Manual fan mode the user has full control and macOS won't be able to change the fan speeds. This isn't so much an issue with the Mac Studio although it's important to know. If this is a concern, use the steps for Auto Boost Mode instead.
Auto Boost Mode
The next way uses the Auto Boost fan mode to completely replace the fan curve, which allows TG Pro to control the fan speeds based on the temperatures. If you're not familiar with how the rules work, quickly check out the section on using Auto Boost with rules.
- If Auto Boost mode hasn't already been enabled, the available fan mode will be System / Max / Auto Max. If this is the case, open the app preferences and choose the Fan tab.
- Check the "Use Auto Boost instead of Auto Max" checkbox at the bottom.
- Create some new rules. The more that are made, the smaller the gap that's needed between fan speed changes.
- For this scenario, we'll make five rules. Feel free to adjust the temperatures used to be higher so the fans come on later, or lower to have them kick in sooner.
- All Fans to 0% Always (this ensures it will lower the fan speeds to the minimum of no other rule is active)
- All Fans to 25% if Any Sensor is above 45℃
- All Fans to 50% if Any Sensor is above 50℃
- All Fans to 75% if Any Sensor is above 55℃
- All Fans to 100% if Any Sensor is above 60℃
- Close the preferences window.
- In either the main window or drop down menu, change the fan mode to Auto Boost.
As the temperatures change, TG Pro will adjust the fan speeds to match what was used in the rules. Watch in the video below as TG Pro automatically adjusts the fan speeds as the CPU temperatures are forced to increase (and then decrease) by using our handy Endurance: CPU Stress Test app.
Use diagnostics to find defective hardware
Opening up the main window, there is a section at the bottom labelled Diagnostics. It includes checks for various diagnostics to try and find if any temperature sensors or fans are defective, as well as the battery for laptop models.
To show the difference between a properly functioning Mac and one with hardware issues, we've simulated what it would look like if each area had an issue to contrast them.
Normal

Defective

There are four areas for the diagnostics:
Last Shutdown: - The last reason the Mac was either shutdown or put to sleep. It also indicates if the last time the Mac was shutdown was normal or forced.
Example of a normal shutdown: The "Shutdown…" menu item was chosen from the Apple menu.
Example of a forced shutdown: Battery died or the Mac overheated to the point of turning off.
Fans: - If any of the fans have been labelled as potentially defective by the hardware. TG Pro checks a special sensor which returns a non-zero value if any of the fans are operating outside of their normal parameters. This can happen if the fan is disconnected or running at an abnormal speed. A fan labelled as defective may appear to be working without any visible issues, although it's possible it might be about to fail.
If this happens, try the following steps to isolate the issue:
- Reset the SMC
- Restart into Apple Diagnostics to see if an error code is displayed related to the fans
- Clean the fans with compressed air and gently vacuum the expelled dust
Battery Health: - For Macs with an internal battery, it will show the condition, any errors that have been reported, along with the charge cycle count. The condition will be one of the following:
Good - A well-performing power source.
Fair - A functional power source with limited capacity.
Poor - A power source that's not capable of providing power.
If the condition is Fair or Poor, there is usually an associated error message in the notification that TG Pro displays.
The charge cycle count is the number of times the battery has been discharged and charged. For example, if it shows 10, then the battery has been discharged by some amount and recharged (by plugging the Mac in to a power outlet) ten times. Most Mac laptops have batteries that are designed to handle roughly 1000 charge cycles before the battery needs servicing.
Saving information to a log file
TG Pro includes a feature to log temperature, fan speed and diagnostic information each time the app updates. It saves the log file in CSV (Comma Separated Values) format. It's a standard way of storing data so it can easily be imported into an app like Numbers or Excel.
Each time the app updates the temperature and fans speeds, it writes a new row into the log file along with the current date/time.
To setup logging, open the preferences and choose the Log tab.
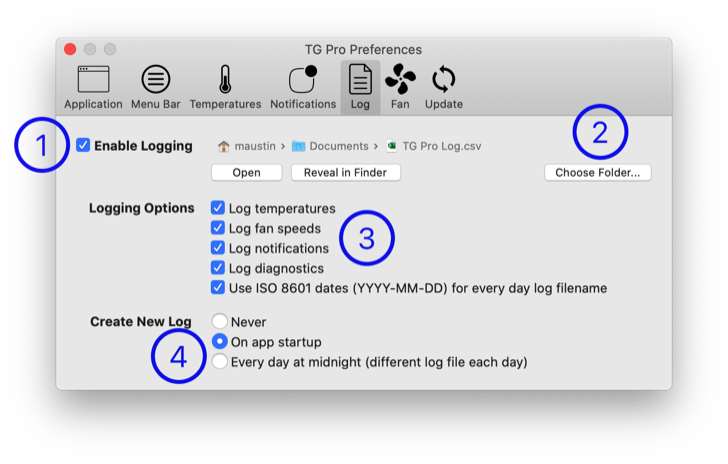
(1) - To enable logging, check the "Enable Logging" checkbox.
(2) - Choose the location where the log file will be stored. The default is the user Documents folder, with a filename of "TG Pro Log.csv".
(3) - Choose which information will be stored in the log file. Use the ISO 8601 dates option to have the current date appended to the log file name in the format YYYY-MM-DD.
(4) - Choose when the log file is created. The options are:
Never - Continuously append to the log file. In this mode, over time the log can get quite large.
On app startup - Create a new log file each time the app is launched. The existing log will be deleted.
Every day - Create a new log file each day at midnight with the current date appended to the filename.
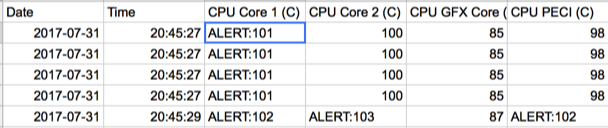
Note: Alerts may be shown in the log file if any of the temperatures exceed the threshold set in the Notifications tab of the app preferences. For example, if the app is setup to show a notification if any temperature goes above 100C, any temperature that is above this and output in a log file will have ALERT: prepended to it.
Get notifications when it's too hot
TG Pro has the ability to display a notification in the macOS Notification Center, or send an email when temperatures rise above a set threshold, as well as a few other triggers.
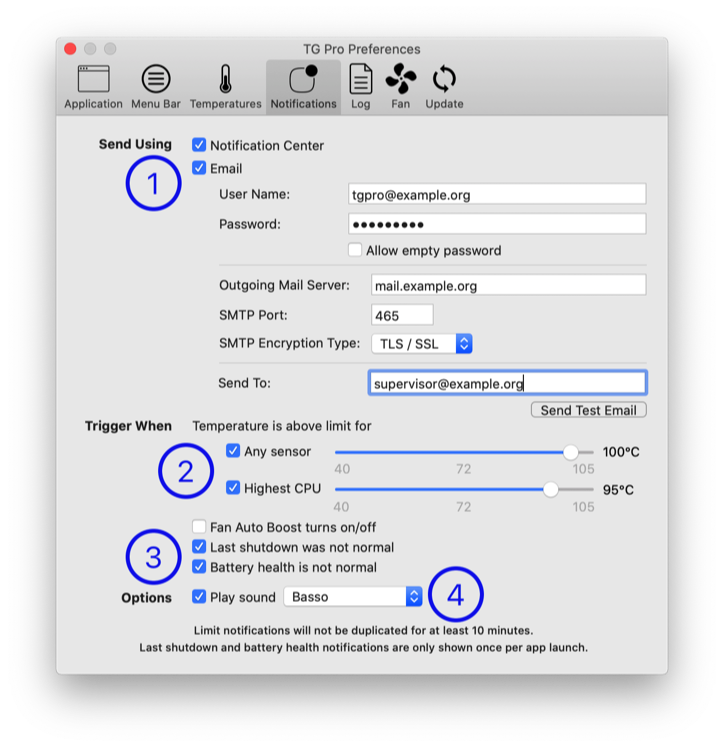
(1) - The two types of notifications available:
Notification Center - Enable to have local notifications appear in the macOS Notification Center.
Email - This option is described in detail below in Email Notifications.
(2) - To get notifications when the temperature is over a set threshold, check one or both of the checkboxes under "Temperature is above limit for" label:
Any Sensor - This is useful to know when the fans may need to be increased (see Increasing fan speeds to cool the Mac down) for a component may be overheating (ex: power supply, GPU, etc).
Highest CPU - It takes the highest value of all CPU sensors and compares it to the set threshold. It's useful for the same reason as the previous one, although for only the CPUs. The thermal limit of most Intel CPUs is 100-105℃ for laptops and 95-100℃ for desktops. If the CPU gets to the thermal limit, it may be throttled (slowed down) in order to help cool it. To avoid this, try setting the limit to a few degrees below the maximum so it's possible to boost the fans if necessary.
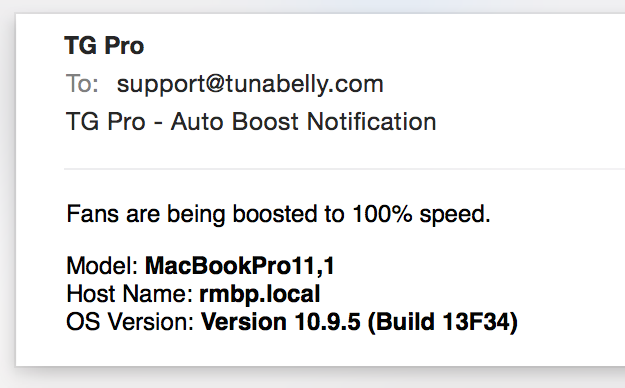
(3) - Options for showing notifications when the fan Auto Boost feature turns on/off, if the last shutdown code was not normal, or if the battery needs servicing (see the section on finding defective hardware for more info).
(4) - Optional sound to play when a notification is shown. The list is loaded from the files located at:
- /System/Library/Sounds/
- /Library/Sounds/
- /Users/< username >/Library/Sounds/
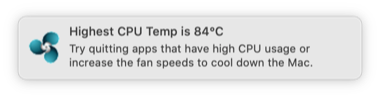
Notification Center
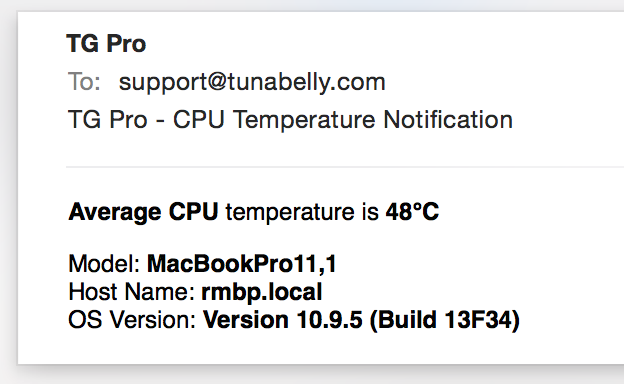
Let's take a look at the first type of notification, the one that gets displayed in the Notification Center. The example below, the notification was triggered because the Highest CPU threshold was set at 80℃, and the highest CPU temperature was 84℃.
The second available type is through emails. These can be very useful for monitoring remote servers, or group of Macs to know if they are overheating or have hardware issues, before any damage or data loss occurs.
The options are the same as for the ones above, along with having enable the "Email" checkbox and filling in the email details.
Note: The emails sent do not require an email account setup on the Mac through Mail or any other mail client.
Email notifications contain the following info:
- Mac model
- Hostname (so it's obvious which Mac this applies to)
- macOS version
- Type of notification (temperature, fan auto boost, shutdown reason, or battery health)
Now, let's go through the email settings and how to setup each parameter:
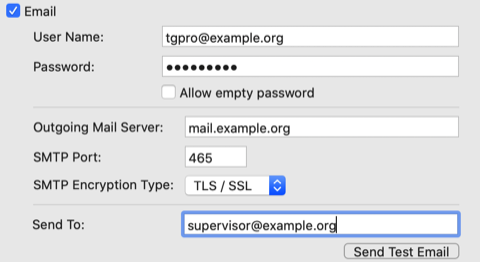
User Name: The email address of the account that will send the notification email.
Password: The password for the sender account. This is securely stored in the Keychain and is never in plain text within TG Pro. For email hosts that support 2FA (Two Factor Authentication), this will be an app-specific password, and not the regular account password. We have a specific FAQ entry with extra information on how to create a one time password using the major email providers.
Allow Empty Password: Some email accounts do not require a password (it's rare, although they do exist), so if that's the case, enable this option.
Once the user name has been filled in, TG Pro will automatically try to fill in the following fields prefixed with a *, based on its domain (ex: gmail.com, icloud.com, etc). If it's not able to, fill them in manually using the information provided by the email host.
* Outgoing Mail Server: The server address for the outgoing mail server.
* SMTP Port: The port for the outgoing mail server.
* SMTP Encryption Type: The encryption type used for the connection not the outgoing mail server.
Send To: The email address for the recipient of the email notification.
Send Test Email: Click this to send a test email to ensure the setup is correct.
Reset to factory defaults
TG Pro has the ability to reset all the application preferences back to their factory defaults, which is the same as if it was launched for the very first time. This can be useful as a handy way to explore the different feature and options without worrying how to restore the original values.
To reset back to factory defaults, open the preferences, choose the Application tab and click the "Reset app to defaults…" button at the bottom of the window. Once it's been clicked, there will be confirmation dialog to double check whether or not the app should be reset. If yes is chosen, the app will reset everything back to the factory defaults, and relaunch itself.
Note: This will not remove the licensing information, so that won't have to be re-entered when the app relaunches.