QR Factory 3
Creating multiple QR codes from a CSV file
QR Factory 3 offers a comprehensive QR code generation solution, compatible with both macOS and iPadOS. Available on their respective App Stores, the app allows free downloads with a one-week trial to fully explore its capabilities. QR Factory 3 prioritizes user privacy and control, ensuring all QR codes are generated on-device without any ad redirections or external interferences. Discover more about its versatile features and professional tools on the QR Factory 3 homepage.
A standout feature of QR Factory 3 is its capacity for bulk QR code generation. Whether it's a small batch of three or a large-scale project of 10,000 codes, the app handles it seamlessly, offering options for verification and template saving for label printing, including Avery and DYMO formats.
This guide delves into the specifics of creating and setting up a CSV file for mass QR code production with QR Factory 3.
Documentation for the previous version, QR Factory 2.x, is still accessible here.

Requires macOS 12 or iPadOS 15
Supported macOS versions:
macOS 12 Monterey - macOS 15 Sequoia
Supported iPadOS versions:
iPadOS 15 and up
Latest Version:
QR Factory 3.4.5
Release Date:
March 11, 2025
Pricing (USD):
Subscription: $14.99/year or $4.99/3 months, with either including a free 7-day trial.
Lifetime Access: $29.99 one time purchase.
Table of Contents
Initial Setup and Requirements
Before setting up to generate multiple QR codes, ensure two key preparations are complete:
QR Factory 3: Confirm that QR Factory 3 is installed and open. It requires at least macOS 11 or iPadOS 14. Download it from the App Store.
Spreadsheet Editing Application: Have an application capable of editing spreadsheets and/or CSV files, such as Numbers or Microsoft Excel. This is essential for formatting data before exporting it to a CSV file, which is the format QR Factory 3 uses for generating multiple codes.
The use of a spreadsheet app facilitates easy organization of data in a grid system, with columns and rows. Columns are utilized for setting options and information for each QR code, and each row represents all the necessary information for a single QR code.
These instructions are applicable for both macOS and iPadOS.
CSV Creation Choices
In this section, we explore various choices for creating a CSV file compatible with QR Factory 3. Each method caters to different preferences and requirements:
Start with a New Spreadsheet: Ideal for those who prefer building their CSV file from the ground up. This method offers maximum flexibility in data organization and customization.
Use Pre-made Sample Files: A time-efficient option for users who want a quick start. Modify the sample files to suit your specific data needs.
Employ the AI-based CSV Builder: Leverage advanced AI tools to create a tailored CSV file effortlessly, especially suitable for complex or large-scale QR code projects.
Choose the method that best fits your needs and follow the easy steps provided to create your CSV file for QR Factory 3.
Option A: Manually Create New Spreadsheet
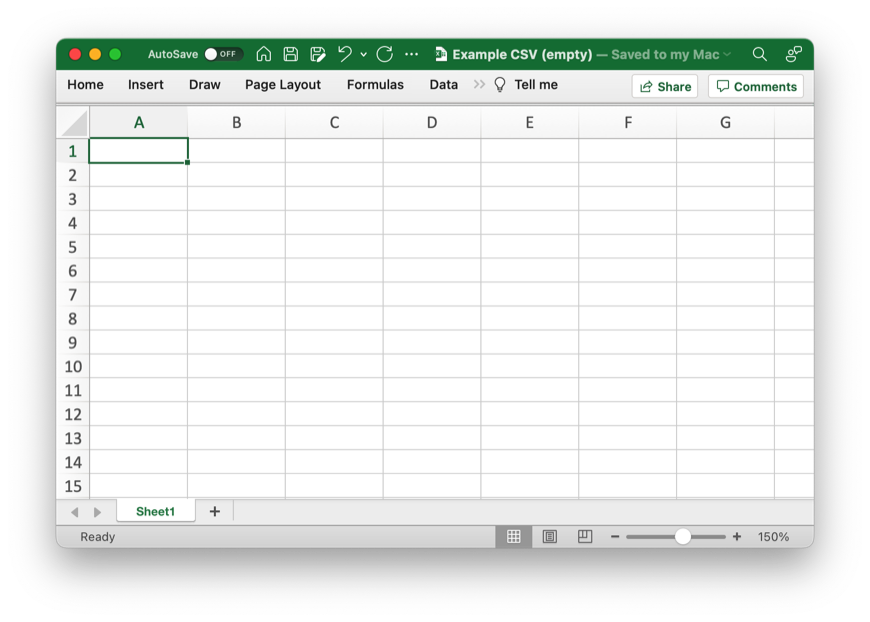
To start, we're going to create a blank spreadsheet, so go ahead and open either Numbers or Excel.
For Excel: Use the File menu and choose "New".
For Numbers: Use the File menu and choose "New…", then "Blank".
It will look something like this (the screenshots are from Excel, but it will be similar for Numbers):
Adding Data
Now that the spreadsheet is created and ready to fill in, it's time to add some data. There are two ways to add the data that QR Factory understands.
The first is to use columns, which is the easiest as well.
The second way is to use key-value pairs where all the content for a QR code goes into a special column labelled Content.
Note: Regardless of which method is used, the final CSV file must contain the Type column so QR Factory can properly determine which type of QR code to create for each row.
Organizing Data Using Columns
Now that we have an empty spreadsheet, let's go ahead and add a few columns that tell QR Factory what type of QR codes to create, what will be in them and what to name the generated files.
In this example, we will be adding in the necessary columns to create SMS (test message, URL and Text QR codes.
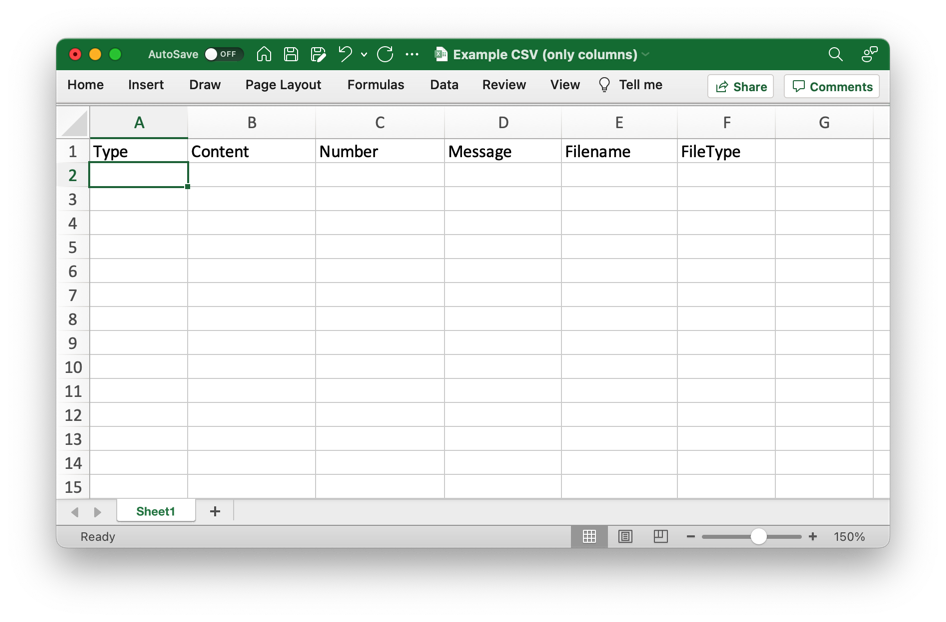
Each column needs to have its name in the first row (so row #1) so when QR Factory reads the file, it knows what the data is for. For a full list of all the possible columns to use, click here.
Add the following columns (the capitalization doesn't matter):
Type (what type of code the row will be)
Content (for code types that only text)
Number (specific for SMS codes)
Message (specific for SMS codes)
Filename (the name of the file that will be created)
FileType (which format to use, ex: PNG)
It will look like this once those have been added:
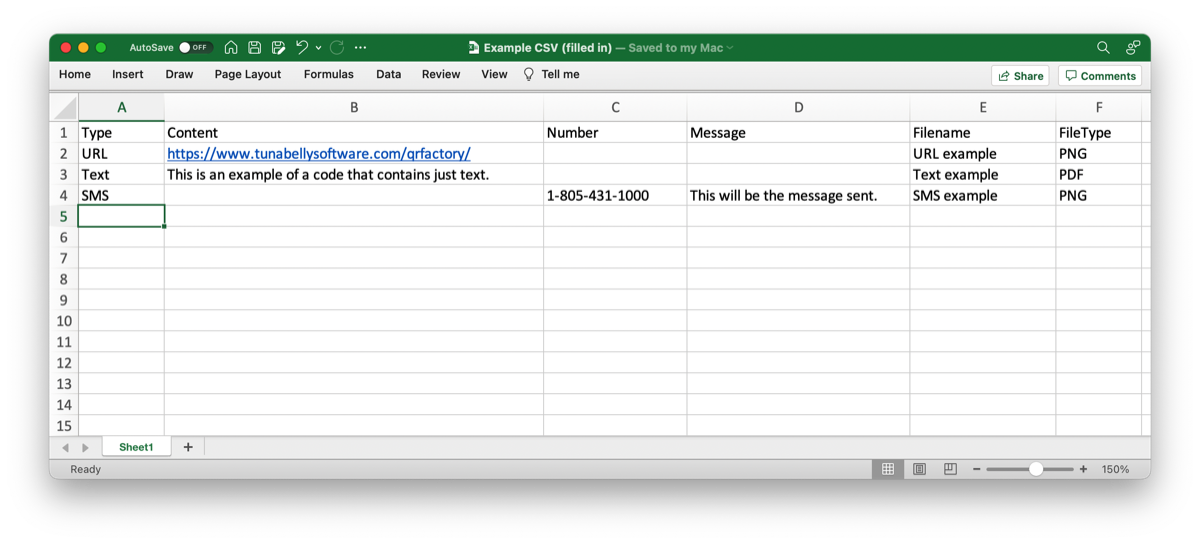
Next, we'll add a few rows of data, with each row representing all the data for one QR code. For the URL and Text types, the data goes into the Content column since it doesn't have any other optional parameters. For the SMS type, the data goes into the Number and Message columns.
Organizing Data Using Key-Value Pairs
As an alternative way to add the data to the spreadsheet, instead of using a column for each parameter, it's possible to use key-value pairs, such as "subject=Please sign documents". All the pairs are combined and separated by a semicolon. Here's an example of how an Email code content column/row could look like:
email=support@tunabelly.com;subject=Hello;body=Type your email here;cc=example@example.org;bcc=hidden@example.org
Note: If this format is used, then a semicolon cannot be used in the actual data or the parsing will fail.
Tips
Here are a few tips to help make it easier to setup and fill in the appropriate data.
Use a comma: If a comma is needed in the data, for example, say a company name like Tunabelly Software, Inc. then Excel or Numbers should wrap that row/column cell in quotes when the spreadsheet is exported to a CSV file. However if it doesn't, just add a quote at the beginning of the text in the cell and one at the end. For example, it would change
Tunabelly Software Inc. —> "Tunabelly Software Inc."
Use a quote: If a quote is needed in the data, again Excel or Numbers should escape the quotes, which changes each quote that's needed into a double quote, and also wrap the cell in quotes. For example, it would change
This is the "text" for a QR code —> "This is the ""text"" for a QR code"
- QR codes can be saved in RGB, CMYK or Grayscale color spaces using the ColorSpace column. Please note the only format that supports all three color spaces is TIFF, which is only available on macOS.
- Color values can be specified in one of three ways:
- Hex (web): In the format #RRGGBB
- RGB: In the format "rgb(R,G,B)", with the quotes since there are commas between the values. The RGB values should be between 0-255.
- CMYK: In the format "cmyk(C,M,Y,K), and also with the quotes. The CMYK value should be between 0-100.
Exporting Spreadsheet as CSV File
The last step in getting the data organized is to export the spreadsheet to a CSV file. This type of file is plain text with each column and row separated by a comma. Here's how, depending on which app is being used:
Numbers: From the File menu, choose "Export To", then "CSV…".
Excel: From the File menu, choose "Save As", then set the format to "CSV UTF-8 (Comma delimited) (.csv)".
The resulting file should have a ".csv" extension and look similar to the following. It can also be clicked to download the CSV file to try out if needed.
Option B: Utilize Pre-made Sample Files
We offer an extensive collection of sample files, encompassing a variety of QR code types. These files are ready-to-use and come in two distinct formats:
- Column-Based Layout: Ideal for clear and straightforward data organization, with separate columns for each value.
- Key-Value Pair Format: Allows for all data to be included in one column, a versatile option for certain use cases, although not as straightforward as the column-based layout.
In addition to these formats, our samples showcase various appearance customization options. These include color variations, adding text at the bottom, logo integration, safe zone adjustments, and more, providing a comprehensive demonstration of QR Factory 3's capabilities.
Option C: Employ AI-based CSV Builder
The AI-based CSV Builder is a sophisticated tool tailored to streamline and enhance the creation of customized CSV files for use with QR Factory 3. This tool is especially beneficial for:
- Effortless Customization: Ideal for generating complex or large-scale QR code projects with ease.
- Advanced Data Manipulation: Capable of collating data from various files or sources, and dynamically generating data based on user inputs.
- Intuitive Interface: Simply specify the requirements in plain text, and the tool will generate the CSV file with the appropriate column names and one row for each QR code.
However, it's important to note that the AI-based CSV Builder currently does not support the creation of Social or Crypto QR codes.
With its advanced features and ease of use, the AI-based CSV Builder simplifies the process of creating a CSV file, allowing you to concentrate on the creative aspects of your QR code project.
Start Using the AI-based CSV Builder
Important Access Note: The AI-based CSV Builder is a premium feature available exclusively to ChatGPT Plus members. Due to the significant costs associated with operating advanced GPT technology, we are unable to offer this tool for free. The Plus membership ensures that users have access to this powerful tool, while supporting the ongoing development and maintenance of these advanced features. Learn more about ChatGPT Plus membership.
Bulk QR Code Generation
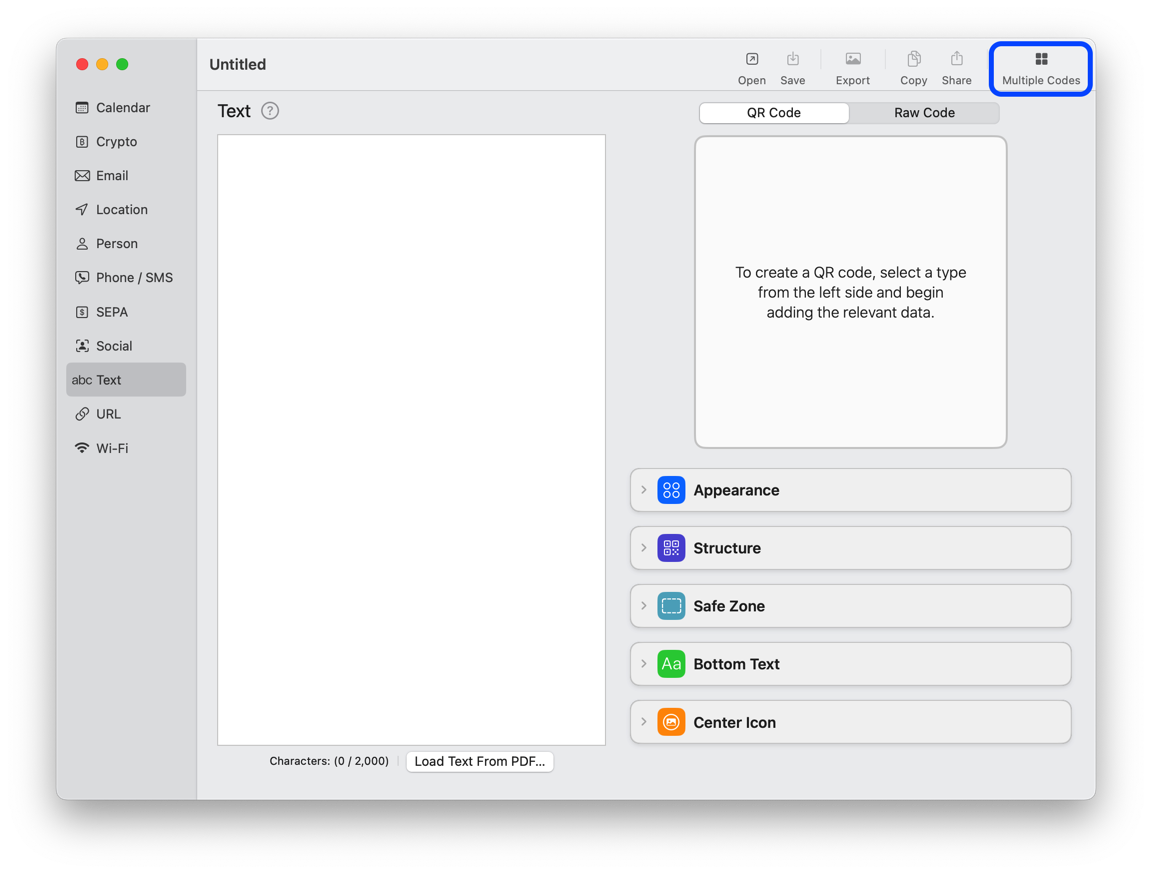
Now that the CSV file is finished, the fun part is to use it with QR Factory 3 to generate the QR codes in one batch. The steps are the same for both platforms, although we'll be using macOS for most of the screenshots.
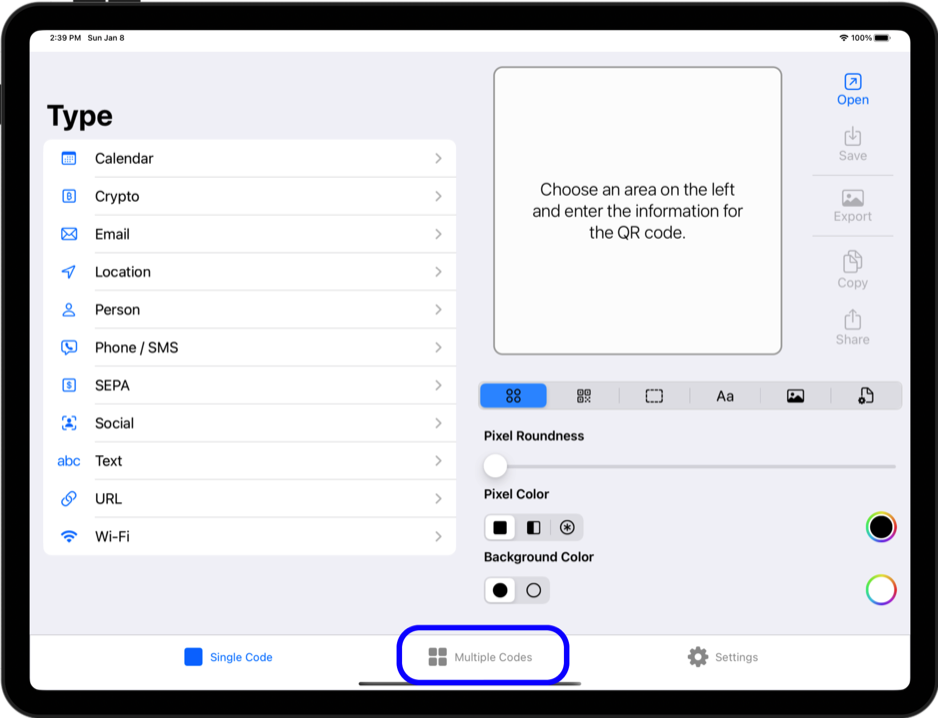
The first thing is to switch over to the Multiple Codes section in the app. Here's how:
macOS
iPadOS
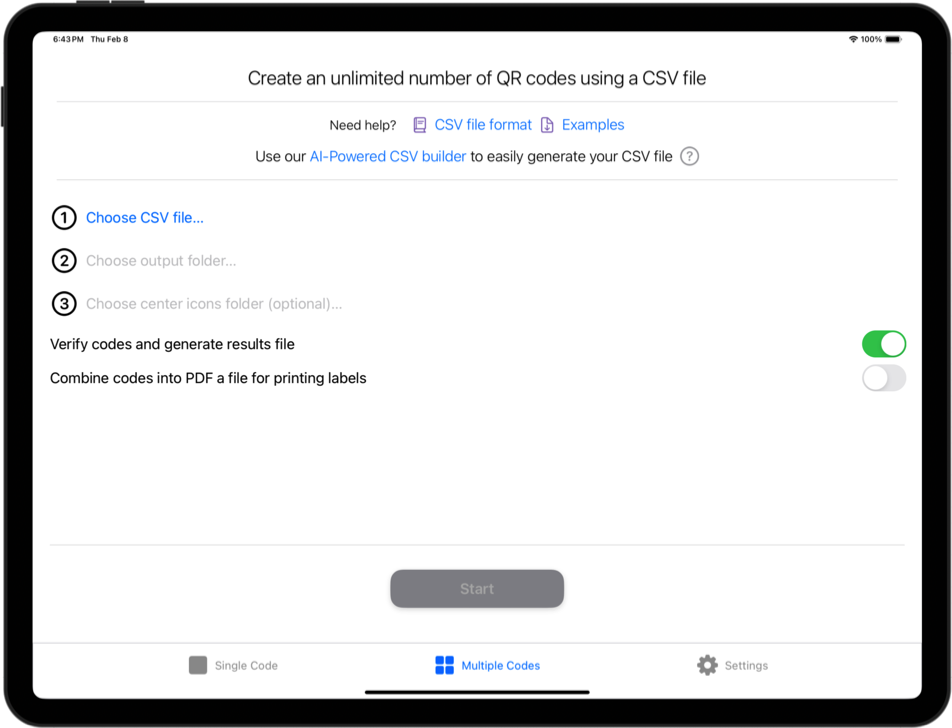
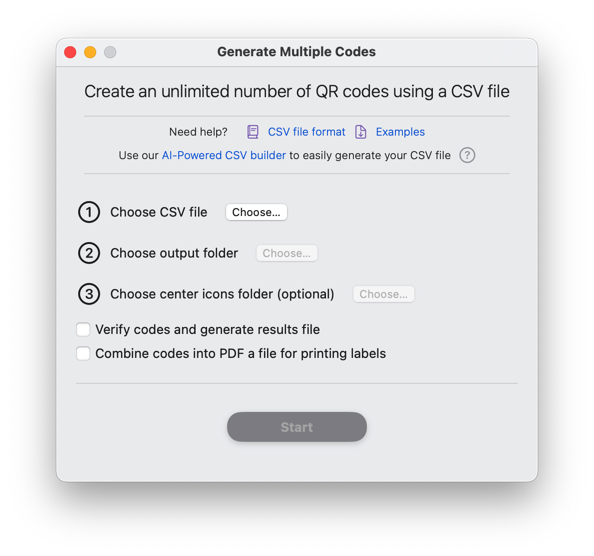
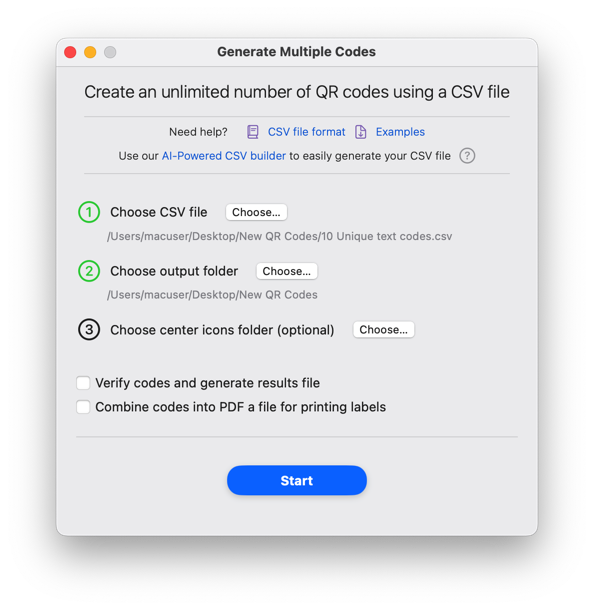
The next steps are to choose which CSV file will be used and where the generated QR codes will be stored.
- Choose the CSV file to use. In this example, we'll use the one created in the previous section. Note that it will only allow selecting a file that has the ".csv" extension.
- Choose where the QR codes will be saved. This can be any folder. For this example, we'll choose a folder on the Desktop.
- If any of the QR codes will have a logo in the middle, choose the folder where the logo images are stored. In this example, we're not using this feature.
Combine codes for printing to labels: Enable this to have all the QR codes arranged in specific patterns for printing them to Avery or DYMO labels.
It should now look like this, and the Start button will be enabled:
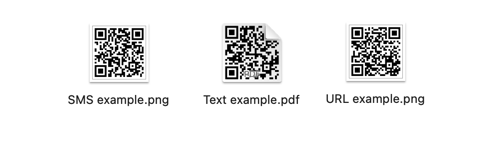
Click/tap the Start button and it will being generating the QR codes in one batch. Since this example only has three, it will be done almost as soon as it was started.
Once it's finished, check out the folder that was chosen in Step 2 and there will be three new files, just like this:
Verify QR Codes for Accuracy
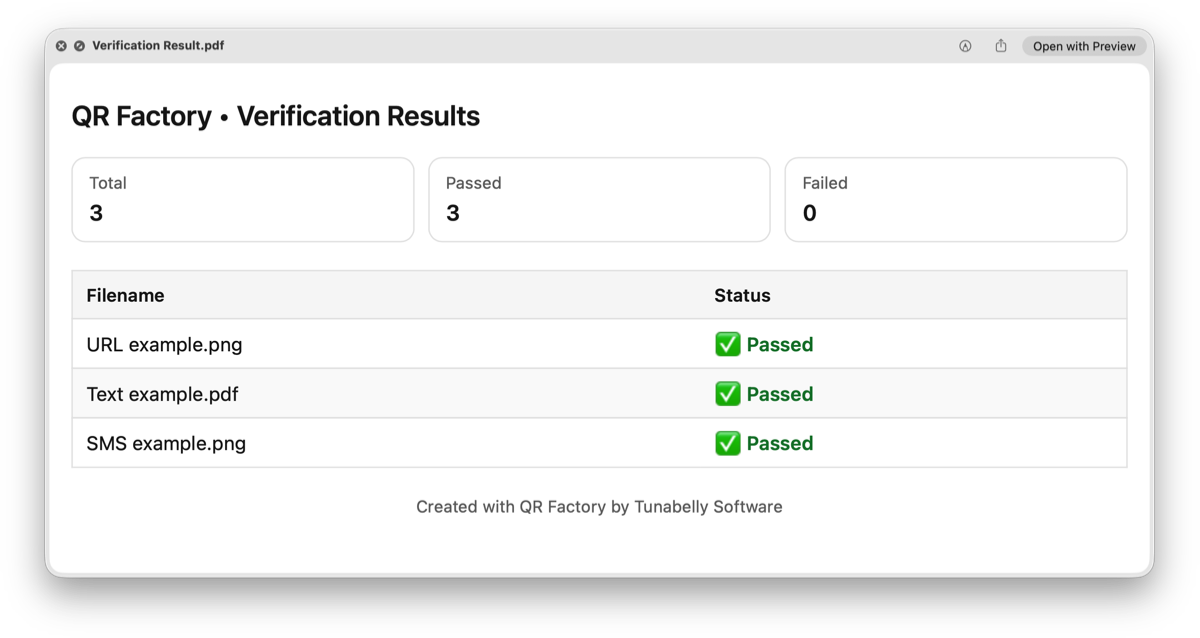
A highly requested addition to QR Factory 3 is the ability to verify each generated QR code for optimal scan-ability. This feature is crucial in ensuring that elements like middle logos do not obscure too much of the code and that the contrast between foreground and background colors is sufficient for easy scanning.
To use this verification feature, simply enable the option by checking the box or toggling the slider next to Verify codes and generate results file. This will activate an automated process that checks each QR code upon generation.
Upon completion, a file named Verification Result.pdf will be available in the same directory as the generated QR codes. This file provides a comprehensive summary of the verification results for each code. Below is a sample of what the verification result looks like:
Print QR Codes on Avery & DYMO labels
QR Factory 3 also offers the flexibility to print QR codes directly onto Avery or DYMO labels. To utilize this feature, activate the 'Combine codes into PDF file for printing labels' option. This can be done by toggling the corresponding checkbox or slider in the application. Once activated, additional settings become available for specifying the label model.
Select the appropriate label type from the newly displayed options, and then initiate the QR code generation with the 'Start' button. The codes will be arranged in a pattern that matches the selected label type, ensuring a seamless printing process.
Additionally, QR Factory 3 supports custom label dimensions. To create a new label size, simply click the plus icon, input the required dimensions, name the label, and save. This custom label will be stored for future use, adding another layer of customization to your QR code printing needs.
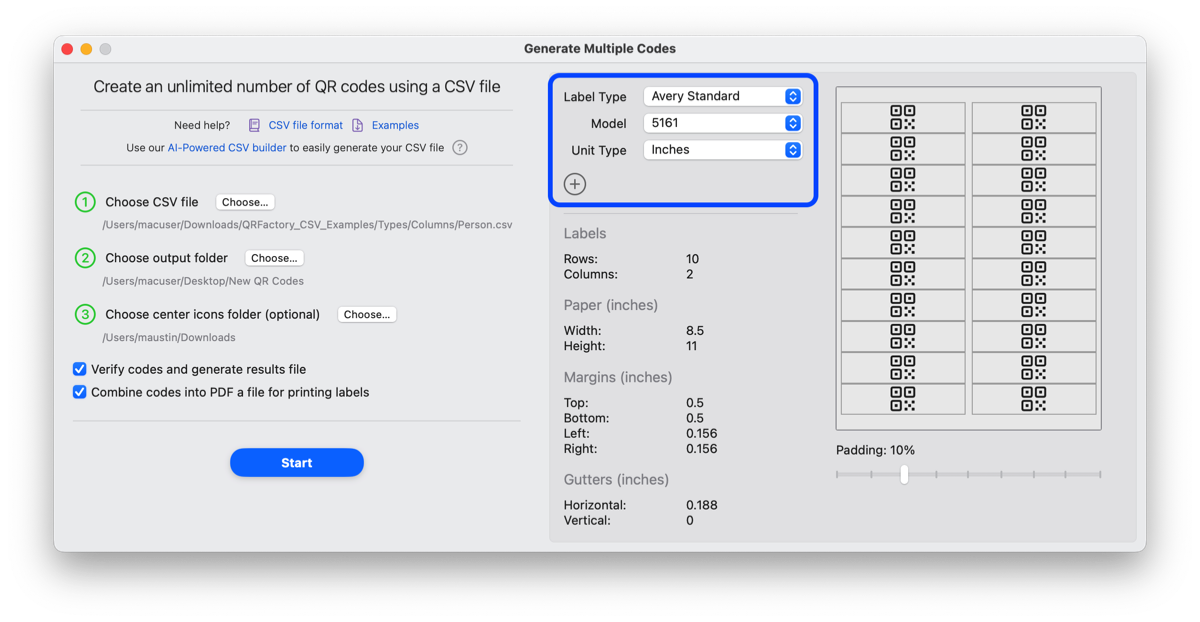
Once it's finished, instead of having a file for each QR code generated, there will be a PDF containing the codes, in the exact same layout that's needed for printing to the labels. Here's an example of how it would look like:
Comprehensive Column Guide
The following details every single column that can be used to modify the appearance of a QR code, how it's stored, what type it is and what's contained inside it.
All of the columns can be used as key-value pairs instead, with the exception of Type and Content - those must be actual columns.

Using Colors
For columns that contain a color, there are multiple formats that define which color to use:
- Web (also known as hex) written as #RRGGBB where RR, GG and BB are the hex values for each colour channel. Ex: #FF0000 is pure red.
- RGB, written as "rgb(R,G,B)", where R, G and B are between 0-255. There must be quotes around it since there are commas between the values. Example: rgb(0, 0, 255) is pure blue.
- CMYK, written as cmyk(C,Y,M,K) where C, Y, M and K are between 0-100. Just like with the RGB color, there must be quotes around it. Example: cmyk(91, 11, 75, 19) is a shade of green.

This is necessary to ensure accurate parsing, as the comma-separated values within these formats might otherwise be misconstrued as column separators, leading to parsing errors.
Appearance
These columns are common to all QR code types and are used for changing the appearance or how the file is stored. They are all optional, with default values being used if they aren't used.
| Column Name | Value |
|---|---|
| OutputSize | Any value between 64 and 4096. Note that the size will always be a square (the output size is the same for both width and height). |
| FileName | The name of the file. The file extension will automatically be added if it's not part of the name. Starting with QR Factory 3.3.8, dynamic file naming can be used. Note: If this is blank, for Person QR codes, it will use a combination of the first and last names for the filename, and for all other types, it will use the name (ex: "URL QR code"). |
| FileType | PNG or PDF can be used on both platforms, however TIFF and EPS are only available on macOS. |
| ColorSpace | RGB, CMYK or Grayscale. Please note that the only format that supports all three color spaces is TIFF. |
| RotationAngle | 0, 90, 180 or 270 |
| ReliabilityLevel | The amount of deterioration to the code that can occur where it is still readable. Another way to think about it is how much of the code can be covered and it still be readable. This is important in the case where there is a logo in the middle which obscures part of the code. Low, Medium, High or Highest. |
| UseAutoReliabilityLevel | Yes or No |
| PixelRoundness | From 0.0 (square) to 1.0 (fully rounded) |
| PixelColorType | Solid, LinearGradient or RadialGradient |
| BackgroundColorType | Solid or Transparent |
| BackgroundColor | Depending on what was set for BackgroundColorType: "Transparent" - this parameter is ignored. "Solid" - the color to use for the background. It must be one of the formats specified in Colors. |
| PixelColorStart | Depending on what was set for PixelColorType: "Solid" - the pixel color. "LinearGradient" or "RadialGradient" - the start color of the gradient. It must be one of the formats specified in Colors. |
| PixelColorEnd | Depending on what was set for PixelColorType: "Solid" - this is ignored. "LinearGradient" or "RadialGradient" - the end color of the gradient. It must be one of the formats specified in Colors. |
| GradientAngle | Any value between 0 and 359 |
Dynamic File Naming
QR Factory 3.3.8 introduces a dynamic file naming feature for generating multiple QR codes, allowing for personalized file names based on specific data from the CSV file.
How it Works:
Placeholder Format: This feature requires placeholders in curly brackets within the desired file name format, such as
"{FirstName} {LastName} ({OutputSize}px)".Data Substitution: Placeholders correspond to column names in the CSV file. During QR code generation, QR Factory automatically substitutes these placeholders with actual data from the respective columns.
Example:
- For columns FirstName, LastName, and OutputSize in a CSV file, and a row containing the values Bob, Munroe, and 2000, the resulting file name for the QR code will be Bob Munroe (2000px).
Center Icon
The center icon enhances the QR code by allowing the incorporation of a distinct visual element. This can be a logo, any graphic file, or a selection from the SF Symbol library provided by the operating system. The parameters guide the customization of the icon's appearance, including size, placement, and the addition of an optional border to align with visual identity or branding requirements.
Using a File
The center icon can be chosen from a local file or a URL for a hosted file. To do so, the IconFilePath column will be used to set the file path, ensuring the icon is displayed properly at the center of the QR code. This approach provides flexibility in sourcing the icon while maintaining its clarity and integration within the QR code's design.
| Column Name | Value |
|---|---|
| IconPath | For the image to use for the center icon, the path needs to be specified for where QR Factory should load it from. It's now possible to use either a local file, or a web URL for the icon path. Here's how to use either one: Absolute File Path (macOS): This is the full path to the file. For a quick ay to retrieve it, in the Finder, right-click the icon file, press the Option key, and select "Copy [filename] as Pathname" to obtain the full path. Ex: for a file on the Desktop, it would look like this: "/Users/macuser/Desktop/Logo.png". Relative File Path (iPadOS & macOS): This is the path relative to the chosen center icons folder (Step 3 when generating multiple QR codes). - If the icon file is in the chosen folder (but not a subfolder), just use the filename, like "logo.png". - If it's in a subfolder, specify the path relative to the chosen folder, starting with the subfolder name. For example if the subfolder name is "Templates", then the relative path may look something like this: "Templates/Icons/logo.png". Web URL Path: Simply provide the complete web URL for the icon path, like https://www.example.com/icon.png. |
Using a SF Symbol
Starting with QR Factory 3.4.0, it is now possible to choose a symbol from SF Symbols, a library of high-quality, vector-based icons provided by macOS and iPadOS, for the center icon. SF Symbols are designed to be highly scalable and customizable, allowing for adjustments in rendering, coloring, and sizing. Just like with custom file icons, all standard customization options such as positioning and optional border enhancements are available, ensuring that the symbols integrate seamlessly and maintain aesthetic consistency within the QR code.
| Column Name | Value |
|---|---|
| IconSymbolName | Specifies the name of the SF Symbol to be used as the center icon, such as 'arrow.down.app' or 'macwindow.on.rectangle'. Users should select from the continuously expanding library of vector-based icons included with each macOS and iPadOS version. Note that selecting a symbol introduced in a newer version (e.g., macOS 14) may lead to compatibility issues if the QRD file is opened on devices running older versions of the OS, as these symbols may not be available. To explore and verify the availability of symbols, download the SF Symbols app from Apple at https://developer.apple.com/sf-symbols/. |
| IconSymbolRenderingMode | Determines the rendering style of the SF Symbol. Options include: Monochrome - Renders the icon in a single color. Hierarchical - Displays the symbol in different shades of the same color, enhancing depth and emphasis (available for symbols that support this mode). Palette - Uses two or sometimes three distinct colors to create a visually rich and layered appearance (applicable for symbols that support multi-color rendering). |
| IconSymbolColorFirst | Sets the primary color for the symbol. This color is used for 'Monochrome' and 'Hierarchical' rendering modes and serves as the first color in 'Palette' mode. It must be one of the formats specified in Colors. |
| IconSymbolColorSecond | Specifies the second color for the 'Palette' rendering mode, adding an additional layer of color to parts of the symbol to enhance visual appeal. It must be one of the formats specified in Colors. |
| IconSymbolColorThird | Defines the third color for the 'Palette' rendering mode, used to further differentiate and highlight elements of the symbols that support it, contributing to a richer, more vibrant appearance. It must be one of the formats specified in Colors. |
Customization Options
There are many customization options available for the center icon within a QR code. Detailed guidelines are provided for adjusting the icon's size, positioning, and the inclusion of an optional border. These adjustments allow for enhanced visual impact and better alignment with branding or aesthetic preferences, ensuring the QR code remains both functional and visually appealing.
| Column Name | Value |
|---|---|
| IconAutoScale | Yes - Enables automatic resizing of the center icon to ensure an optimal fit within the QR code, irrespective of the icon's original dimensions. When enabled, this setting overrides the IconSizePercent parameter. No - Retains the specified size set in IconSizePercent without automatic adjustments, using the exact dimensions provided. If a value is not provided, it will default to No. |
| IconLockToSquares | Yes - Aligns the center icon with the QR code squares for a seamless overlap without gaps. No - Uses the size specified in IconSizePercent without alignment adjustments. If a value is not provided, it will default to Yes. |
| IconSizePercent | The percentage (1-100) that the middle icon should be scaled to. The icon will always retain its original aspect ratio. Note that the icon cannot be scaled to larger than its original size. |
| IconBorderType | The type of border to use around the icon. Contour - QR Factory automatically generates a border that follows the shape of the center icon. Square - Creates a square border around the center icon, with an option to adjust the corner radius. |
| IconBorderPercent | The percentage (1-100) of the icon's size to use for drawing a border around the middle icon. It will be the same color as the background. |
| IconBorderSquareCornerSize | The size to use for the rounded corners when IconBorderType is set to "Square". The value must be between 0-50, where 0 is no rounded corners and 50 is full rounded, where the border is a circle. NOTE: This was previously called IconBorderManualCornerSize and was renamed to be clearer. |
| IconBorderColor | The color to use for the border around the icon. It must be one of the formats specified in Colors. |
Bottom Text
Parameters for how the text below the QR code should appear.
| Column Name | Value |
|---|---|
| BottomText | The text to place below the QR code. |
| BottomTextSize | Any value between 1 and 100. With 1 being the smallest possible and 100 being the largest. |
| BottomTextColor | The color to use for the text below the QR code. It must be one of the formats specified in Colors. |
| BottomTextFont | The font to use for the text below the QR code. It must be spelled exactly as it appears in either the popup menu in QR Factory, or using the Font Book application on macOS. Some examples: Times New Roman, Keep Calm, Roboto, SF Pro, Verdana If not specified, the default font will be Helvetica. |
| BottomTextFontStyle | The style to use for the chosen font. It must be spelled exactly as it appears in either the popup menu in QR Factory, or using the Font Book application on macOS. For example, if Avenir Next is the chosen font, it could be one of: Ultra Light, Ultra Light Italic, Regular, Italic, Medium, Medium Italic, Demi Bold, Demi Bold Italic, Bold, Bold Italic, Heavy, Heavy Italic For another example, if Damascus is the chosen font, it could be one of: Light, Regular, Medium, Semi Bold, Bold If not specified, the default font style will be Regular. |
Safe Zone
Parameters for how the optional safe zone around the QR code should appear.
| Column Name | Value |
|---|---|
| SafeZonePercent | The percentage (0-100) to use for the safe zone around the QR code. The maximum size of 100% would draw the safe zone 1/4 the size of the QR code around all sides (ie: the division from left to right would be 1/4 safe zone, 1/2 QR code, 1/4 safe zone). |
| SafeZoneColor | The color to use for the safe zone. It must be one of the formats specified in Colors. |
Calendar
| Column Name | Value |
|---|---|
| Type | Calendar |
| Title | The name of the event. |
| Location | The location of the event. This is only text and is not GPS coordinates. |
| Description | The description (may be interpreted as a note in some scanners) of the event. |
| TimeZone | Time zone of the event. Ex: "America/Vancouver". |
| StartDate | Start time of the event in format YYYY-MM-DDThh:mm |
| EndDate | End time of the event in format YYYY-MM-DDThh:mm |
| AlarmType | None - No alarm AtStart - Alarm will be set at the same time as the event Minutes - Number of minutes before the event for the alarm Hours - Number of hours before the event for the alarm Note: Not all phones will be able to set the alarm properly when scanning a calendar QR code. The built-in scanner for iOS works well, but some Android scanners may ignore it. |
| AlarmValue | Only used if AlarmType is set to either Minutes or Hours. |
| AlarmDescription | The description to use for the alarm. |
SEPA
| Column Name | Value |
|---|---|
| Type | SEPA |
| SEPAVersion | V1 or V2 |
| IBAN | IBAN (International Bank Account Number) of the beneficiary. Maximum of 34 characters. |
| BIC | BIC (Business Identifier Code) of the beneficiary bank. Maximum of 11 characters. |
| SEPAName | Name of the beneficiary. Maximum of 70 characters. |
| AmountInEuros | Amount in Euros. EUR is an optional prefix that will automatically get filled in if missing. Ex: "EUR10.5". Maximum of 12 characters. |
| PurposeCode | Purpose of the transfer. Maximum of 4 characters. The list of standard purpose codes can be seen in QR Factory 3, or from here. |
| RemittanceType | Reference or Text |
| RemittanceReference | Reference for the transaction. Maximum of 35 characters. |
| RemittanceText | Remittance information. Maximum of 140 characters. |
| BeneficiaryInfo | Extra info for the beneficiary. Maximum of 70 characters. |
| CustomCurrencyCode | The currency to use, specified by a ISO 4217 three-letter code, which are also provided in QR Factory 3. Note: If this is left blank, it will default to EUR for Euros. |
| Amount | Use 'Amount' to specify the transaction value. It functions identically to 'AmountInEuros' and should be used alongside the 'CustomCurrencyCode' column for non-Euro currencies. |
Person (vCard)
General
| Column Name | Value |
|---|---|
| Type | Person |
| FirstName | First name |
| LastName | Last name |
| NameTitle | Person's title (ex: Mr, Mrs, etc) |
| Nickname | Nickname |
| Company | Company name |
| JobTitle | Job title (ex: Software Developer, CEO, etc). |
| JobDepartment | Job department (ex: Engineering, Warehouse, etc). |
| URL | Any URL |
| Note | Any notes about the person. |
Phonetic Spellings
QR Factory 3.3.8 now features phonetic spellings for select fields, improving clarity in languages such as Japanese. This enhancement is particularly useful for accurate pronunciation and comprehension, especially with the Katakana script, widely used in Japan for transcribing non-native words.
| Column Name | Value |
|---|---|
| PhoneticFirstName | Phonetic spelling of the person's first name. |
| PhoneticLastName | Phonetic spelling of the person's last name. |
| PhoneticCompanyName | Phonetic spelling of the company's name. |
Phone Numbers
| Column Name | Value |
|---|---|
| PhoneHome | Home phone number |
| PhoneWork | Work phone number |
| PhoneMobile | Mobile (cell) phone number |
| PhoneHomeFax | Home fax phone number |
| PhoneWorkFax | Work fax phone number |
| PhoneCustomLabels | Assign custom labels to phone numbers by using a vertical bar to separate the label from the number. For instance, enter 'Assistant' followed by a vertical bar (found above the Enter key) and then '18005550012'. To add multiple custom labels, separate each pair with a semicolon. Example for one label: Assistant|18005550012Example with two labels: Sales|18005559932;Marketing Support|18005553470 |
Emails
| Column Name | Value |
|---|---|
| EmailHome | Personal email address |
| EmailWork | Work email address |
Postal Addresses
| Column Name | Value |
|---|---|
| StreetHome | Home street name and number |
| CityHome | Home city |
| ProvinceStateHome | Home province/state |
| CountryHome | Home country |
| PostalZipCodeHome | Home postal/zip code |
| StreetWork | Work street name and number |
| CityWork | Work city |
| ProvinceStateWork | Work province/state |
| CountryWork | Work country |
| PostalZipCodeWork | Work postal/zip code |
Social Profiles
Social profiles are a bit different because QR Factory doesn't know which services will be used, so there aren't any hardcoded column names. To add a social profile, use a column that starts with "SocialProfile" then add the service name. For example, to add a Twitter profile, the column name would be "SocialProfileTwitter", or for YouTube, it would be "SocialProfileYouTube".
For the value, the format is the full URL to the social profile, a vertical bar ('|'), then the username.
For example, the Tunabelly Software Twitter username is tunabelly, and the full URL to the account is https://twitter.com/tunabelly, so the value would be https://twitter.com/tunabelly|tunabelly
For another example, the Tunabelly Software YouTube username is @tunabellysoftware5670 and the full URL to the account is https://www.youtube.com/@tunabellysoftware5670, so the value would be https://www.youtube.com/@tunabellysoftware5670|@tunabellysoftware5670
| Column Name | Value |
|---|---|
| SocialProfileSERVICE_NAME | FULL_URL|USERNAME |
SERVICE_NAME = The service name to use. For example: Twitter, FaceBook, YouTube, Vimeo, etc.
FULL_URL = The full URL to the social profile. For example: https://twitter.com/tunabelly
USERNAME = Just the username. For example: tunabelly
Social Media
Creating a social media QR code is a bit different since the data is dynamic and QR Factory doesn't have a hard coded list of what it could be. It used to be that this type required the use of key-value pairs, although starting with version 3.3.0, it's possible to use the normal columns as well.
Using key-value pairs
It requires a Type column with the value set to Social, plus a Content column, and any other optional ones that are needed. For example:
| Type | Content |
|---|---|
| Social | name=FacebookMessenger;username=tunabellysoftware |
The easiest way to figure out the format is to use the template for the social media platform needed from the list below. Just copy it and fill in the placeholders with the proper values.
The placeholders will have square brackets around them, for example, [USERNAME] and should be completely replaced with the actual username. Here's how one example would look:
name=Twitter;username=[USERNAME] —> name=Twitter;username=tunabelly
| Social Media platform | Content column value |
|---|---|
| name=Twitter;username=[USERNAME] | |
| name=Facebook;username=[USERNAME] | |
| Facebook Messenger | name=FacebookMessenger;username=[USERNAME] |
| name=Instragram;username=[USERNAME] | |
| Snapchat | name=Snapchat;username=[USERNAME] |
| Snapchat (Business) | name=SnapchatBusiness;username=[USERNAME] |
| TikTok | name=TikTok;username=[USERNAME] |
| TikTok (Music) | name=TikTokMusic;username=[USERNAME] |
| TikTok (Video) | name=TikTokVideo;username=[USERNAME];videoid=[VIDEO ID] |
| name=Pinterest;username=[USERNAME] | |
| name=LinkedIn;username=[USERNAME] | |
| LinkedIn (Company) | name=LinkedInCompany;companyname=[COMPANY NAME] |
| LinkedIn (Job Post ID) | name=LinkedInJobPostID;jobid=[JOB ID] |
| LinkedIn (Message Thread ID) | name=LinkedInMessageThreadID;messageid=[MESSAGE ID] |
| Telegram | name=Telegram;username=[USERNAME] |
| Telegram (Join Chat) | name=Telegram;chatid=[CHAT ID] |
| PayPal | name=PayPal;username=[USERNAME] |
| Venmo | name=Venmo;username=[USERNAME] |
| App Store | name=AppStore;appid=[APP STORE APPLICATION ID] |
| Google Play | name=GooglePlay;appPackageID=[GOOGLE PLAY PACKAGE ID] |
| name=WhatsApp;phonenumber=[PHONE NUMBER] | |
| WhatsApp (With Message) | name=WhatsAppWithMessage;phonenumber=[PHONE NUMBER];message=[MESSAGE] |
| Cash App | name=CashApp;username=[USERNAME] |
| X | name=X;username=[USERNAME] |
| Threads | name=Threads;username=[USERNAME] |
| Mastodon | name=Mastodon;username=[USERNAME];server=[SERVER ADDRESS] |
| Reddit (User) | name=RedditUser;username=[USERNAME] |
| Reddit (Subreddit) | name=RedditSubreddit;subreddit=[SUB REDDIT NAME] |
| Reddit (Post) | name=RedditPost;postid=[POST ID] |
| Signal (Phone Number) | name=SignalPhoneNumber;phonenumber=[PHONE NUMBER] |
| Signal (Nickname) | name=SignalNickname;nickname=[NICKNAME] |
| Discord (User) | name=DiscordUser;userid=[USER ID] |
| Discord (Server Invite) | name=DiscordServerInvite;invitecode=[INVITE CODE] |
| Discord (Channel) | name=DiscordChannel;serverid=[SERVER ID];channelid=[CHANNEL ID] |
| GitHub (User) | name=GitHubUser;username=[USERNAME] |
| GitHub (Repository) | name=GitHubRepo;username=[USERNAME];repository=[REPO NAME] |
| GitHub (Gist) | name=GitHubGist;username=[USERNAME];gistid=[GIST ID] |
| Signal (Phone Number) | name=SignalPhoneNumber;phonenumber=[PHONE NUMBER] |
| Signal (Nickname) | name=SignalNickname;nickname=[NICKNAME] |
| Bluesky (User) | name=BlueskyUser;username=[USERNAME] |
| Bluesky (Post) | name=BlueskyPost;username=[USERNAME];postid=[POST ID] |
| Bluesky (Feed) | name=BlueskyFeed;username=[USERNAME] |
| Bluesky (Thread) | name=BlueskyThread;username=[USERNAME];postid=[POST ID] |
| LINE (Profile) | name=LINEProfile;accountid=[ACCOUNT ID] |
| LINE (Chat) | name=LINEChat;accountid=[ACCOUNT ID] |
| LINE (Chat with Message) | name=LINEChatWithMessage;accountid=[ACCOUNT ID];message=[MESSAGE] |
| LINE (Video) | name=LINEVideo;accountid=[ACCOUNT ID] |
| WeChat (User) | name=WeChatUser;wechatid=[WECHAT ID] |
| WeChat (Official Account Article) | name=WeChatOfficialAccount;articleid=[ARTICLE ID] |
| WeChat (Mini Program) | name=WeChatMiniProgram;appid=[APP ID] |
Using columns
When creating social media QR codes in CSV format, it's essential to organize the data correctly:
Separate Columns for Each Requirement: For each type of social media QR code, you should create a column for every additional piece of information that's required.
- Example: For WhatsApp with a message, the format in the key-value chart is:
name=WhatsAppWithMessage;phonenumber=[PHONE NUMBER];message=[MESSAGE]In the CSV file, accordingly, it should have: - The value of
Socialfor theTypecolumn - The value of
WhatsAppWithMessagefor theNamecolumn - The phone number to use in the column labeled
PhoneNumber - The message text ot use in the column labeled
Message
Note: The capitalization of these column titles does not affect functionality.
- Example: For WhatsApp with a message, the format in the key-value chart is:
Below is an example illustrating how to utilize columns with various types of social media QR codes. Note that for row/column intersections that are not applicable, simply leave them blank.
| Type | Name | Username | AppID | CompanyName |
|---|---|---|---|---|
| Social | tunabelly | |||
| Social | tunabellysoftware | |||
| Social | AppStore | 1609285899 | ||
| Social | LinkedInCompany | Innotech |
Social Media Icon Integration
QR Factory 3 now includes a feature that allows for the addition of company icons directly in the middle of QR codes These icons are original, high-quality and sourced directly from company websites, ensuring they accurately represent the brand. For most companies there are multiple icon options available, providing flexibility in design and appearance.
In addition, by default it will align the icon with the QR code data, eliminating any gaps, and include a border around the icon for a clean, modern look. It also automatically verifies each QR code to make sure it’s scannable, adjusting the reliability level if needed. This ensures that the QR codes are not just visually appealing, but also functional and reliable. These features distinctly set QR Factory 3 apart from other QR code generators, offering a superior blend of aesthetics and functionality.
Here are the columns for including the company's icon in the QR code:
| Column Name | Value |
|---|---|
| UseCompanyIcon | Yes - will include the company's logo as the center icon for the QR code. No - will not include the company's logo. |
| CompanyIconIndex | Specifies the index of the company icon to be included in the QR code, corresponding to the list of available icons within QR Factory 3 for that particular company. Icons are indexed starting from 1, with subsequent icons numbered sequentially – the first icon is 1, the second is 2, and so on. |
| IconLockToSquares | Yes - will make the center icon aligned with the QR code squares so they overlap perfectly with no gaps. No - will use the exact size from IconSizePercent If a value is not provided, it will default to Yes. |
Crypto
Create a crypto QR code is the same as making a Social Media one, with the same requirement to put all the data into the Content column using key-value pairs.
It requires a Type column with the value set to Social, plus a Content column, and any other optional ones that are needed.
Here is an example for a Crypto QR code:
| Type | Content |
|---|---|
| Crypto | name=Bitcoin;WalletAddress=43718943268743212908 |
The easiest way to figure out the format is to use the template for the crypto type needed from the list below. Just copy it and fill in the placeholders with the proper values.
The placeholders will have square brackets around them, for example, [WALLET ADDRESS] and should be completely replaced with the actual wallet address. Here's how one example would look:
name=Bitcoin;WalletAddress=[WALLET ADDRESS]—> name=Bitcoin;WalletAddress=43718943268743212908
| Social Media platform | Content column value |
|---|---|
| Bitcoin | name=Bitcoin;WalletAddress=[WALLET ADDRESS] |
| BitcoinWithAmount | name=Bitcoin;WalletAddress=[WALLET ADDRESS];Amount=[AMOUNT IN DECIMAL] |
| Ethereum | name=Ethereum;WalletAddress=[WALLET ADDRESS] |
| EthereumWithAmount | name=EthereumWithAmount;WalletAddress=[WALLET ADDRESS];Amount=[AMOUNT IN DECIMAL] |
| EthereumWithAmountAndGas | name=EthereumWithAmount;WalletAddress=[WALLET ADDRESS];SenderAddress=[SENDER WALLET ADDRESS];Amount=[AMOUNT IN DECIMAL];SuggestedGas=[SUGGESTED GAS IN DECIMAL] |
| Dogecoin | name=Dogecoin;WalletAddress=[WALLET ADDRESS] |
| DogecoinWithAmount | name=Dogecoin;WalletAddress=[WALLET ADDRESS];Amount=[AMOUNT IN DECIMAL] |
QR Factory