- General
- How many computers can I use a license on?
- Are there discounts for volume purchases?
- I've lost my license key. How can I recover it?
- The app isn't working/responding properly. What should I do?
- What's Tunabelly Software's refund policy?
- How can I move my license to another Mac?
- How do I update my apps?
- I'd like feature XYZ added.
- How do I take a screenshot?
- How do I send a System Profiler report?
- How do I send a DarwinDumper report?
- Why is the company called Tunabelly?
- Why am I getting an error about a read-only disk image when updating?
- How can I purchase an app from Russia?
- Why can't I purchase a license from my country?
- TG Pro
- Which versions of macOS are supported by TG Pro?
- What is the install limit for a single TG Pro license?
- How do I install TG Pro?
- How do I uninstall TG Pro?
- How do I force quit TG Pro?
- How do I send a Support Package?
- What's the "Helper App" all about?
- Fan control without installing the helper app: Will macOS take over?
- What happens to the fan control after TG Pro is quit or uninstalled?
- Which Mac models are supported?
- Is it a one-time purchase or a subscription?
- Is there a specific version for Apple silicon Macs?
- Nothing happens when I open TG Pro.
- How do I remotely deploy/install/register TG Pro?
- What's the difference between the regular and Pro versions?
- I just bought Temperature Gauge and I'd like to upgrade to the Pro version. How much is it?
- What is fan Auto Boost?
- How can I lower the fan speeds?
- TG Pro diagnostics are showing one of the fans as not working properly. What does this mean?
- I need to re-download TG Pro. Where can I find it?
- How do I have TG Pro run in the background?
- What temperatures should I keep my Mac at?
- TG Pro quits when I close the main window. How do I fix this?
- Why does the current graphics (GPU) card name change?
- Why does the GPU temperature show N/A?
- Why are the fan speeds at 0 RPM and it says the hardware turned them off?
- How do I reset the diagnostics?
- I can't see the app icon in the menu bar.
- I can't see the maximum temperature tooltips in the main window.
- I don't see any GPU temperatures for my MacPro
- iMac 5K model with 6/8 CPU cores is only showing temperatures for 4. Why is this?
- Does it work with Hackintosh computers?
- I keep seeing "execute 155" about TGProLaunchHelper in the Console app.
- Fix "TG Pro could not install the required helper app for fan control."
- What is the dialog for HockeySDK accessing the keychain for?
- After updating the fan control is no longer working. How do I fix it?
- "The XPC connection to the helper tool is invalid" is shown in the Console
- "Fan control is not available" error is shown on app launch
- "Fan Helper App Not Enabled" error is shown on app launch
- "The disk image couldn't be opened" is shown after opening the DMG file
- Is there a version that works with macOS 10.9?
- Is there a version that works with macOS 10.6?
- How do I deregister TG Pro?
- It keeps prompting for a license key after the Mac restarts. How do I fix this?
- kernel_task has a high CPU usage and the Mac is slow.
- Why is there not a 1-1 mapping of temperature sensors to CPU cores for M1 based Macs?
- Does TG Pro support the M1, M1 Pro, M1 Max and M1 Ultra models?
- Does TG Pro support the M2, M2 Pro, M2 Max and M2 Ultra models?
- Does TG Pro support the M3, M3 Pro and M3 Max models?
- Does TG Pro support the M4, M4 Pro and M4 Max models?
- Why is the fan helper app still running as Intel on my Apple Silicon Mac?
- How do I configure email notifications using two factor authentication?
- How do I setup Gmail for the email notifications?
- Why are there no hard drive temperatures shown?
- Why is my older Mac slowing down when enabling SMART temperatures for hard drives?
- How to Backup and Restore TG Pro settings
- M3 Max: Why are half of the CPU Performance cores all the same temperature?
- M3 Max: Why are all the GPU cores the same temperature?
- Why are there only four GPU temperatures shown for M3-series Macs with many more cores?
- M3-series Macs: Why fan control may not work consistently with TG Pro
- M4-series Macs: Why fan control is unavailable when fans are powered off
- QR Factory
- Do the QR codes created by QR Factory expire, and who owns them?
- Does Tunabelly Software host the created QR codes?
- Can the URL of a QR code be changed after it has been created and published?
- How do I upgrade to QR Factory 3?
- Can I batch create codes from a CSV file?
- Is there an in-app purchase to create batch codes?
- What formats can the QR codes be saved as?
- What colorspaces are supported?
- What's the maximum pixel size that can be saved?
- Are unicode characters (such as Umlaut) supported?
- How does the in-app verification work?
- Can I scan a QR code that's outside the app (ex: in Safari) ?
- Can I import an existing QR code?
- I can't import a CSV that was exported from Numbers.
- Excel/Numbers exports a CSV file that has semi-colons instead of commas. How do I fix this?
- Why can't I use a transparent background when exporting as PDF?
- Is the display order of name, company, and email in contact codes from QR Factory customizable when scanned by an iPhone?
- How to insert new lines in text for a QR code
- Disk Diet
- Is it safe?
- I can't select my drive.
- Why do I have to choose folders at the start?
- How do I choose the Applications or Library folder?
- How do I choose the System Logs folder?
- Why isn't it finding much to clean?
- Why is it so fast?
- Why do the caches reappear?
- How do I get Mail Downloads & Trash to work on macOS 10.14 (Mojave) and newer?
- How do I get everything to work on macOS 10.15 Catalina?
- System logs and unused applications/languages aren't being removed. How do I fix this?
- Why is the free space not matching up to what the Finder shows?
- Folder Tidy
- Does it work with external drives?
- Is there a tutorial on how to use the app?
- Can I change the order of the rules?
- How fast is it?
- Can I create my own custom rules?
- Can I undo the a tidy?
- How does it handle multiple files with the same name?
- Can I move all files of a certain name or type to a folder?
- Can I move files into subfolders inside the main tidied folder?
- Does it matter if my files have extensions?
- How can I have it only move files (and no folders) ?
- I have folders within folders and so on. How do I get Folder Tidy to look inside all of them?
- Where are the rules stored?
- How do I include files for an entire year?
- It keeps showing zero files moved, how do I fix this?
- Folder Tidy can't move any files because the Spotlight metadata is missing
- None of the files are moved from the Downloads, Desktop or Documents folders
- None of the files that are only stored in iCloud Drive are moved
- None of the files on an external drive are being moved properly
- How can I force Spotlight to re-index my drive?
- Why can't I move any files from iCloud Drive or other cloud storage providers?
- Texty for Google Messages
- Why are some of the emoji symbols blank?
- How can I make notifications remain on the screen until I close or reply to them?
- Why aren't notifications appearing when a new message arrives?
- Silent Start
- The startup chime isn't silenced when headphones are plugged in. Why is this?
- Endurance: CPU Stress Test
- Why does macOS show 100% for the battery level, but it's a bit lower in the app?
- HandsFree 2
- Does it send any call/text/contact data to a server?
- Boom 2 is causing audio distortion in calls.
- Can I make a call using a URL like tel://123-4567 ?
- Why can't I send a text message (SMS) with my iPhone?
- Why can't I use the text messaging feature with my Android phone?
- Why are there limitations when using an iPhone?
- I've been asked to send a Bluetooth Reporter package. How do I create one?
- I can't see the app icon in the menu bar.
- Are both parties recorded when recording a call?
- Are outgoing calls recorded too?
- What format are the recording saved in?
- Is it compatible with El Capitan (10.11) ?
- Why aren't my phone contacts visible in the app?
- How do I uninstall HandsFree 2?
- Why is there no sound from my Bluetooth headset?
- Is AppleScript supported?
- How do I use the Address Book (Contacts) app plugin?
- HandsFree
- Which phones is it compatible with?
- Will I get a notification if my phone is in silent/vibrate mode?
- How do I search through my contacts?
- How do I connect to my phone?
- I can't see any contacts, what's wrong?
- For some customers the voice quality is poor. Why is this?
- Can I dial a number by highlighting it?
- The app sometimes crashes when connecting to the phone or answering a call.
- The audio sometimes has static or crackling noises. What's going on?
- It keeps disconnecting from my phone. How can I fix this?
- Temperature Gauge
- Is the trial on the website the same as the Mac App Store version?
- Does it support both Celsius and Fahrenheit?
- Can the fan speeds be controlled?
- Can the temperatures be exported?
- My Mac is running really hot. Is this normal?
- My fans are always running at full speed. Is this normal?
- What does "Ambient Air" mean?
- How can I see the maximum recorded temperatures?
- What does the number under the fan name mean?
- I can't see the status icon in the menu bar.
- I see a weird sensor name.
- Can I set alerts on specific sensors?
- Why do I only have a Right Heatsink? Is the other missing?
- Why doesn't it show my GPU temperature?
- I can't download Temperature Gauge from the Mac App Store
- I'm getting a message to re-download Temperature Gauge from the Mac App Store
- Balance Lock
- Why does the System Preferences still show the balance not centered?
-
General
-
How many computers can I use a license on?Each license purchased from our website can be used on up to 3 different Macs (ex: TG Pro).
For apps purchased from the Mac App Store, the licensing follows the normal store policy. -
Are there discounts for volume purchases?If you are in need of at least 5 license keys for any of our apps, please email us for a discount.
Our volume discount is 20% off for 5+ license keys and 25% off for 10+ license keys. -
I've lost my license key. How can I recover it?The first option is to use our self-serve feature at https://bit.ly/tunabelly-recover-license. Enter your email address and Paddle will send you the license key for every app that was purchased under that address. If you're not sure which one you used to purchase the app, feel free to try multiple email addresses (one at a time).
It may take a few minutes for the email to arrive although if you don't get anything and there's nothing caught in any spam/junk folders, please email us at support@tunabelly.com and we'll be happy to assist.
-
The app isn't working/responding properly. What should I do?Email support@tunabelly.com and optionally include the following information:
- Take a screenshot (if possible) when it's not working properly. Press Command-Shift-3 at the same time to take a picture of the entire screen, or to take a picture of a specific window, press Command-Shift-4 then the space bar, then click on the window.
- Get a System Profiler log which includes all your Mac's hardware information which is super useful for figuring out what happened. To get this, hold down the Option key, then click on the Apple menu and choose "System Information…". Then go to the "File" menu and choose "Save…".
- If the app isn't responding, open up Activity Monitor (in /Applications/Utilities), click once on the app name (ex: Disk Diet), then click the "Sample Process" button in the toolbar. When this is finished, click the "Save…" button in the top right of the window.
If you do this, thank you for taking the time since it makes the process of tracking down and fixing your issue a lot quicker. -
What's Tunabelly Software's refund policy?Our customers satisfaction is our number one priority and we want to make sure that everyone who purchases our apps enjoys them. If for any reason, you're not happy with a purchase, please send an email to support@tunabelly.com and let us know what the issue is and we'll do our best to resolve it. If we're unable or you'd still like a refund, here's what to do:
App Store purchases:
Simply contact Apple by going to https://support.apple.com/HT204084 and follow the instructions to sign into reportaproblem.apple.com, then use the "Find a purchase" or "Report a problem" link for the purchase. Apple doesn't provide us with any purchasing or customer information, so we are unable to help out or offer any refund directly.
Website or in-app purchase (through Paddle):
• It must have been purchased within the last 30 days.
• If the app has been registered, make sure to deregister it first. All of our apps with the exception of TG Pro have a "Deregister License" menu item in the application menu. For TG Pro, click the menu bar item, scroll down to the "More" submenu and choose "Deregister License".
• Email support with the link above and provide either the email used for the purchase, or the email receipt that includes the transaction number from Paddle (this is different from a PayPal number for example).
• We'll deregister the license key and issue a full refund which will arrive back in your account within a few business days. -
How can I move my license to another Mac?For any of the apps downloaded from the Tunabelly website, they need to be registered with a license key. Each license key is good for a specific number of registrations (usually 3) so it can be used on multiple Macs.
Each time a license key is used, the registration count goes up by one. When it reaches the limit (ex: 3) it will no longer be able to be used until the registration count goes down. To lower the count, simply deregister on a Mac. To do this, either click on the menubar icon (ex: TG Pro, HandsFree 2) or click the application icon (ex: Disk Diet, Folder Tidy, etc) and choose "Deregister License". Once this is done, the registration count will be lowered by one.
To sum it up, if you're going to be formatting a drive to reinstall macOS or you're selling your Mac, make sure to deregister any Tunabelly apps first so you can continue to use your license key without any issues. -
How do I update my apps?Depending on how they were purchased, here's how:
Mac App Store: To update, simply open the Mac App Store, choose the Updates tab and then click the "Update" button next to the app, or "Update All" for all apps that need updating.
Website: For each app, either click the application menu and choose "Check for Updates" or if it's a menubar only app, click the menubar icon and choose More -> Check for Updates. If for whatever reason, the update does not work or is unavailable, go to the main page on the website, choose the app page then re-download it (it's free). Once it's finished downloading, unzip it and move it to the Applications folder to overwrite the old version. -
I'd like feature XYZ added.Send your request to support@tunabelly.com. We listen to our customers and we're usually able to add the request in a future update.
-
How do I take a screenshot?Press the following key combinations at the same time to take a screenshot on your Mac:
Full screen: Command-Shift-3
Specific area: Command-Shift-4, then drag a box around the area to capture.
Specific window: Command-Shift-4, press the space key, then click on the window to capture.
It will create a new file in the default folder, which is usually the Documents or Desktop, with a name prefix of "Screen Shot" followed by the current date and time. -
How do I send a System Profiler report?To send a System Profiler report, hold down the Option key, click on the Apple menu and choose "System Information…". From the "File" menu choose "Show More Information" unless it says "Show Less Information". Then go to the "File" menu and choose "Save…". Email that to support@tunabelly.com.
-
How do I send a DarwinDumper report?1) Download the latest version of DarwinDumper from https://bitbucket.org/blackosx/darwindumper/downloads/ (at the time of this writing it's 3.0.4).
2) Run DarwinDumper and click the "Deselect All Dumps" on the left. Then check the "SMC Keys" checkbox. So it will look like this: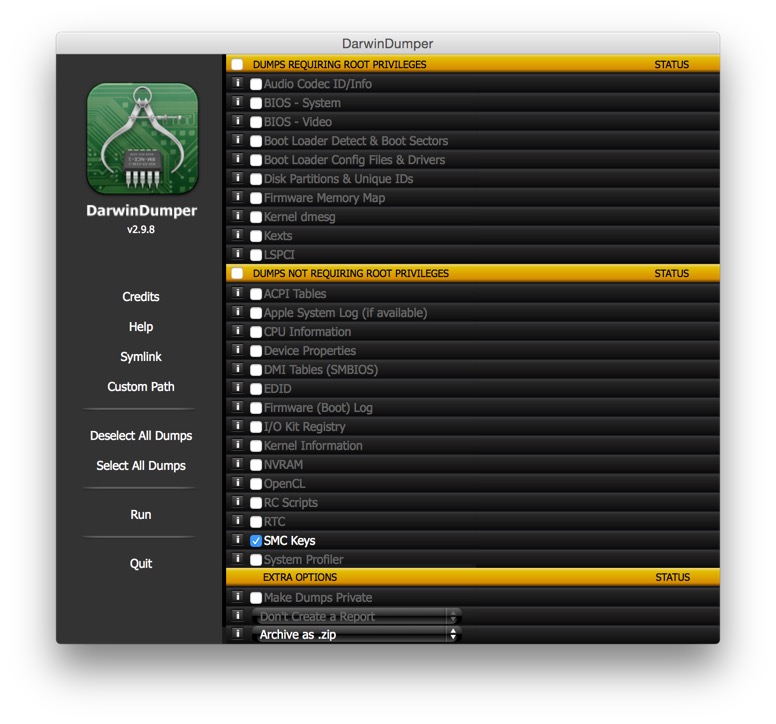
3) Choose the Run button on the left and it should only take a few seconds. It will create a zip file with the report - please email that to support@tunabelly.com.
-
Why is the company called Tunabelly?Legend has it that two friends were talking in a coffee shop, and the name came up, it sounded fun, and it stuck. Plus, O-Toro sushi is super delicious.
-
Why am I getting an error about a read-only disk image when updating?There is a new feature in macOS 10.12 (Sierra) where applications downloaded into the Downloads folder get run from a randomized path. It's called App Translocation and there is a great summary of how this works here.
So when running one of our apps from the Downloads folder and it attempts to update itself (using the Sparkle service that's built-in), there will be an error dialog displayed that looks like this: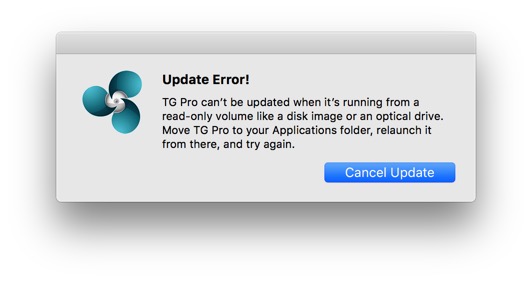
To fix this so the app can be updated, quit the app, move it to the main Applications folder (at /Applications) and then re-open it. Once it's open, click either the application menu and choose "Check for Updates" or the menubar icon and choose More-->Check for Updates.
-
How can I purchase an app from Russia?Due to the global banking sanctions issued against Russia, our apps are no longer available for purchase for our Russian users. This applies to both purchasing a licensing key for our direct download apps (ex: TG Pro) and our App Store apps (ex: QR Factory 3).
-
Why can't I purchase a license from my country?We use Paddle as our licensing and payment provider and they must abide by global anti-money laundering and international sanctions regulations. For the countries on the sanctioned list, they are unable to offer any financial services, which prevents purchasing any licenses from our website or in-app (for example, TG Pro).
Which countries are supported by Paddle? -
TG Pro
-
Which versions of macOS are supported by TG Pro?TG Pro is compatible with macOS 10.13 High Sierra and newer, including full support for macOS 15 Sequoia. If you are running an older version of macOS and need a compatible release, previous versions of TG Pro for each macOS version are available at Release Notes.
-
What is the install limit for a single TG Pro license?A single TG Pro license allows the use of the same license code for installation on up to three different Macs for personal use. For business purposes, the license is valid for installation on one Mac. For more detailed information, please refer to the full End User License Agreement (EULA) available at https://www.tunabellysoftware.com/tgpro/eula/index.php.
-
How do I install TG Pro?First off, download the latest version from https://www.tunabellysoftware.com/tgpro/. It will be in a disk image (.dmg) format. Once the disk image is finished downloading, follow the guided steps on how to install and register it.
If there are any issues, please email our support team and we'd be happy to assist with it. -
How do I uninstall TG Pro?To remove the application, first quit TG Pro. If it's open, click the menu bar item and then choose "Quit" at the bottom of the popup menu. Then move the TG Pro icon from the Applications folder into the trash.
There is also a helper tool (it can't be launched if TG Pro has been removed) that can be removed by opening the Terminal app and pasting the following commands into it one at a time (press enter after each one):
sudo rm /Library/PrivilegedHelperTools/com.tunabellysoftware.TGFanHelper
sudo rm /Library/LaunchDaemons/com.tunabellysoftware.TGFanHelper.plist
sudo rm -rf ${HOME}/Library/Containers/com.tunabellysoftware.TGFanHelper
sudo rm -rf ${HOME}/Library/Containers/com.tunabellysoftware.TGProLaunchHelper
And to remove any left over files from the preferences or the Paddle licensing service, run these commands:
rm -rf ${HOME}/Library/Application\ Support/TG\ Pro
rm -rf /Users/Shared/TG\ Pro/
rm ${HOME}/Library/Preferences/com.tunabellysoftware.tgpro.plist
If one of the commands shows an error about the file not being there, that's ok, it means it's already been removed or it wasn't installed by TG Pro. -
How do I force quit TG Pro?TG Pro runs as a menu bar app by default, which means it doesn’t appear as a regular app in the macOS Dock. If it becomes unresponsive or you need to force quit it for any reason, follow these steps:
1. Open Activity Monitor:
• Open Launchpad from the Dock or by pressing the F4 key (or the equivalent key for Launchpad on the keyboard).
• Type “Activity Monitor” into the search bar and press Return.
2. Locate TG Pro:
• In Activity Monitor, use the search bar in the upper-right corner and type “TG Pro”.
• Select “TG Pro” from the list of running processes.
3. Force Quit:
• Click the Stop button (a small “X” in a hexagon) in the top-left corner of the Activity Monitor window.
• In the dialog that appears, select Force Quit.
Note: Force quitting TG Pro will immediately stop all active processes, including temperature monitoring and fan control. Use this option only if the app is unresponsive.
If the issue persists, please contact support for further assistance. -
How do I send a Support Package?If you're been requested by support to send a Support Package to help diagnose an issue, here's how:
• Click the TG Pro menu bar icon
• Scroll down to the "Help & Support" submenu (on older versions it will be labelled "More")
• Choose "Send Support Package…" from the submenu
• Fill in your email address and click the "Create & Upload" button.
Each Support Package is uploaded to a private bucket we own in Amazon S3 over a secure (HTTPS) connection. Neither the contents of the support package nor your email address will ever be shared outside of Tunabelly Software.
The following list is what is included in a Support Package:
• An anonymous system profiler report
• App console log
• App preferences
• App crashlogs
• Screenshots of the main window and the menu bar item for the TG Pro app (nothing else is included)
• IOService registry
• Licensing files
• Fan & temperature information
• Internal battery info -
What's the "Helper App" all about?The fan helper app is an essential component of TG Pro, granting the necessary privileges to manage fan control and adjust fan speeds. It is developed with the macOS hardened runtime for robust security and has been notarized by Apple, ensuring it is free from any malicious code.
Upon TG Pro's launch, if the helper app is not present, an option to install it will be shown. The installation places the helper app in the following system locations for proper functioning:
/Library/PrivilegedHelperTools/com.tunabellysoftware.TGFanHelper
/Library/LaunchDaemons/com.tunabellysoftware.TGFanHelper.plist
This ensures seamless integration with the system for reliable fan management.
Note: To avoid the installation prompt at each startup if the helper app is not installed, check the 'Do not show again' option. To enable fan control at a later stage, the helper app can be installed through TG Pro's menu bar by selecting More -> Reinstall Fan Helper.
-
Fan control without installing the helper app: Will macOS take over?Choosing not to install the fan helper will place TG Pro in a monitoring-only state. You'll be able to view real-time temperature readings and fan speeds, but won't have the capability to adjust fan settings. As a result, fan management will be entirely under macOS control.
If you prefer not to see this dialog at every startup, select the 'Do not show again' option. Should you decide to enable fan control later, install the fan helper anytime via TG Pro's menu bar item: More -> Reinstall Fan Helper. -
What happens to the fan control after TG Pro is quit or uninstalled?When TG Pro is quit or uninstalled, all fan settings are immediately reset to their macOS default values, and control over the fans is returned to macOS. This ensures that there is no lasting impact on the system's built-in settings or performance.
Should you wish to completely remove TG Pro, including any supporting files, you can follow the detailed uninstallation instructions provided in the FAQ section "How do I uninstall TG Pro?".
This design approach has been carefully implemented to maintain the integrity of your macOS environment, allowing you to use TG Pro with the assurance that it can be fully reversed. -
Which Mac models are supported?TG Pro supports every Mac model that can run macOS 10.13 (High Sierra) or higher.
This includes Apple silicon and Intel models, with the full list available here (just click to expand the table so they are all visible). -
Is it a one-time purchase or a subscription?TG Pro offers a unique, one-time purchase model, priced on sale at $10 USD, although the cost is adjusted to local currencies based on the customer's location. Every license key can be used for up to 3 Macs for personal use or for a single Mac for business use.
Unlike many software services, TG Pro does not require a subscription. Moreover, all updates of TG Pro 2.x have and will continue to be no-cost upgrades. -
Is there a specific version for Apple silicon Macs?TG Pro is now built as a Universal Binary 2, so it includes the code for both Intel and Apple silicon inside the same app. As of version 2.61, it includes full support for the M1, M1 Pro and M1 Max chips.
This means that no matter which Mac TG Pro is downloaded and used on, it will run natively for maximum efficiency and speed. -
Nothing happens when I open TG Pro.Not to worry, TG Pro is most likely running properly and the one of the following has occurred:
1) It's set to run in background mode, which means that there is no dock icon or application menu bar. There is a status icon in the main menu bar near the top right. It will look similar to this (depending on your settings):
or this:
Click the highlighted icon to see the status menu where you can interact with the app.
2) The app is in background mode and there isn't enough space in the menu bar to show the status icon. This can happen if the current application that's running (like the Finder or Safari) have a lot of menus, leaving a small amount of space for status icon on the right of the menu bar. It will usually occur when lots of other apps have status icons, leaving no room for TG Pro. If you find this happening, try turning off the icon (and using just text) by going to the preferences, choosing the "Menubar" tab and unchecking "Show application icon" and checking "Use smaller font" and "Use shorter titles" like so: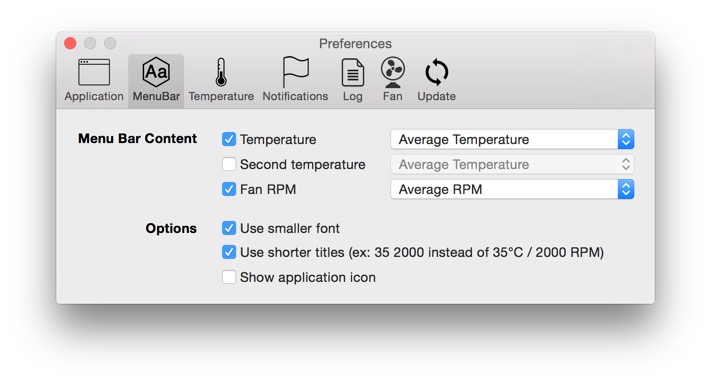
-
How do I remotely deploy/install/register TG Pro?Starting with TG Pro 2.33, it's easy to remotely deploy along with having the fan helper installed, preferences setup and licensing as well. See the TG Pro Remote Deploy guide for more details.
-
What's the difference between the regular and Pro versions?The regular version is Temperature Gauge, and it's on the Mac App Store (MAS).
The professional version is Temperature Gauge Pro (TG Pro), and it's only available from the Tunabelly website. We decided to make it a website only app so that we are free to add whatever features customers request and can issue updates immediately, as opposed to being feature blocked and waiting over a week on the MAS.
Here are the main features that TG Pro adds over the regular version:
• Complete manual and automatic fan control, including Auto Boost with configurable rules.
• Sensor diagnostics to help find defective sensors and fans.
• Full status menu with temperatures, fans (plus control), active graphics card and more.
• Email notifications, which is fantastic if you're monitoring a remote server.
• Updated and refreshed UI.
• Almost all new development effort is being put towards the Pro version.
Learn More
-
I just bought Temperature Gauge and I'd like to upgrade to the Pro version. How much is it?We've got you covered.
There is a special offer in TG 4.6 for customers who would like to upgrade to the Pro version. Just click the status icon (in the menubar) and choose "Upgrade Now (with discount)". This will open a special link to the Paddle store with the coupon pre applied.
Just make sure to update to TG 4.6 to use this offer. -
What is fan Auto Boost?Auto Boost allows you to set that speed the fans should be boosted to when a specified temperature is hit for either the average CPU temperature, any sensor or always. It's also specific to either battery or AC power.
The time it takes for the fans to get to the specified speed can also be adjusted to avoid the fans coming on full speed then immediately returning to normal. -
How can I lower the fan speeds?Yes, it is now possible to lower fan speeds if necessary.
However, please be careful when doing so since it is possible to potentially damage the hardware if the fans are continuously lowered and the Mac starts to overheat. The idea of TG Pro is to raise the fan speeds in order to help cool down the Mac.
Usually this option is used when there is a broken temperature sensor, or the HD has been replaced in certain iMac models and the fans are always running at 100% speed.
To enable the ability to completely control the fan speeds (for specific or all fans) including lowering them, the "Override System Control" option needs to be turned on. Read more about how to do this in the app tutorial section on Overriding system fan control. -
TG Pro diagnostics are showing one of the fans as not working properly. What does this mean?In the bottom of the main window where the hardware diagnostics reside, it may indicate that one or more fans may not be not working properly. It will look similar to this, depending on which Mac model it's being run on:
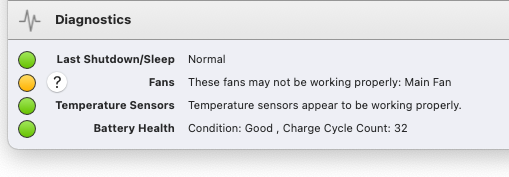
What this means is that TG Pro has detected that one or more fans have been labelled by the hardware as potentially defective. This can be from a variety of reasons, including being clogged with dust, not spinning at the correct speed, etc.
First, try restarting the Mac since it can be a one off event, as well as a SMC reset, which may also clear it. Secondly, try cleaning the fans. One way to do this is to spray the exhaust grill with compressed air and then gently vacuum the dust that gets expelled. If those doesn't resolve it, it may be worth having the Mac checked out by a repair technician.
Note: A fan consistently labelled as defective may seem to be working properly although it's about to fail. -
I need to re-download TG Pro. Where can I find it?To re-download the latest version for free, go to http://tunabelly.com/tgpro and click the "Free Trial" button.
If you've already registered it, it should open without having to enter your license key again. -
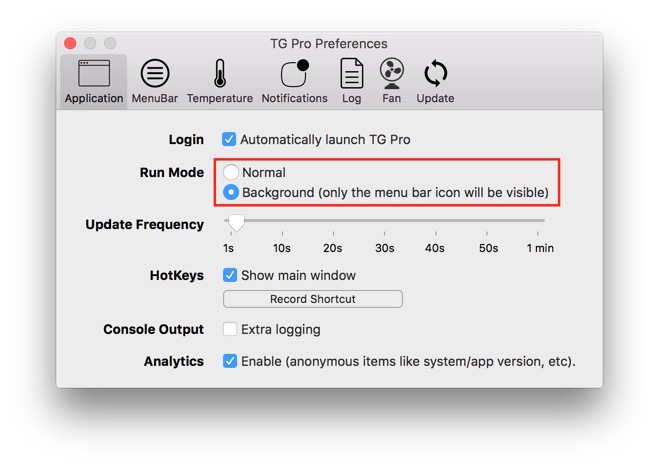
How do I have TG Pro run in the background?Open up the preferences, click the "Application" tab and then choose the "Background" radio button like so:
-
What temperatures should I keep my Mac at?This can be a personal preference although the temperatures to look out for are if components like the CPU are consistently running at 100C (212F) or higher.
-
TG Pro quits when I close the main window. How do I fix this?Open the Preferences (from the application menu or the status icon) and choose the "Application" tab.
Make sure the "Background" radio button is selected:
which will turn off the dock icon and allow TG Pro to run in the background with the status icon, which will look like this:
This also allows the main window to be closed without quitting the app.
-
Why does the current graphics (GPU) card name change?On some MacBook Pro models, there are two separate GPUs - discrete and integrated.
The discrete is a separate GPU from either AMD or Nvidia. It's usually quite a bit more powerful than the other although it uses more power so it has a bigger battery drain.
The integrated has a name like like "Intel 4000" or "Intel Iris", etc. It's built into the CPU package, and is lower power and less powerful.
So OS X will occasionally switch between the two depending on the current graphics processing needs. Usually it will use the integrated GPU to save power and switch to the discrete GPU for apps like 3D games. -
Why does the GPU temperature show N/A?On MacBook Pro models with two GPUs (see previous FAQ entry for more info), the one that's turned off will usually show N/A since the temperature sensor is also not available. This is normal and expected behaviour.
-
Why are the fan speeds at 0 RPM and it says the hardware turned them off?On some Mac models, such as the MacBook Pro 13" or MacBook Air, the fan(s) can be turned off by the hardware if the temperatures are low enough. It's our theory that Apple does this to lower the overall power consumption. When in this state, TG Pro isn't able to control the fans although once the temperatures rise above a certain threshold, the hardware turns them back on and TG Pro is able to control them as usual.
The specific models we have seen this with are:
• MacBookAir8,1 - MacBook Air (Retina, 13-inch, 2018)
• MacBookPro16,3 - MacBook Pro (13-inch, 2020, Two Thunderbolt 3 ports)
• MacBookPro16,2 - MacBook Pro (13-inch, 2020, Four Thunderbolt 3 ports)
• MacBookPro15,2 - MacBook Pro (13-inch, 2019, Four Thunderbolt 3 ports)
• MacBookPro14,2 - MacBook Pro (13-inch, 2017, Four Thunderbolt 3 ports)
• MacBookPro14,1 - MacBook Pro (13-inch, 2017, Two Thunderbolt 3 ports)
• MacBookPro13,2 - MacBook Pro (13-inch, 2016, Four Thunderbolt 3 ports)
• MacBookPro13,1 - MacBook Pro (13-inch, 2016, Two Thunderbolt 3 ports)
• MacBookPro12,1 - MacBook Pro (Retina, 13-inch, Early 2015)
For reference, this is what is displayed in the main window:
And this is the dialog that will appear: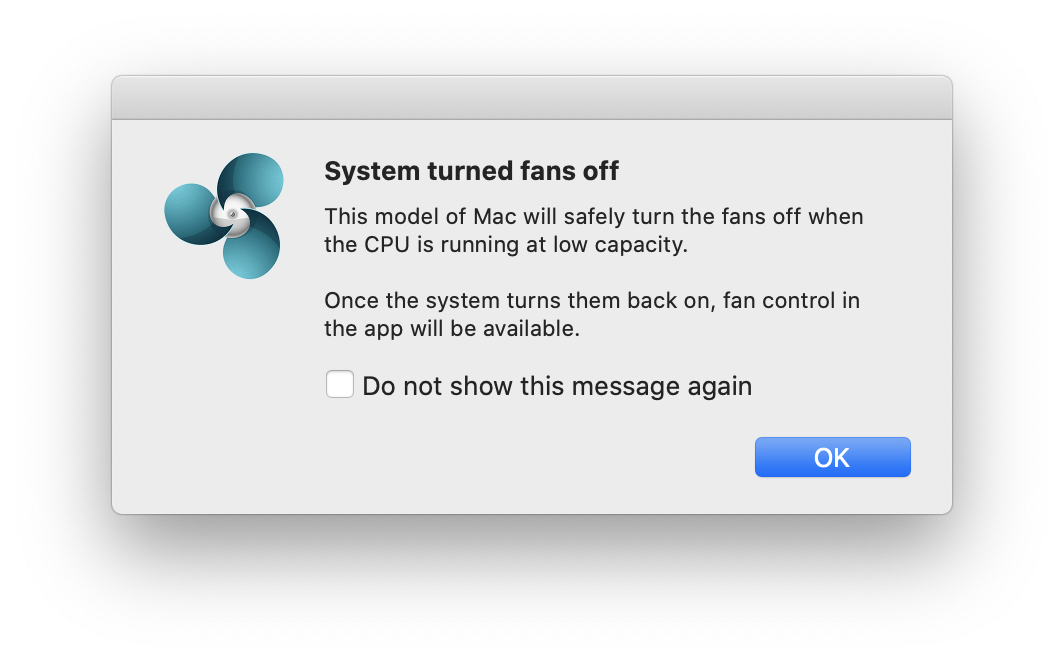
-
How do I reset the diagnostics?The diagnostics (fan, temperature sensors and last shutdown) are checked every time the temperatures and fan speeds are updated in the app. From the information available, it's possible the values that the diagnostic sensors return only get updated by the Mac hardware at startup. So if you've done something like clean out the fans and would like to reset the diagnostics, try restarting the Mac.
-
I can't see the app icon in the menu bar.This can happen if the current application that's running (like the Finder or Safari) have a lot of menus, leaving a small amount of space for status icon on the right of the menu bar. It will usually occur when lots of other apps have status icons, leaving no room for TG Pro. If you find this happening, try turning off the icon (and using just text) by going to the MenuBar tab of the preferences and unchecking "Show Application Icon" and checking "Use Smaller Font".
Alternatively, there are utilities such as Bartender which can help to organize all the menu bar apps to give more space. -
I can't see the maximum temperature tooltips in the main window.Within the main window in TG Pro is is possible to see the maximum temperature for a particular sensor by hovering the mouse over the horizontal bar (see Viewing maximum temperature values for more info on this).
However the popover will not appear if the app update frequency is set to lower than around 4 seconds. This is because macOS waits a few seconds when hovering the mouse before displaying a tooltip/popover. If the update frequency is set for example to the lowest, which is 1 second, there is not enough of a delay before the table (with all the temperature values) refreshes.
To change this, open the app preferences, click the Application tab and move the Update Frequency slider to the right at least to between the 1 and 10 second markers.
-
I don't see any GPU temperatures for my MacProOnly the latest model, the cylindrical Mac Pro 2013 (MacPro6,1), has built-in sensors for the GPU temperatures.
On older models, such as the MacPro5,1 and earlier, the GPU temperatures are not exposed in the same way. It will require interfacing directly with the GPU chips to get these, which is currently un-documented on OS X. We're investigating the possibility of adding this in a future update. -
iMac 5K model with 6/8 CPU cores is only showing temperatures for 4. Why is this?For the iMac 27-inch 5K models, even through they have 6 (or 8) CPU cores, the SMC only exposes 4 CPU temperature sensors. The SMC (System Management Controller) is what's responsible for controlling the fans and monitoring temperatures and it's the one that exposes the CPU temperatures. For some reason, Apple decided on these particular Mac models to only expose 4 CPU temperatures instead of the full list.
TG Pro is still showing everything that's available to it which unfortunately on these models only exposes a maximum of 4 CPU temperatures. However it's possible that the sensors are located in a way that covers all the cores so it's still feasible to monitor the temperatures reliably. -
Does it work with Hackintosh computers?It is possible, although by default Hackintosh computers do not expose any temperature sensors so there won't be any displayed in the app.
However, installing the FakeSMC kernel extension can help. One resource to check out is the Hackintosh site. -
I keep seeing "execute 155" about TGProLaunchHelper in the Console app.Occasionally this can happen due to a bug in OS X. If you see the following in the Console app:
TemperatureGaugeHelper could not find and/or execute 155: refusing to execute/trust quarantined program
then open up the Terminal app, and paste the following command in (without the quotes): "xattr -d -r -s com.apple.quarantine /Applications/TG\ Pro.app/", then press enter.
This will reset the quarantine bit and should stop the messages from appearing in the Console. -
Fix "TG Pro could not install the required helper app for fan control."The most likely reason is that there's a permission error. To quickly solve this, open the Terminal app (use Spotlight or Launchpad to search for it, or open it from /Applications/Utilities/Terminal.app, and paste the two following commands in (and press return after each one):
sudo chown root /Library/LaunchDaemons/com.tunabellysoftware.TGFanHelper.plist
sudo chown root /Library/PrivilegedHelperTools/com.tunabellysoftware.TGFanHelper
Then quit and re-open TG Pro and it should be able to install the fan helper tool properly. If it still doesn't, please email support@tunabelly.com or during normal business hours, chat with us from the website. -
What is the dialog for HockeySDK accessing the keychain for?This isn't a dialog that appears very often and it's from the HockeySDK service that the app uses for crash reporting. It doesn't send anything personal if you choose to send a crash log (you have the choice if it does crash and shows a dialog about it).
It can only access what the HockeySDK service has stored in the keychain which has nothing to do with other items in the keychain such as passwords, etc. It's completely safe to choose either Allow or Always Allow. Otherwise the crash reporting may not work.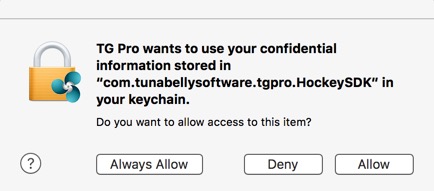
-
After updating the fan control is no longer working. How do I fix it?There was an issue with the code signing certificate expiring for the fan helper app which is causing an issue to a very small percentage of users. The fan control will no longer work properly and if this happens, simply open TG Pro, click the menubar icon and choose More -> Reinstall Fan Helper. Enter the Mac admin password when prompted and to be safe, quit and open TG Pro again. That seems to resolve it for everyone who's tried this although if it doesn't, please email us at support@tunabelly.com.
-
"The XPC connection to the helper tool is invalid" is shown in the ConsoleOccasionally, it's possible that TG Pro will get a XPC_ERROR_CONNECTION_INVALID error from the system when attempting to connect to the helper app for fan control. When this happens, in the console log, there will be something that looks like this:
TG Pro: The XPC connection to the helper tool is invalid.
If this is happening, please try the following steps to resolve it:
1) Quit TG Pro if it is currently running.
2) Open the Terminal app and paste the following commands in (and press return after each one):
sudo rm /Library/LaunchDaemons/com.tunabellysoftware.TGFanHelper.plist
sudo rm /Library/PrivilegedHelperTools/com.tunabellysoftware.TGFanHelper
3) Drag TG Pro from the Applications folder (or wherever it's located) to the trash.
4) Reboot the Mac.
5) Empty the trash.
6) Download the latest version of TG Pro from https://www.tunabellysoftware.com/tgpro/
7) Move TG Pro to the Applications folder and launch it.
If the error is still being displayed, the next step to try is to click the TG Pro menubar icon and choose More -> Reinstall Fan Helper and enter the admin password when prompted.
Finally if that doesn't resolve it, please contact support at support@tunabelly.com
-
"Fan control is not available" error is shown on app launch
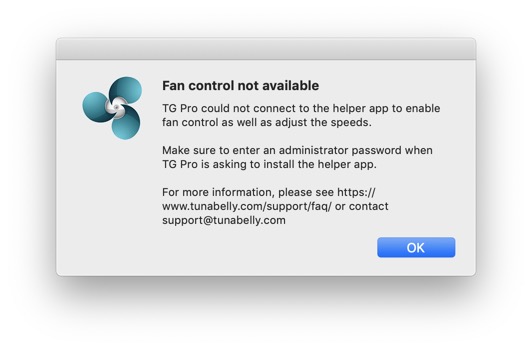
If you see this dialog on app launch, try the following:
1) Click the TG Pro menu bar icon.
2) Choose More —> Reinstall Fan Helper.
3) Enter the Mac administrator password when prompted.
This should resolve the issue and if not please contact support at support@tunabelly.com -
"Fan Helper App Not Enabled" error is shown on app launch
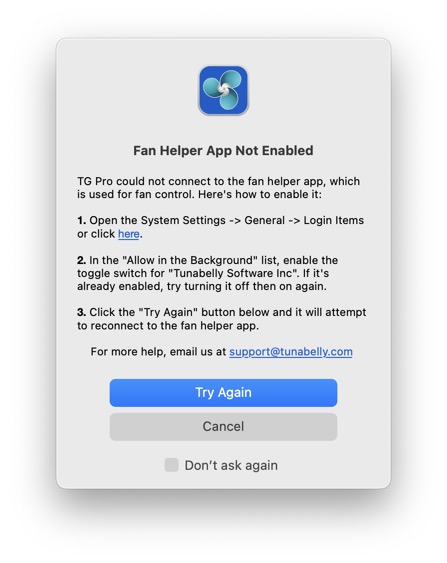
If this dialog is appearing when opening TG Pro, it's because for whatever reason, on macOS 13 Ventura and up, it's possible that the fan helper needs to be reenabled in the system settings to allow it to run in the background. To do so, simply click the link in the dialog or open the System Settings, choose General, -> Login Items. Then scroll down in the "Allow in the Background" until the "Tunabelly Software Inc" toggle is visible and click it twice to turn it off then on again. It will look similar to this: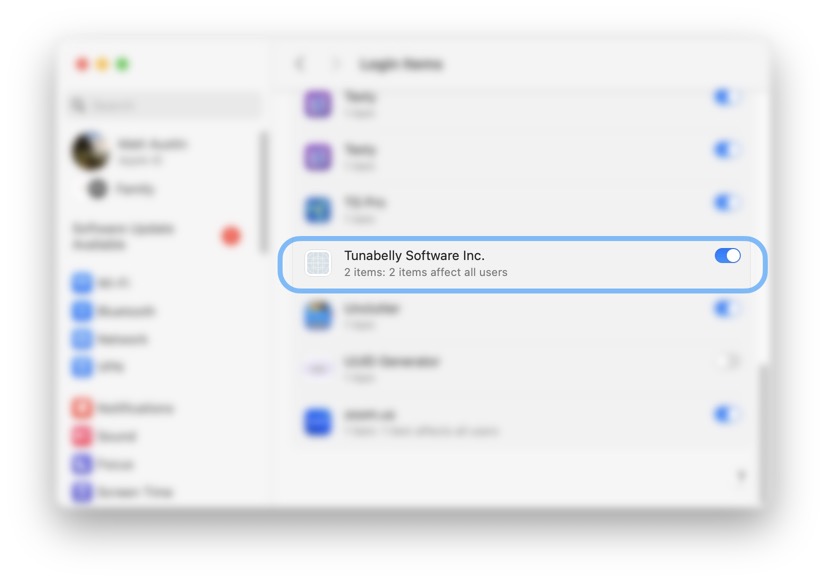
If "Tunabelly Software Inc." is not visible, try re-installing the fan helpers then run the steps from above again. -
"The disk image couldn't be opened" is shown after opening the DMG file
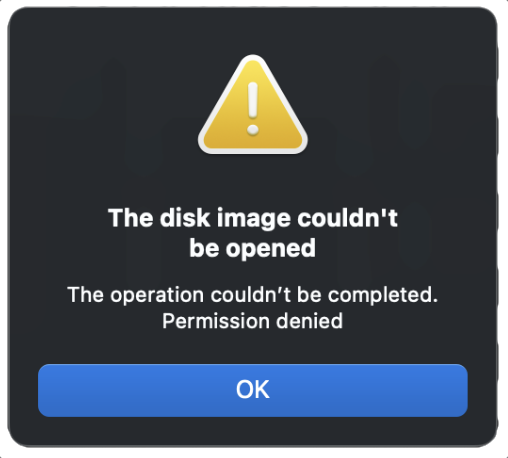
If you see this error after accepting the EULA when opening the TG Pro disk image (DMG), it may be due to a bug in macOS 14 Sonoma. To try and resolve this, open the Disk Utility app and run Disk First Aid to ensure all the file and folder permissions are correct.
In addition, the TG Pro disk image can be verified to ensure it was not corrupted during the download process. Again, open Disk Utility and follow the steps to Verify a Disk Image. Once it's finished, it should show something similar to this: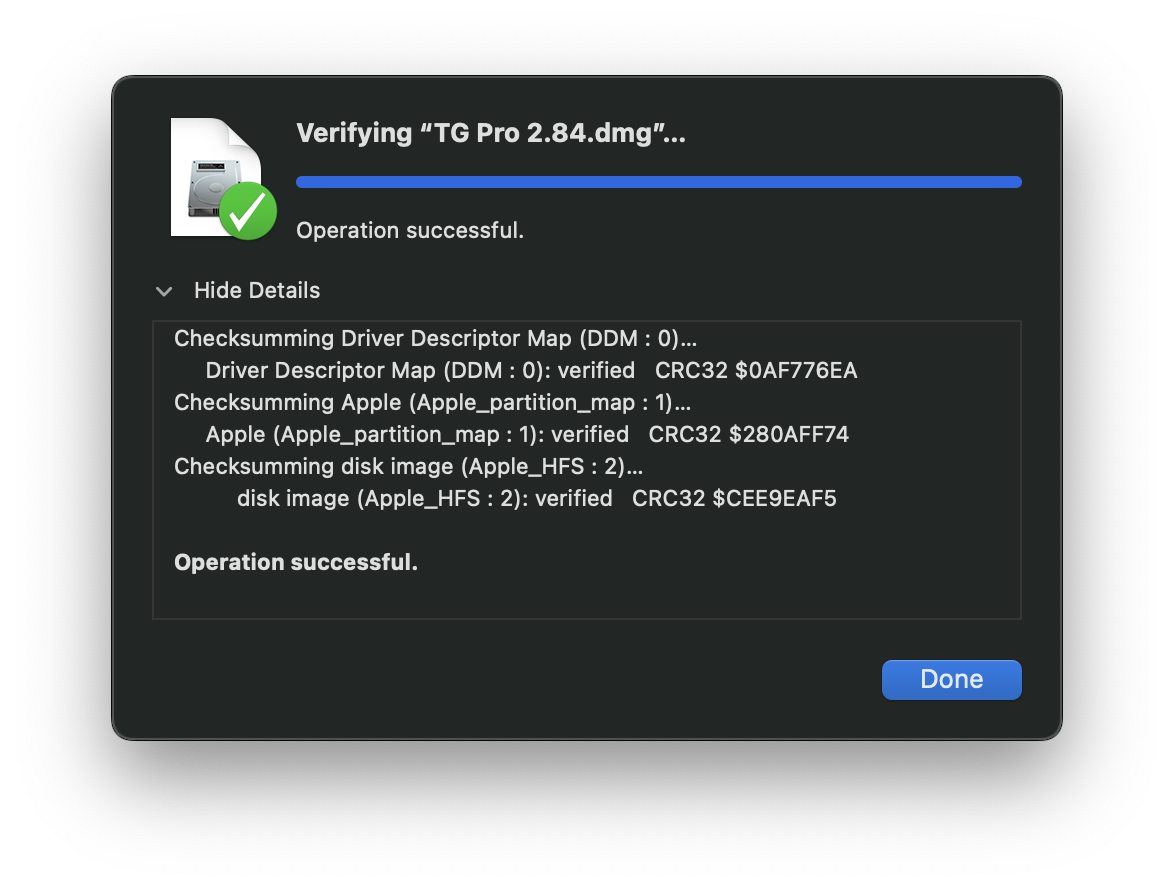
-
Is there a version that works with macOS 10.9?Starting with the last few versions, it has required macOS 10.10 or higher. If a version that is compatible with 10.9 is required, TG Pro 2.32 can still be downloaded here.
-
Is there a version that works with macOS 10.6?No, unfortunately the development effort required to make TG Pro compatible with macOS 10.6 would be extremely high for a very small number of customers. So we won't be offering this at any point. However, if the Mac is able to be upgraded to 10.10 or higher, then the latest version from TG Pro will work with no issues.
-
How do I deregister TG Pro?TG Pro can be deregistered if the Mac is going to be given to someone else, or if you need to move the license to another Mac. To do so, click the TG Pro menubar icon, scroll down to the "More" submenu, then choose "Deregister License".
-
It keeps prompting for a license key after the Mac restarts. How do I fix this?We're really sorry about this happening. The issue is a super frustrating bug in the Paddle middleware we use for licensing. It has to do with the fact the Paddle framework can't store the license file properly so it will repeatedly prompt for a license key after a system restart.
The good news is most customers have been able to fix it by using the following steps:
Note: You'll need your license key for TG Pro. It will be in an email that you got just after purchasing it. If you can't find this or it's missing, use this link to recover it: https://bit.ly/tunabelly-recover-license.- Click the TG Pro menubar icon, scroll down to the "More" submenu and choose "Deregister License".
- Quit TG Pro (click the menubar icon and choose "Quit" at the bottom) and re-open it.
- Enter your license key when prompted.
- After you've entered your license key, click the TG Pro menubar icon, scroll down to the "More" submenu and choose "About TG Pro". Take a screenshot of that window; it should show your email and license key if it was able to store them successfully. Otherwise it will show "null".
That should resolve the issue with Paddle, however if it doesn't, please email our support team and we'll do our best to get it fixed up. -
kernel_task has a high CPU usage and the Mac is slow.On newer models, especially the T2 based Macs, lowering the fan speeds can cause throttling with the kernel_task process taking all available CPU resources (ex: 900-1000% usage).
The problem is if the fan speeds are too low (and overridden), and the system detects that the thermal values are getting too high it will lower the CPU speed and/or cause the kernel_task process to use all available CPU resources.
To avoid this, starting in TG Pro 2.48 there is a new feature that can be used when the fans are being completely overridden. It will force the fan speeds to be increased when necessary and lowered back down when it's safe. It will only do this when the thermal pressure is high enough that the system will throttle the CPU. The idea is to make sure the system is happy with the thermal levels and fan speeds so it doesn't do either of these measures. To learn more about this feature, click here.
-
Why is there not a 1-1 mapping of temperature sensors to CPU cores for M1 based Macs?Most of the Intel based Macs have one temperature sensor per CPU core, although this does not appear to be the case for Apple Silicon, beginning with the M1 chip.
We did extensive research to find the appropriate temperature sensors for these CPU cores and it turns out so far it seems that there is not a one-to-one mapping of a temperature sensor to each CPU core. The M1 chip has 4 Performance and 4 Efficiency CPU cores, yet we have found 7 temperature sensors for the Performance cores, and 2 for the Efficiency cores. Our theory is that there are many more sensors for the Performance cores because they need more monitoring since they are the ones that will work the hardest and generate the highest temperatures. To try and make this clearer, we are using the suffix "Package" instead of "Core" for the CPU temperatures.
We will continue to investigate to try and find if there are more CPU based temperature sensors for the M1 chip.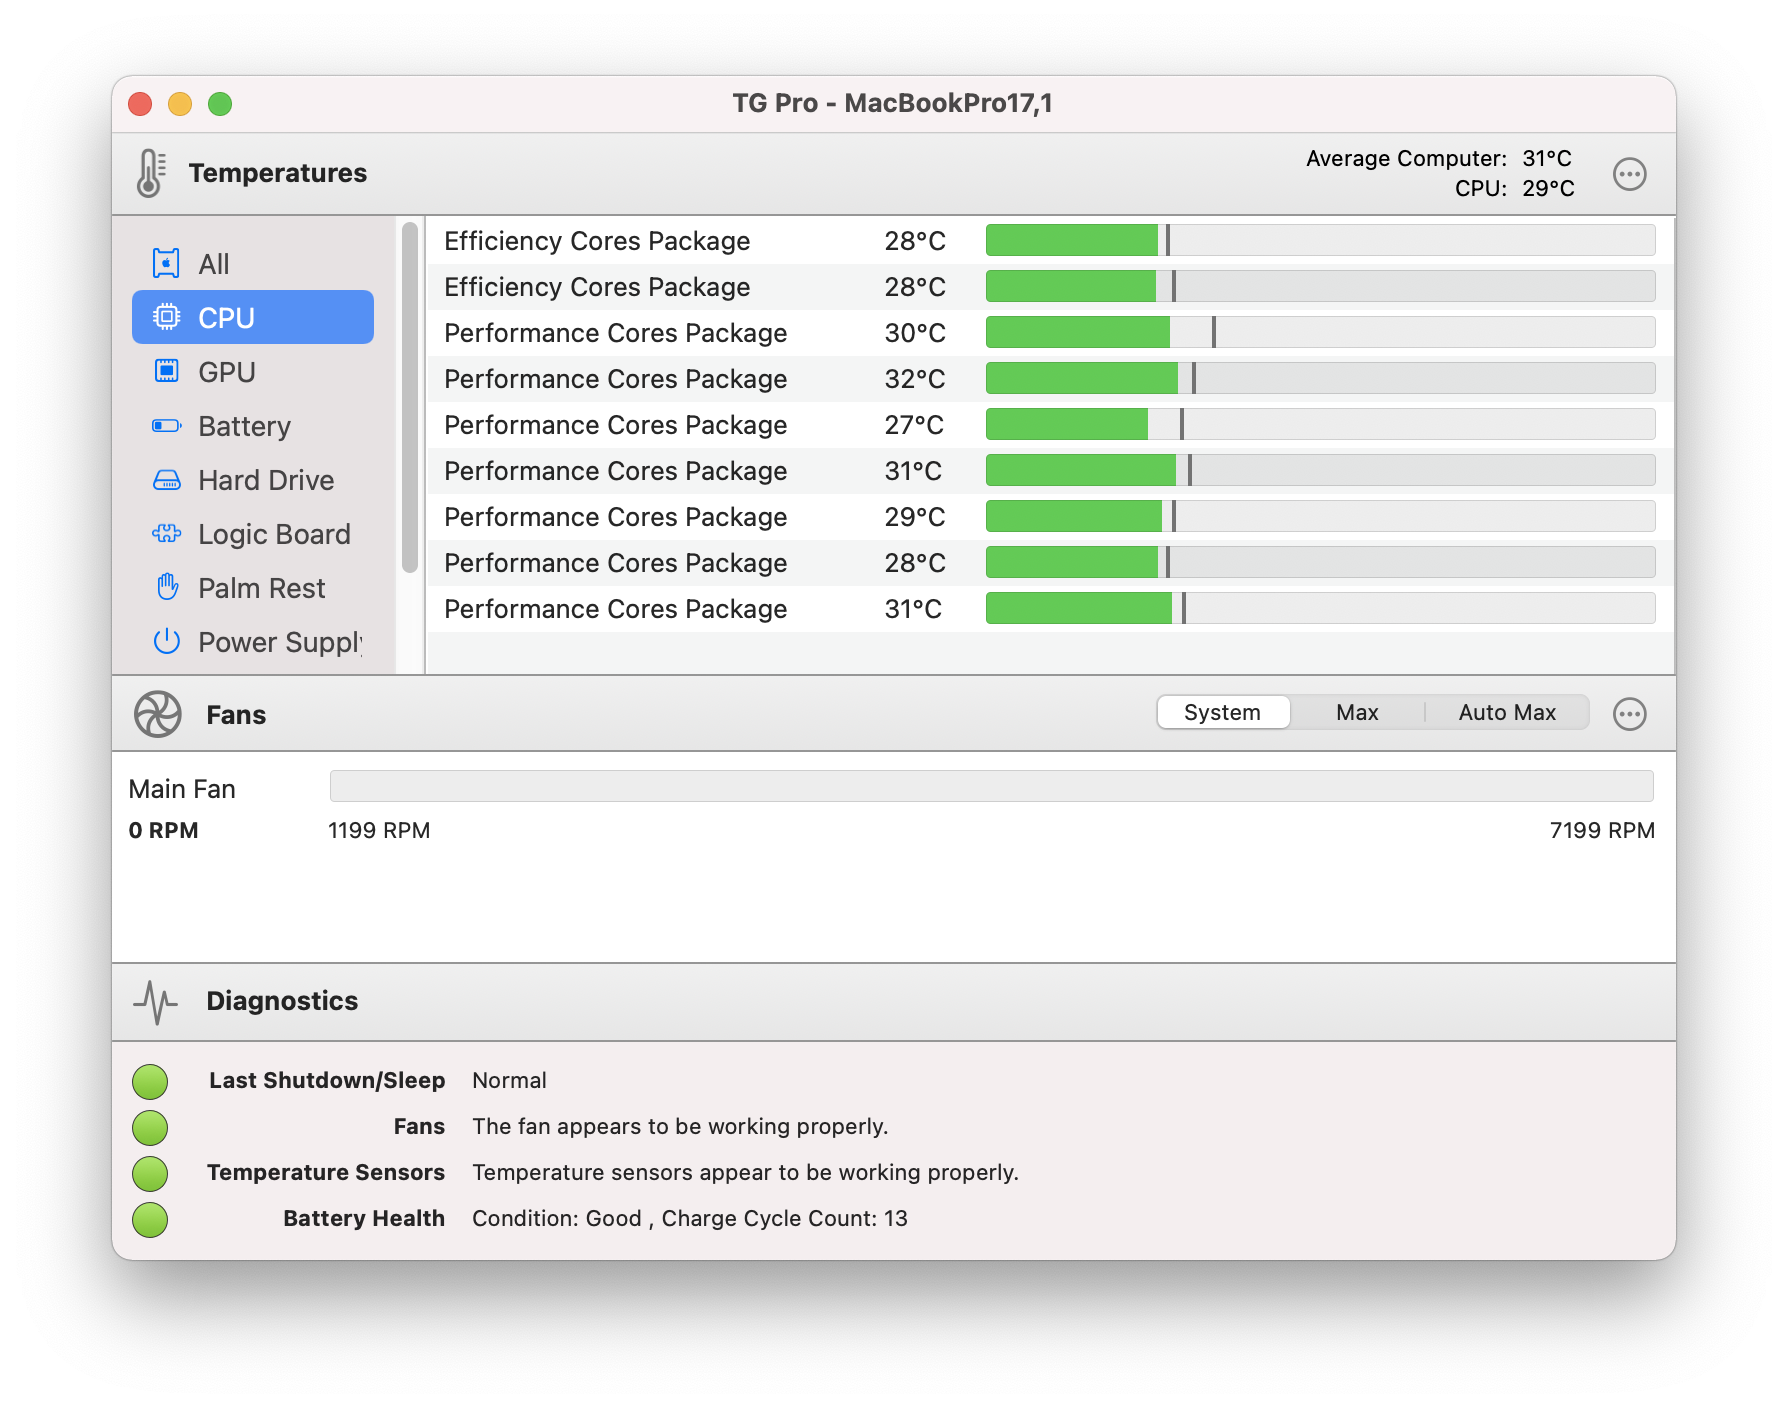
-
Does TG Pro support the M1, M1 Pro, M1 Max and M1 Ultra models?As of TG Pro 2.67, it supports all versions of the M1 chip including all variants of the M1 Pro, M1 Max and M1 Ultra. It will display internal temperatures such as CPU, GPU, logic board, battery and more, along with the fan speeds and full fan control.
If it's an older version, just update in-app by clicking the TG Pro menubar icon, scrolling down to the More submenu and choosing "Check for Updates". -
Does TG Pro support the M2, M2 Pro, M2 Max and M2 Ultra models?As of TG Pro 2.82 it supports all versions of the M2 chip including all variants of the M2 Pro, M2 Max and now, the mighty M2 Ultra. It will display internal temperatures such as CPU, GPU, logic board, battery and more, along with the fan speeds and full fan control.
If it's an older version, just update in-app by clicking the TG Pro menubar icon, scrolling down to the More submenu and choosing "Check for Updates". -
Does TG Pro support the M3, M3 Pro and M3 Max models?Yes, TG Pro fully supports the M3, M3 Pro, and M3 Max models starting from version 2.88. This support includes comprehensive monitoring of internal temperatures across components like the CPU, GPU, logic board, and battery. TG Pro also offers detailed insights into fan speeds, along with full fan control capabilities.
It's important to note that on these models, if the temperatures are sufficiently low, the hardware itself may turn off the fans for energy efficiency and noise reduction. In such cases, TG Pro can only control the fans when they are actively running. -
Does TG Pro support the M4, M4 Pro and M4 Max models?Yes, TG Pro fully supports the M4, M4 Pro, and M4 Max models starting from version 2.93. This support includes comprehensive monitoring of internal temperatures across components like the CPU, GPU, logic board, and battery. TG Pro also offers detailed insights into fan speeds, along with full fan control capabilities.
As with previous models, it’s important to note that on these Macs, if the temperatures are sufficiently low, the hardware may turn off the fans to improve energy efficiency and reduce noise. In such cases, TG Pro can only control the fans when they are actively running. -
Why is the fan helper app still running as Intel on my Apple Silicon Mac?The fan helper app was updated to be a Universal Binary 2 shortly after the M1 was released, which means it contains both Intel and Apple Silicon (ARM) code. There is an edge case however, where if macOS is restored from an Intel Mac onto a new Apple Silicon model, it may not properly prompt to upgrade the fan helper app.
To resolve this, just manually reinstall the fan helper app. To do so, click the TG Pro menubar icon, scroll down to the "More" submenu, then choose "Reinstall Fan Helper". You'll be asked for your Mac administrator password once or twice so make sure to enter it so it can install the tool. Once this is finished, the fan helper app will be running as native Apple Silicon.
-
How do I configure email notifications using two factor authentication?Setting up email notifications in TG Pro is fairly straightforward, especially for major email services like iCloud, Hotmail, Gmail, etc. Once the email address to use is entered, it will automatically fill in the server information (which is available for most providers).
For email providers that have two factor authentication enabled, a one time password needs to be created for TG Pro to use. Here's some helpful pages that explain how to create one:
Gmail
iCloud
Hotmail
Outlook
Yahoo
-
How do I setup Gmail for the email notifications?TG Pro includes built-in support with the Gmail mail server settings once a gmail address is entered. It will automatically fill in the proper values, with only the email and password needed.
In order to use a 3rd party email client (in this case TG Pro) with Gmail, the account must have two factor authentication (2FA) enabled. If it's not, then TG Pro will return an authentication error when trying to send a test email.
Here's how to generate a one time password in Gmail to use with TG Pro. -
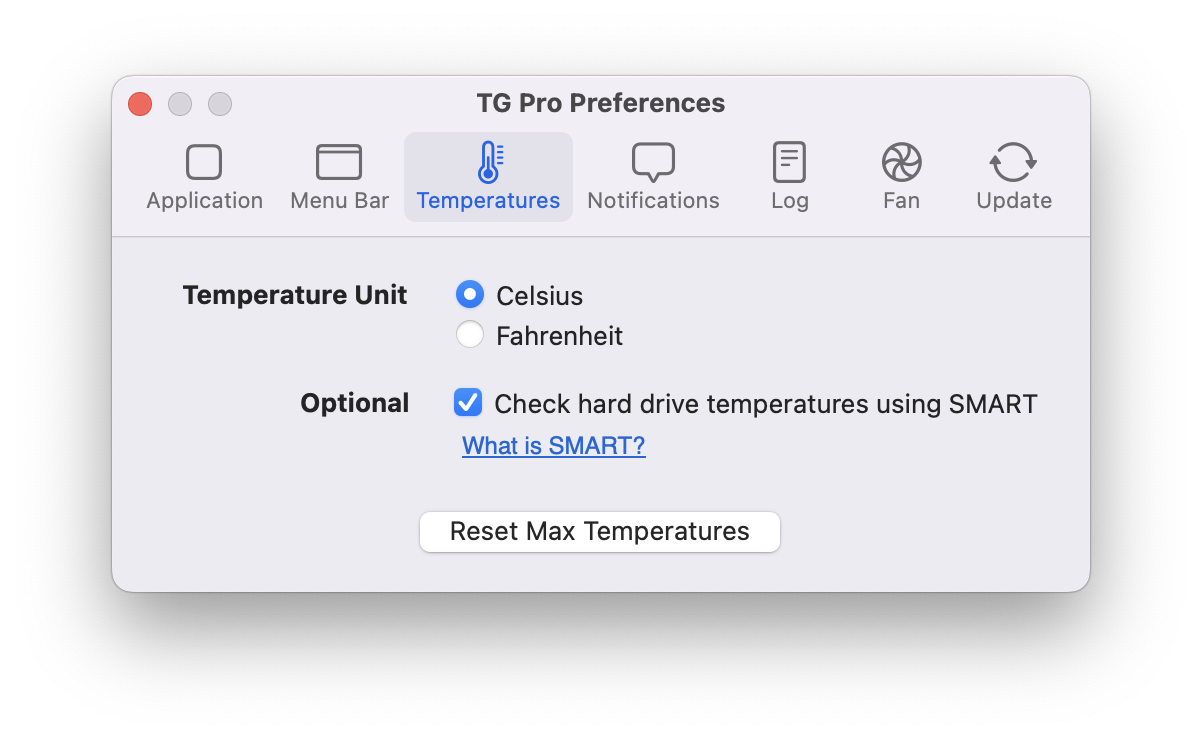
Why are there no hard drive temperatures shown?There is an option in TG Pro to check hard drive temperatures through S.M.A.R.T which is not enabled by default. To turn it on, open the Preferences, choose the Temperature tab and check the "Check hard drive temperatures using SMART" checkbox like so:
-
Why is my older Mac slowing down when enabling SMART temperatures for hard drives?For some older style HDDs, we have seen it where when TG Pro accesses the temperature (via the SMART protocol), it causes an enormous slowdown so the entire system grinds to the halt or becomes very slow. It has to do with when TG Pro checks the temperature, on some older hard drive controllers, it seems to pause file I/O operations while it does this, whereas newer ones can do it simultaneously.
If you're seeing a slowdown when enabling this feature, please turn if off for now by opening the app preferences, click the Temperatures tab and uncheck the option for "Check drive temperatures using SMART". -
How to Backup and Restore TG Pro settings
To preserve your TG Pro settings and licensing files, you can back them up and restore them when needed. This is helpful when switching to a new Mac or recovering from a system issue. Follow the steps below for detailed instructions.
Backup Settings
- Backup the Preferences File
- Open Finder.
- Click the Go menu in the menu bar and select Go to Folder.
- Enter the following path and press Enter:
~/Library/Preferences/ - Locate the file named
com.tunabellysoftware.tgpro.plist - Copy the file to a secure location, such as an external drive or cloud storage.
- Backup the Application Support Folder
- Open Finder.
- Click the Go menu in the menu bar and select Go to Folder.
- Enter the following path and press Enter:
~/Library/Application Support/ - Locate the folder named TG Pro
- Copy the entire folder to the same secure location as the preferences file.
Restore Settings
- Restore the Preferences File
- Ensure TG Pro is not running before restoring the file.
- If it is open, click the menu bar item and select Quit from the drop-down menu.
- Open Finder.
- Click the Go menu in the menu bar and select Go to Folder.
- Enter the following path and press Enter:
~/Library/Preferences/ - Copy the
com.tunabellysoftware.tgpro.plistfile from your backup to this folder. - If prompted, confirm that you want to replace the existing file.
- Restore the Application Support Folder
- Open Finder.
- Click the Go menu in the menu bar and select Go to Folder.
- Enter the following path and press Enter:
~/Library/Application Support/ - Copy the TG Pro folder from your backup to this location.
- If prompted, confirm that you want to replace the existing folder.
Note: If the Mac hardware has changed — for example, if the logic board was replaced during a repair — you may be asked to reactivate TG Pro after restoring the settings.
Force Reload Settings
- Open the Terminal application.
- Run the following command to force the system to reload preferences:
killall cfprefsd - Relaunch TG Pro to verify that your settings have been restored.
- Backup the Preferences File
-
M3 Max: Why are half of the CPU Performance cores all the same temperature?The M3 Max chip features three distinct CPU clusters:
Efficiency Cluster: Comprises low-power cores that are highly efficient but less powerful.
Performance Cluster 1: Contains the first set of powerful cores with higher clock speeds and increased power consumption.
Performance Cluster 2: Includes the second set of powerful cores.
In scenarios of low utilization, the second half of the Performance CPU cores may appear to be inactive. This is a deliberate power-saving measure. When these cores are not needed, they are turned off to conserve energy, leading to invalid temperature readings. TG Pro addresses this by employing a 'best guess' method for all CPU cores in this state, resulting in similar temperature reports across these cores. As the utilization escalates, these cores reactivate, allowing for more accurate temperature measurements. -
M3 Max: Why are all the GPU cores the same temperature?Similar to the behavior observed in the Performance CPU cores, the GPU cores in the M3 Max chip exhibit a unique temperature reporting pattern. At times of low usage, the temperature sensors for the GPU cores are not actively reporting. This is likely a measure to conserve power and resources.
To address this, TG Pro implements a strategy of using an alternative temperature metric. This metric provides an estimate that is relatively close to the actual temperature. Once the GPU cores become more active and the sensors are re-engaged, TG Pro will then report the actual temperatures as they are measured. -
Why are there only four GPU temperatures shown for M3-series Macs with many more cores?For the M3 series, it turns out there isn't a direct one-to-one mapping of temperature sensors for each GPU core.
For instance, in the top of the line M3 Max with 40 GPU cores, TG Pro is able to display four GPU temperature values. These temperatures represent different sections of the GPU cores rather than individual cores. This approach is due to the way the sensors are configured in the hardware, which provides a more comprehensive view of the temperature distribution across the GPU.
This also applies to each of the M3 series, including all versions of the M3, M3 Pro and M3 Max. -
M3-series Macs: Why fan control may not work consistently with TG ProOn certain newer Mac models, including the M3-series, fan control is tightly regulated by the system’s hardware. If the hardware disables fan control, TG Pro (or any other third-party app) cannot override these restrictions. When this occurs, a message will appear in the main window and drop-down menu, explaining that the hardware has turned off the fans. This is why fan control may not always be available.
We’re continuing to explore potential solutions, but the hardware design of these newer models may limit the control third-party software like TG Pro can offer. We’ll keep investigating, but these challenges are tied to Apple’s evolving hardware architecture. -
M4-series Macs: Why fan control is unavailable when fans are powered offSimilar to the previous generation, on certain newer Mac models, including the M4-series, fan control is managed directly by the system’s hardware. When the hardware powers off the fans, TG Pro (or any other third-party app) is unable to override this behavior. During these times, a message will appear in the main window and drop-down menu, indicating that the fans are powered off. This is why fan control may not always be available.
We continue to investigate possible solutions, but the hardware design of these newer models imposes restrictions on third-party software like TG Pro. As Apple’s hardware architecture evolves, these limitations may remain a challenge, but we’ll keep working to improve what TG Pro can offer. -
QR Factory
-
Do the QR codes created by QR Factory expire, and who owns them?QR codes created with QR Factory are yours to own and do not expire. The app generates QR codes locally on your device, ensuring that no data is transmitted or stored externally, giving you complete control and ownership.
QR codes from QR Factory remain functional indefinitely, as long as the data they represent (e.g., a website URL, contact info, or text) stays valid. Unlike many online QR code generators, QR Factory does not impose expiration dates, advertisements, or redirects.
Some online services may create temporary QR codes or insert ads to monetize their platform, potentially compromising user experience and privacy. QR Factory offers a secure, private, and ad-free way to create QR codes that you fully control and can use for as long as needed. -
Does Tunabelly Software host the created QR codes?No, the QR codes created with QR Factory are not hosted by us.
The app generates QR codes directly on your device, and all data remains local. This means that Tunabelly Software does not store, transmit, or host any of your QR codes, ensuring complete privacy and control over the codes you create. You can save, print, or share your QR codes as needed, without any external involvement. -
Can the URL of a QR code be changed after it has been created and published?QR codes created with QR Factory 3 are static, meaning they cannot be modified to use a different URL once generated. Each QR code directly encodes the original URL, so creating a new QR code is necessary if the URL needs to be updated.
For those needing a dynamic solution where the final URL can be redirected, a URL shortening service can be used. This approach generates a short URL that can be embedded in the QR code and redirected as needed, providing more flexibility after creation. -
How do I upgrade to QR Factory 3?Customers who have previously purchased QR Factory 2.x are eligible for a significant discount on the Lifetime Access option to upgrade to QR Factory 3. Instead of the normal price of $29.99 USD, it's only $9.99 USD (localized to different currencies). It's a one-time purchase and will include all future updates and features for free. It will look similar to this:

This discount will automatically be offered as long as the older QR Factory 2 is on the Mac. It doesn't matter if it's the website or App Store versions, either one will work, however for the website version it must be registered.
Once that's purchased, you'll have unlimited access to both the Mac & iPad versions (use the Restore Purchases button for any new installs). -
Can I batch create codes from a CSV file?Yes, QR Factory supports batch creation from a CSV file. Using a spreadsheet app like Numbers, Microsoft Excel, Google Sheets, or any other CSV-compatible editor on macOS, iOS, or the web, it’s easy to set up columns for each parameter (e.g., URL, text, contact info) and a row for each QR code to generate.
For detailed instructions and examples, see How to create multiple QR codes using a CSV file. QR Factory has been tested to generate up to 100,000 QR codes in a single batch with no issues, making it an efficient way to create large numbers of QR codes at once. -
Is there an in-app purchase to create batch codes?QR Factory 3 offers a comprehensive set of features at a single price, with no additional in-app purchases required. This includes the ability to create an unlimited number of QR codes using the bulk export feature. All functionalities, including batch code creation, are fully accessible without extra charges.
-
What formats can the QR codes be saved as?They can be saved in four different formats. PNG/TIFF for bitmap, or PDF/EPS for vector (both are great for printing).
-
What colorspaces are supported?Here are the various colorspaces supported for each format:
PNG: RGB, Grayscale
TIFF: RGB, CMYK, Grayscale
PDF: RGB
EPS: RGB
We wish all colorspaces were available for every format, although due to limitations in both the formats and macOS, this isn't currently possible. -
What's the maximum pixel size that can be saved?For bitmaps, it's 4096 by 4096, although on some systems we've been able to create 20000 by 20000 pixels successfully. For vector, it's unlimited since vectors are drawn based on shapes and not pixels.
-
Are unicode characters (such as Umlaut) supported?Yes!
-
How does the in-app verification work?When you verify your QR code inside the app, it reads it using the same code that a scanner app (like for an iPhone) would use. If it passes this test then it will be readable by any well written scanning app.
-
Can I scan a QR code that's outside the app (ex: in Safari) ?Not in the current version, although we're looking at adding this feature soon.
-
Can I import an existing QR code?Not in the current version, although we're looking at adding this feature soon.
-
I can't import a CSV that was exported from Numbers.There was an issue in Numbers 3.6 where it was possible that it would export a CSV file using semicolons as the delimiter instead of commas. We recommend updating to at least Numbers 3.6.1 and re-exporting your file again as a CSV so it has the proper commas.
-
Excel/Numbers exports a CSV file that has semi-colons instead of commas. How do I fix this?Depending on the system setting for the region, it's possible that Excel or Numbers will use semi-colons instead of commas when exporting to a CSV file. If this happens, QR Factory won't be able to properly import the CSV file since it's assuming the values are separated by commas. To resolve this, change the character used to separate values to be a comma: https://superuser.com/questions/988756/how-can-you-change-mac-excel-2011-to-separate-using-commas-not-semicolons.
-
Why can't I use a transparent background when exporting as PDF?The issue is that macOS saves PDFs in version 1.3 format which doesn't support transparencies, so when QR Factory exports a PDF any transparent background gets changed to white. The next version, 1.4 does support this although macOS doesn't, so it's a bit tricky. We're looking into the possibility of using a 3rd party PDF library instead of macOS to create them although this isn't a simple process to replace it.
One alternative is to export the QR codes as TIFF or PNG since both of those formats support transparent backgrounds. QR Factory can output up to 4096 x 4096 which helps to offset the fact these are bitmap formats. -
Is the display order of name, company, and email in contact codes from QR Factory customizable when scanned by an iPhone?After thorough testing, it has been observed that on iOS devices, if an email is provided, it will be displayed at the top of a new contact along with the name, in place of the company name. This is a default setting by iOS and cannot be altered within QR Factory. For more details, a Stack Overflow post delves into this behavior: Why does the email replace org and title in iOS contacts when a VCF file is scanned?.
-
How to insert new lines in text for a QR code
When creating QR codes in QR Factory 3, the method to add new lines in the text varies depending on the type of QR code being generated.- For most text areas: To insert a new line, simply press
Option-Enterinstead of the usualEnterkey. This will move the text to the next line. - For the note for a Person QR Code: Due to the specific encoding requirements of a vCard (the structure used for embedding personal information in QR codes), the note must be a continuous block of text. However, new lines can still be added using specific escape characters. This method ensures compatibility with both Android and iOS devices using their built-in camera apps for scanning QR codes. Here's what to add:
- To add a single new line, insert
\nat the desired point in the text. - For a new line with a blank line in between, use
\n\n.
Example:
This is a note.\n\nThis will be on a new line with a blank one between this and the previous line.
- For most text areas: To insert a new line, simply press
-
Disk Diet
-
Is it safe?Yes! There have been over 60,000 downloads and only an exceptionally small percent have had any issues after running Disk Diet. In fact, almost all the issues where in very early versions and those have been long resolved.
-
I can't select my drive.In the rare case this occurs, please run Disk Utility to repair disk permissions. If this doesn't solve it, try reseting Disk Diet by removing it's preferences. This can be done by going to the Finder, choosing the "Go" menu, then "Go to Folder…". Paste in "~/Library/Containers" and click "Go". When the list of folders appears, move the "com.tunabellysoftware.diskdiet" folder to the trash and then empty the trash.
-
Why do I have to choose folders at the start?All apps on the Mac App Store have to run in a sandbox which prevents Disk Diet from being able to access anything on your drive until you give it permission. By choosing the appropriate folders in the choose dialogs, it gets permission to access the necessary files and folders to do its job.
-
How do I choose the Applications or Library folder?Disk Diet will default to the correct folder to choose automatically, although it seems that sometimes the OS will decide to show a different folder. If this happens, please choose the following folders:
For Applications, choose the Applications folder at the top level of the drive.
For Library, click on your home (user) folder, then choose the Library folder. -
How do I choose the System Logs folder?Disk Diet will attempt to default to the correct folder to choose automatically, although sometimes it does require choosing it manually (this only needs to be done once).
The folder to choose is located at /private/var/log. It will looks something like this:
-
Why isn't it finding much to clean?There are generally two reasons for this:
1) Disk Diet has just been run and the system is in a very clean state.
2) The user account that is being used is not an administrator which prevents Disk Diet from being able to access certain system folders. -
Why is it so fast?Disk Diet can run through a clean very quickly, especially on SSD drives. The main reason it is so quick is that it's designed from the ground up to use Grand Central Dispatch, which allows it to efficiently use all CPU cores. This allows Disk Diet to clean more than one area at a time (ex: Caches and Logs).
-
Why do the caches reappear?Some of the caches that Disk Diet cleans up are old and unnecessary. However there are a small amount that are constantly used so they get re-created by either the system or apps immediately after Disk Diet runs. Usually the amount of space these take up is small compared to the amount of old ones that Disk Diet cleans up.
-
How do I get Mail Downloads & Trash to work on macOS 10.14 (Mojave) and newer?Starting with macOS 10.14 Mojave, Apple changed the security model so that apps no longer have access to anything related to Mail, Trash, Safari and Time Machine backups, even if the user has chosen these folders (or even the home Library folder). Then in macOS 10.15 Catalina, that list expanded to include the Trash as well.
These instructions also apply to macOS 11 Big Sur and macOS 12 Monterey.
To allow Disk Diet access to both the Mail Downloads and Trash folders to clean them, you must manually add it to the list of apps that have "Full Disk Access".
To do so, follow these steps:
• Open the System Preferences
• Click the Security & Privacy icon
• In the list on the left, scroll down and click Full Disk Access.
• If the list of apps on the right is greyed out, click the lock icon in the bottom left to authenticate.
• In the list of apps on the right, either drag the Disk Diet icon from the Finder into the list, or click the plus icon and choose Disk Diet from the Applications folder.
• If Disk Diet is currently open, it will prompt to relaunch it. Make sure to allow this or it won't have proper access until it's relaunched.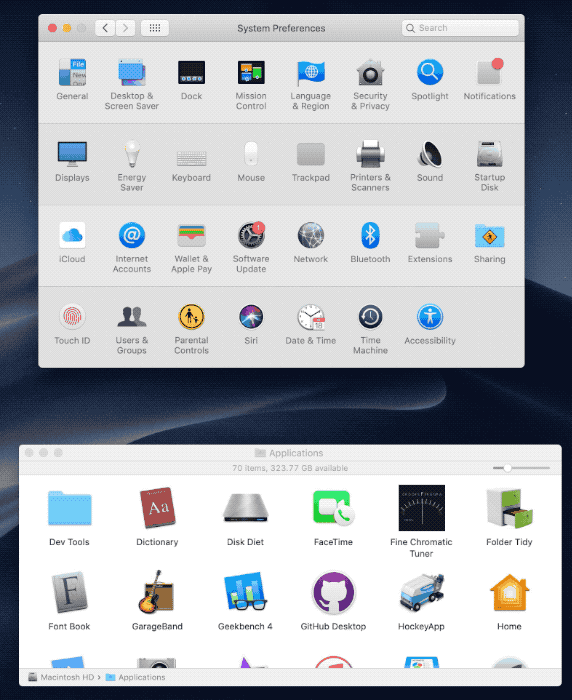
-
How do I get everything to work on macOS 10.15 Catalina?It's the same issue for getting Mail Downloads to work on macOS 10.14 Mojave, and emptying the Trash on macOS 10.15 Catalina, which now requires full disk access.
Just follow the simple instructions for giving full disk access, restart Disk Diet and every area will be available to clean.
This also now applies to macOS 11 Big Sur and macOS 12 Monterey. -
System logs and unused applications/languages aren't being removed. How do I fix this?Most likely the Disk Diet helper app isn't installed which allows it to remove System Logs, Unused Applications and Extra Languages. The app should prompt to install on launch although if it doesn't, the helper app can be downloaded manually from here.
Once it's downloaded, open the installer and enter the Mac admin password when prompted, then restart Disk Diet and it will be able to remove the above areas. -
Why is the free space not matching up to what the Finder shows?Disk Diet uses the standard file system calls to determine the amount of free space along with other values, such as the capacity of the drive. The value in Disk Diet can be different from what's shown in the Finder because the later takes into account the space that can be freed up by storing some files in iCloud Drive.
The values shown in Disk Diet are exactly the same as the ones in the Disk Utility app, since it also doesn't have the ability to determine what the Finder can. -
Folder Tidy
-
Does it work with external drives?Folder Tidy will work with any drives, as long as they are indexed by Spotlight. It relies on this in order to be able to quickly determine the properties of each file. Otherwise, it would be exponentially longer to check each file individually.
If it's not working properly with an external drive, check out this FAQ entry, which gives some tips on how to try and resolve it. -
Is there a tutorial on how to use the app?Yes! Head over to the Folder Tidy Tutorial and check it out.
-
Can I change the order of the rules?Yes, starting with version 2.6 it is possible to change the order by simply dragging a rule to a different spot in the list.
-
How fast is it?Starting with Folder Tidy 2.7.2, we've optimized it to use all available CPU cores and be a lot faster at deciding how to sort the files it finds. For an example of speed, to sort through and move 90,000 files, it takes Folder Tidy about 10 seconds on a 2018 MacBook Pro with a 6-core i7.
-
Can I create my own custom rules?Absolutely. The custom rule editor is incredibly powerful. You can add as many predicates as you'd like to make the simplest or most complex rules you need. To add a custom rule, simply open up the Preferences, choose the "Rules" tab, then click the plus button in the bottom left If you have any specific questions about how to make a rule, please feel free to email us anytime at support@tunabelly.com.
-
Can I undo the a tidy?Yes, when the tidy is finished you will see a dialog with a button labeled "Undo". Clicking this will move all the files and folders back to their original locations, plus it will remove any new subfolders that are empty.
Please note that the option to undo that specific tidy won't be available after quitting the app.
-
How does it handle multiple files with the same name?Folder Tidy will handle files that have same name by renaming them using the same logic as the Finder. For example, if three files are being moved into the "Movies" folder and they are all named "My favourite movie.mp4", here's how they will be renamed:
First one: "My favourite movie.mp4"
Second: "My favourite movie copy.mp4"
Third: "My favourite movie copy 2.mp4"
Note: If the files are moved back to their original locations through an undo, they will all be renamed back to their original names. -
Can I move all files of a certain name or type to a folder?For sure, that's what Folder Tidy is all about. For example, if you'd like to move all PNGs that include "water" in the name, you can easily set this up as a custom rule.
-
Can I move files into subfolders inside the main tidied folder?Yes. Using a custom rule, simply add a forward slash and the name of the subfolder. For example, say you have a custom rule to move all PNGs that are over 20MB and you want them to go into a folder named "Large" inside a main "Tidied Pictures" folder, . In the custom rule, the subfolder name would be "Tidied Pictures/Large" instead of just "Tidied Pictures".
-
Does it matter if my files have extensions?No. Folder Tidy doesn't rely on file extensions since they might not be there. For example, if there is a file called "My Awesome Project" and there is no extension, what type is it? To determine this, Folder Tidy uses the metadata that Spotlight creates when it indexes the file.
-
How can I have it only move files (and no folders) ?Make a new rule, set the conditions to "All", and add an entry that has "Kind" "is not" "folder". That will cause Folder Tidy to not move any folders, but still continue to look inside them.
-
I have folders within folders and so on. How do I get Folder Tidy to look inside all of them?In the Preferences, click the "Options" tab and choose "Tidy files inside subfolders".
-
Where are the rules stored?For the Mac App Store version:
The rules are stored at ~/Library/Containers/com.tunabellysoftware.cleanmydesktop/Data/Library/Preferences/com.tunabellysoftware.cleanmydesktop.plist
An easy way to copy these to your Desktop is to run the following command in the Terminal app: cp ~/Library/Containers/com.tunabellysoftware.cleanmydesktop/Data/Library/Preferences/com.tunabellysoftware.cleanmydesktop.plist ~/Desktop/
Then to move it back (ex: on a different Mac), run the following command: cp ~/Desktop/com.tunabellysoftware.cleanmydesktop.plist ~/Library/Containers/com.tunabellysoftware.cleanmydesktop/Data/Library/Preferences/com.tunabellysoftware.cleanmydesktop.plist
For the Website version:
The rules are stored at ~/Library/Preferences/com.tunabellysoftware.cleanmydesktop.plist
An easy way to copy these to your Desktop is to run the following command in the Terminal app: cp ~/Library/Preferences/com.tunabellysoftware.cleanmydesktop.plist ~/Desktop/
Then to move it back (ex: on a different Mac), run the following command: cp ~/Desktop/com.tunabellysoftware.cleanmydesktop.plist ~/Library/Preferences/com.tunabellysoftware.cleanmydesktop.plist
-
How do I include files for an entire year?This can be achieved by creating a custom rule and using the "is after" and "is before" predicates.
For an "is after" rule, the date will start for anything with a timestamp including and after 12:00am (midnight). For an "is before" rule, the date will start for anything before 12:00am (midnight).
For example, to move all screenshots from the year 2020 to a folder, it would use the following rules. These would include all files staring at midnight Jan 1, 2020 all the way up to just before midnight Jan 1, 2021.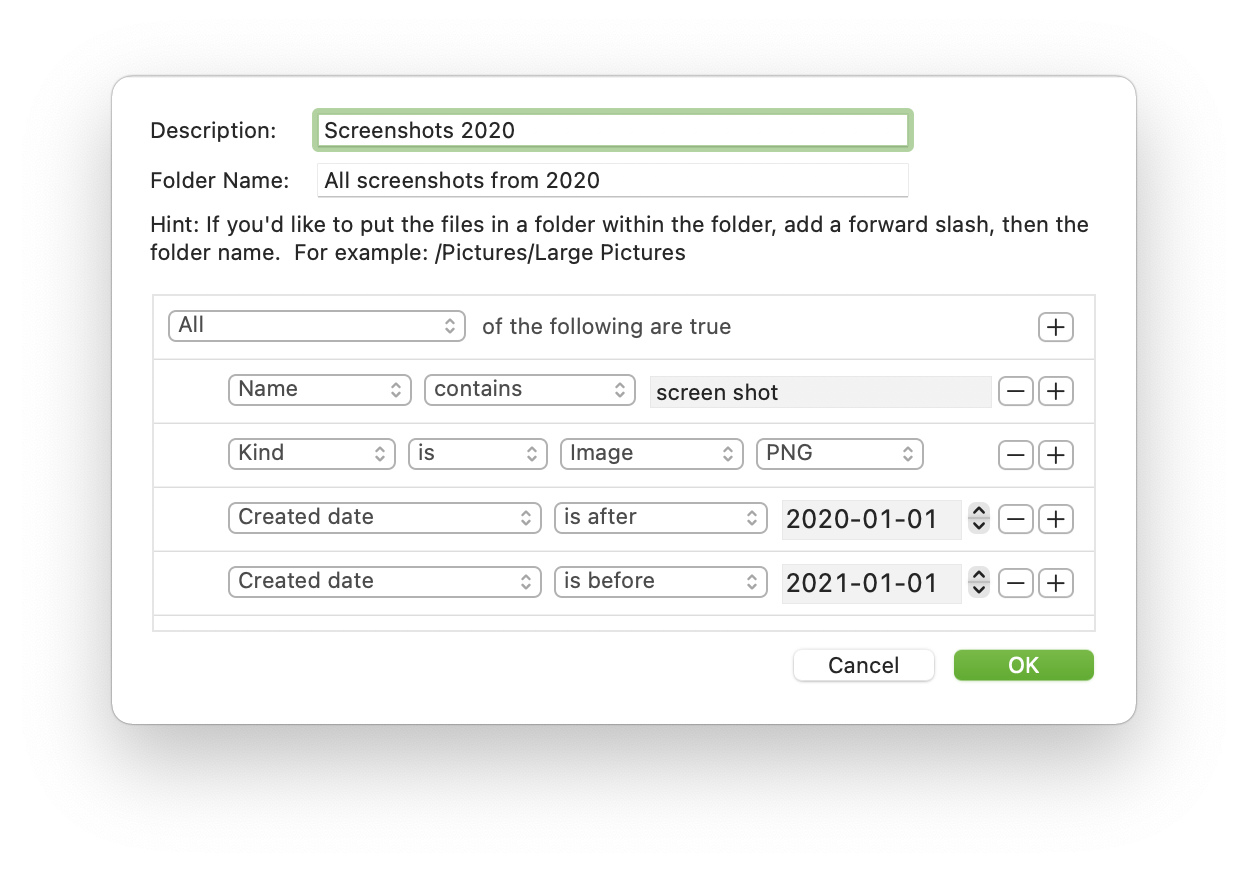
-
It keeps showing zero files moved, how do I fix this?In some cases, due to constraints outside Folder Tidy's control, it may not be able to move any files successfully.
The first steps to try and to ensure that the folder isn't in the Spotlight ignore list, and to rebuilt the index for the drive. In cases where Folder Tidy cannot move any files, even when it should, it's most likely that the Spotlight index is corrupted and needs to be rebuilt. If this is the case, searching for the same types of files in the Finder will also give zero results. Here's how to resolve these two issues:
How to check if the files are ignored by Spotlight
How to rebuild the Spotlight index (it's important to do the entire drive and not just one folder)
Alternatively, some folders are protected by later versions of macOS and it's possible that Folder Tidy does not have access. Or if the files are in iCloud Drive or an external drive, please take a moment to give the following a try depending on which issue it is.
For files in the Downloads, Desktop and Documents folder
For files stored in iCloud Drive
For files on an external drive
-
Folder Tidy can't move any files because the Spotlight metadata is not availableFolder Tidy relies on the Spotlight metadata available for each file in order to determine which files to move and to where. Without this metadata, a lot of the sorting rules cannot work properly, which can affect if any files are moved during a tidy. Spotlight is the system service that indexes all the files on the Mac so it's possible to search both the contents of a file and the information about it extremely quickly and efficiently.
Usually, if this information is not available, it's due to one of two reasons:
1. The most common is the source folder chosen in Step 1 within Folder Tidy is either itself ignored or a parent folder is ignored by Spotlight for indexing. To check if a folder is on the ignore list, here's how depending on the version of macOS being used:
macOS 13: Open the System Settings, click on the "Siri & Spotlight" row, then click the "Spotlight Privacy…" button at the bottom right. Then verify that the folder or parent folder isn't in the list of folders to ignore. If it is there, remove it by selecting the row and then using the minus button.
macOS 12 and older: Open the System Preferences, click on the Spotlight icon, then choose the Privacy tab. Then verify that the folder or parent folder isn't in the list of folders to ignore. If it is there, remove it by selecting the row and then using the minus button.
2. If the folder is not on the ignore list, then it's possible the Spotlight database needs to be rebuilt. Here's how to rebuild it using the same ignore folder list as in the previous step, and alternatively through the Terminal. -
None of the files are moved from the Downloads, Desktop or Documents foldersWith the later versions of macOS, when an app attempts to access a file in a protected folder, which includes the Downloads, Desktop and Documents, a prompt will appear asking if the app can have access. If that's denied, then it will silently fail without any errors since to Folder Tidy, there are zero files in the folder (since that's what it gets from macOS).
To resolve this, here's how:
1. Quit Folder Tidy if it's already open.
2. Open the System Preferences.
3. Click on the Security & Privacy icon.
4. Click the Privacy tab.
5. On the left, click the Files & Folders row.
6. On the right, scroll down until you see Folder Tidy.
7. Click the lock icon in the bottom left and follow the prompts.
8. Check the checkbox for the specific folder (Downloads, Desktop or Documents).
9. Open Folder Tidy and it should be able to move the files properly now.
10. If it still is unable to move any files, rebuilding the Spotlight index usually resolves it.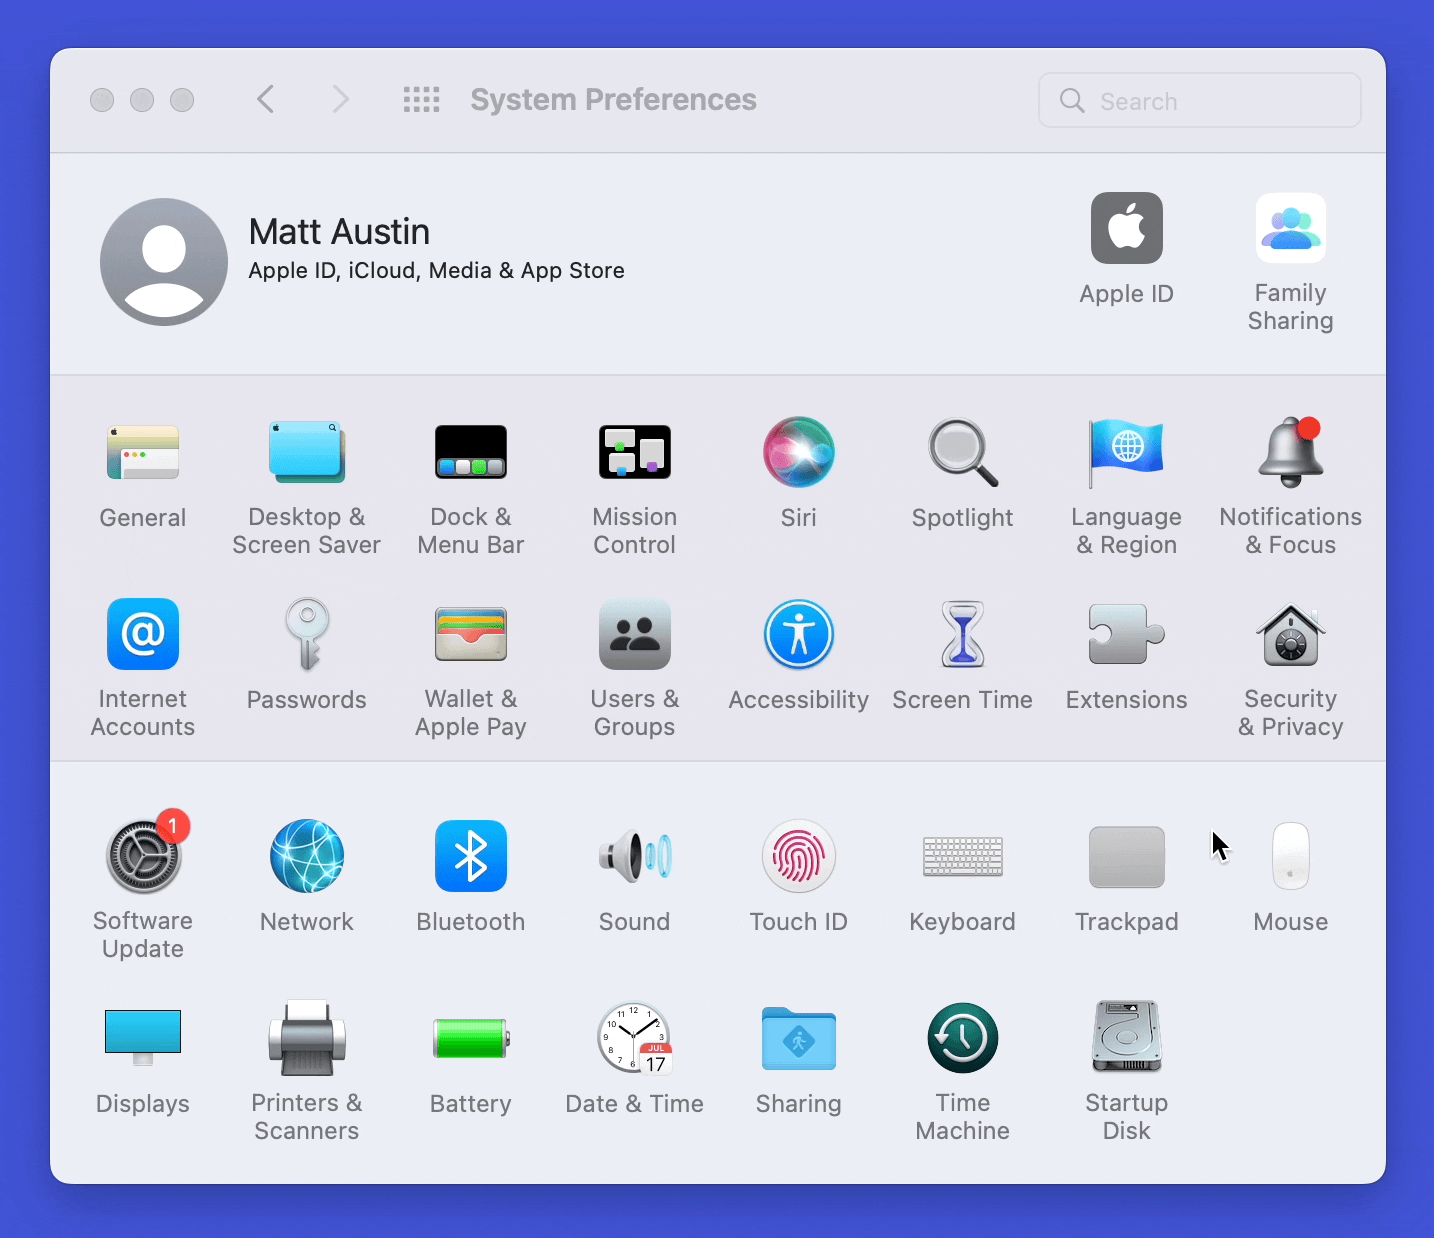
If this doesn't resolve it, please feel free to email us at support@tunabelly.com.
-
None of the files that are only stored in iCloud Drive are movedThe way iCloud Drive works is it will show a placeholder file in the Finder for files in both the Desktop and Documents folder, with the actual file on the iCloud servers. Then when the file is opened by a user, it's downloaded to the Mac so it's available.
When a file is just a placeholder, there will be an icon next to the file:
This will prevent not just Folder Tidy, but any app that will try to move/sort files from actually moving it, because the Spotlight metadata is not available because the file isn't actually there (it's just a placeholder). For anyone curious, to test this, open up the Terminal, type mdls (with a space after it) and then drag a file that didn't get moved into the Terminal window. This will paste the full path to the file. It should look something like this:
mdls /Users/macuser/Desktop/icon.png
Press enter and if the file is actually on the Mac, it will show a whole bunch of Spotlight metadata, otherwise it will show an error that it couldn't find the file.
To fix this, click the iCloud icon that is shown above and it will download the files so they are available to be used or moved. Once that's complete, Folder Tidy will be able to successfully sort the files. -
None of the files on an external drive are being moved properlyFolder Tidy relies on Spotlight for the file metadata to determine which files to move and to where. If this data isn't available, then it won't be able to move any files.
Occasionally, it's possible that an external drive isn't indexed. To try and resolve this, first make sure that the drive isn't being ignored by Spotlight. To do so, open the System Preferences, click the Spotlight icon and then the Privacy tab and make sure the external drive isn't listed. If it is, remove it from the list and allow Spotlight to reindex it.
As a last resort, try rebuilding the Spotlight index for that drive.
Note that if the drive is being used for Time Machine or is formatted for a PC, it may not be able to be indexed by Spotlight. -
How can I force Spotlight to re-index my drive?Since Folder Tidy relies on Spotlight to quickly retrieve the metadata for each file, if the database isn't available or is corrupted, then it's possible that none of the files will be moved. Apple has a support page that explains how to re-index Spotlight.
If that doesn't work, there is an alternative method that involves using the Terminal. Here's how:
1. Go to the Finder, then open Applications > Utilities > Terminal, or choose "Terminal" from the Launchpad.
2. In the Terminal, type and run the command: sudo -i
3. Enter your Mac administrator password when prompted and press return.
4. Paste in the following commands one at a time and press return after each one:
mdutil -Ea
mdutil -ai off
mdutil -ai
5. After the last command is run, there should be a message saying that indexing is enabled. -
Why can't I move any files from iCloud Drive or other cloud storage providers?Folder Tidy is a macOS app designed to help you organize files and folders on your local computer based on file details or custom rules. Due to the inherent risks associated with cloud storage providers, such as DropBox, Box, OneDrive, iCloud Drive and others, Folder Tidy does not support organizing files stored in these locations.
The primary reason for this limitation is to prevent potential file loss or broken shared links, which may occur during the reorganization process. Cloud storage providers handle file syncing and sharing differently, and changes made to files by Folder Tidy could result in conflicts or irreversible data loss. To ensure the safety of your files and maintain the integrity of shared links, we recommend using Folder Tidy exclusively for local file organization. -
Texty for Google Messages
-
Why are some of the emoji symbols blank?The font that Google uses to display the emojis isn't fully supported by macOS 11 and below. To work around this, we added special code in Texty to try and fix it, and we were mostly successful although there are still a few symbols that can't be properly displayed. Our best guess is it has to do with the version of Unicode that the font requires, and the WebKit based view in macOS 10.14, 10.5 & 11 that Texty uses doesn't fully support it.
However on macOS 12 and above, all the emoji symbols are able to be properly displayed. -
How can I make notifications remain on the screen until I close or reply to them?If you find that notifications disappear too quickly and would like more time to read or respond to them (note that inline replies require a Pro subscription), you can change the notification settings for Texty. Follow these steps to modify the notification display:
1. Access the "System Settings" or "System Preferences" (depending on your macOS version) from the Apple menu.
2. Navigate to the "Notifications" section.
3. Locate "Texty" in the list of applications and select it.
4. Change the notification type from "Banners" to "Alerts". It should look like this now: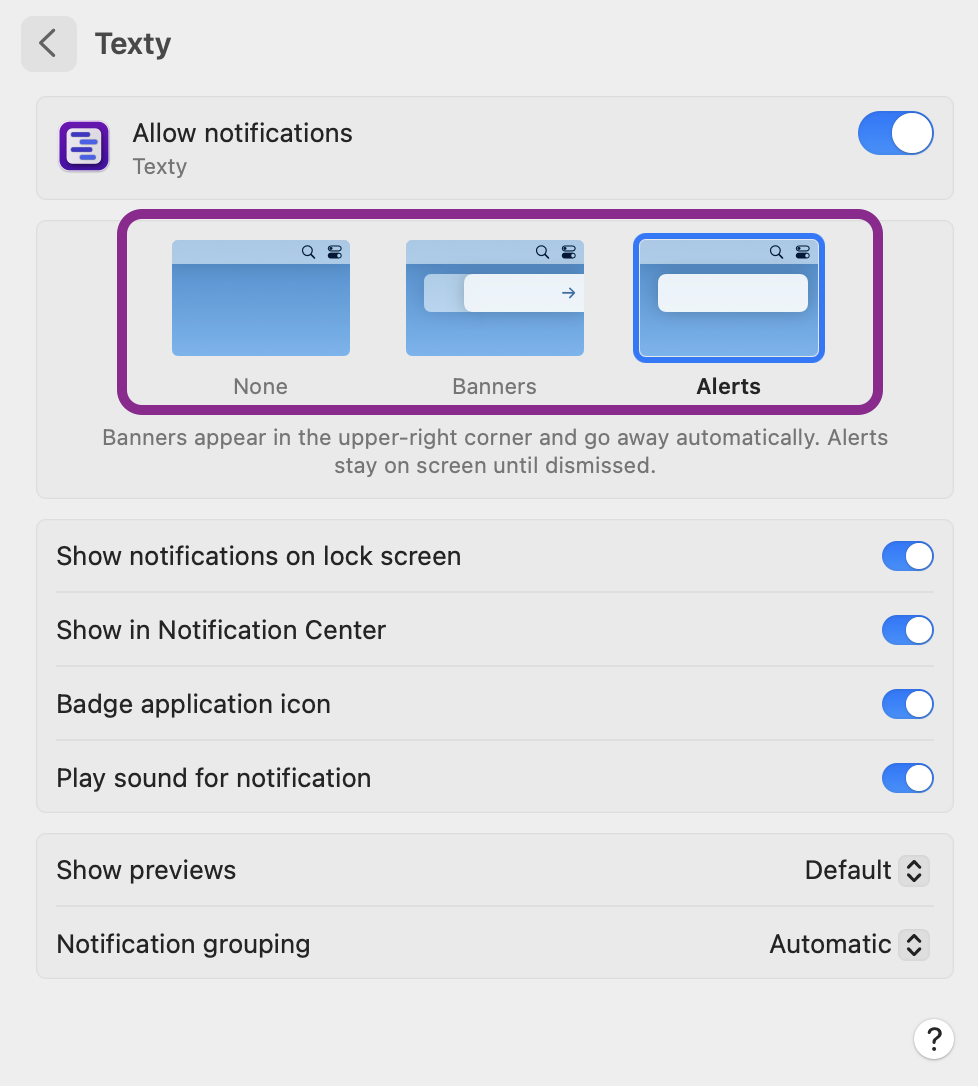
After completing these steps, all future notifications will remain on the screen until you either dismiss them using the close button, click on them to open Texty, or use the Reply button to send a response. -
Why aren't notifications appearing when a new message arrives?Texty displays a notification in the Notification Center when a new message is received. However, there are three scenarios that might prevent notifications from appearing:
1. If Texty is the foremost application, notifications will not be displayed, as this is the default behavior for macOS. This also applies to built-in Apple apps, such as Mail or Safari.
2. If the option to show notifications in Texty is disabled, they will not appear. To verify that this option is enabled, open Texty settings and ensure the checkbox for "Show notifications for new messages" is checked.
3. If the prompt to allow Texty to display notifications was denied, it will not be able to show them. This prompt should have appeared when Texty was first launched, with the option to allow or deny notifications. You can change this setting by following these steps:
A. Access "System Settings" or "System Preferences" (depending on your macOS version) from the Apple menu.
B. Navigate to the "Notifications" section.
C. Locate "Texty" in the list of applications and select it.
D. Enable the toggle at the top of the window labeled "Allow notifications". It should look like this after being enabled: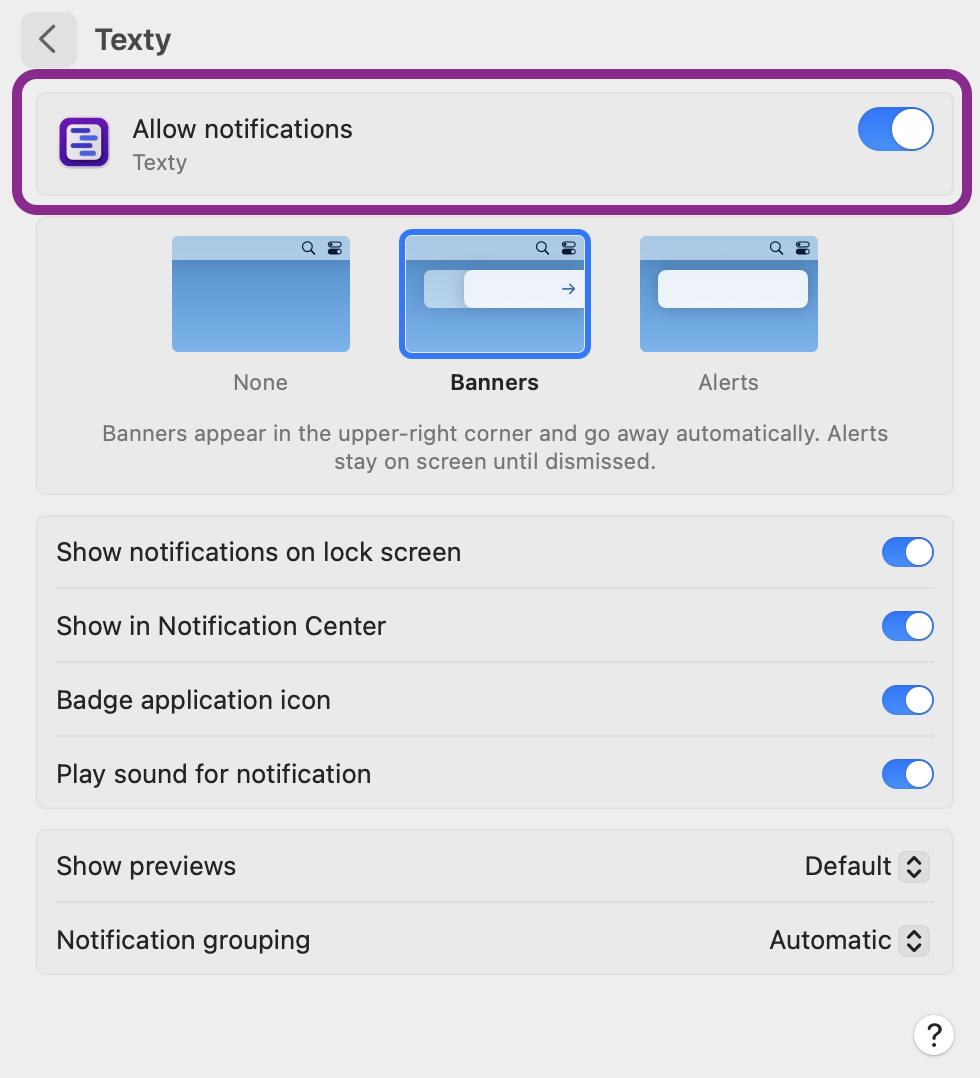
If the notifications are still not displaying properly after trying these steps, please feel free to email us at support@tunabelly.com, and we'll be happy to assist you. -
Silent Start
-
The startup chime isn't silenced when headphones are plugged in. Why is this?The issue is how macOS allows apps to access the audio data source when headphones are plugged in. It ends up preventing Silent Start from accessing the built in speakers to mute them before the restart/shutdown.
-
Endurance: CPU Stress Test
-
Why does macOS show 100% for the battery level, but it's a bit lower in the app?For the battery level, it may be slightly different than what macOS is showing because of way it's calculated.
The way it works is Endurance divides the current capacity by the maximum capacity, then multiplies it by 100 to give a proper percentage. For example:
Current capacity: 59
Max capacity: 100
Battery level = (59 / 100) * 100 = 5.9 * 100 = 59%
For some Mac models (ex: M1 Pro & M1 Max), there are reports online of people seeing 100% in macOS after using Safari for an hour, then it jumps down to 95% or so all of the sudden. This may also account for some of the discrepancy seen when the battery is almost fully charged. -
HandsFree 2
-
Does it send any call/text/contact data to a server?No. HandsFree never sends any of the call, text message or contact data outside the app, unlike some other methods (ex: iCloud). Since the app uses a local Bluetooth connection, everything is done locally and none of it ever leaves the Mac.
-
Boom 2 is causing audio distortion in calls.There is an issue where if Boom 2 is installed on the Mac, there can be audio distortion in calls where it's unusable. If this is happening, try disabling or un-installing Boom 2 and see if it is resolved. If it isn't, please let us know at support@tunabelly.com.
-
Can I make a call using a URL like tel://123-4567 ?Yes, HandsFree 2 supports making calls using either a tel:// or tbhandsfree:// url scheme.
For example, tel://1-613-560-1000 would open HandsFree 2 and dial that number. -
Why can't I send a text message (SMS) with my iPhone?The answer lies in the way that iOS implements the Bluetooth Message Access Profile (MAP).
Apple has chosen to only support reading text messages over Bluetooth. To learn more about the profiles supported on iOS, please see:
iOS: Supported Bluetooth profiles -
Why can't I use the text messaging feature with my Android phone?1) Android 4.4 is required since this is the first version that includes the ability to send and receive SMS (text messages) over Bluetooth. To do this requires that the phone supports the MAP (Message Access Profile). If your Android phone has a lower version, please check with the vendor for any software updates.
Here are the technical details from Android 4.4 Kit Kat Developer Notes: "Bluetooth MAP lets your apps exchange messages with a nearby device, for example an automotive terminal for handsfree use or another mobile device."
2) Make sure that the phone has given access to messages to the paired Mac so HandsFree can access the existing ones and send new ones. To check, open the Settings on your phone, choose Bluetooth, then click on the gear icon next to the Mac that's paired and make sure the "Message Access" checkbox is checked. It should look like this:
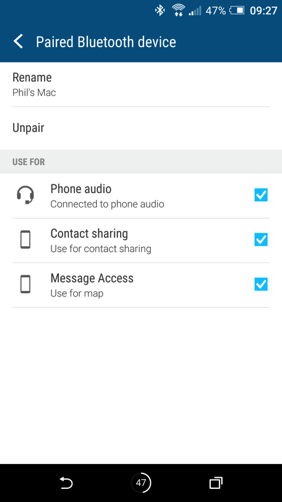
-
Why are there limitations when using an iPhone?The issue is the way that Apple has chosen to implement the MAP (Message Access Profile) for Bluetooth. The profile has a list of features that are mandatory in order to say that a device supports it. iOS has an incomplete implementation and lacks the following features:
1) iOS does not support sending text messages over Bluetooth. See Bluetooth Accessory Design Guidelines for Apple Products (Section 2.2) where it states “iOS devices do not support sending messages using MAP”.
2) iOS does not support listing existing text messages over Bluetooth.
3) iOS does not send any picture attachments in text messages over Bluetooth.
If Apple fixes these issues in a future iOS update then we'll make sure that HandsFree 2 exposes these features for all iPhone users. -
I've been asked to send a Bluetooth Reporter package. How do I create one?The good news is it's pretty easy. Create a Bluetooth Reporter package by clicking on the Bluetooth icon in the menu bar (it's near the top right of the screen) while holding down the Option key then choosing "Create Diagnostic Report on Desktop...". Once the file is created, please email it to us at support@tunabelly.com so we can investigate what's going on.
-
I can't see the app icon in the menu bar.This can happen if the current application that's running (like the Finder or Safari) have a lot of menus, leaving a small amount of space for the status icon on the right of the menu bar. It will usually occur when lots of other apps have status icons, leaving no room for HandsFree 2. If you find this happening, there are 3rd party utilities such as Bartender which can help to organize all the menu bar apps to give more space.
-
Are both parties recorded when recording a call?Yes, both the the incoming and outgoing parties are recorded, so the whole conversation is captured.
-
Are outgoing calls recorded too?Yes, both incoming and outgoing calls can be recorded. It doesn't matter who initiated the call.
-
What format are the recording saved in?They are saved in AAC MPEG-4 audio format (.mp4) which are playable by pretty much any audio app, including QuickTime Player, iTunes and even using Quicklook.
-
Is it compatible with El Capitan (10.11) ?Yes, it's compatible with El Capitan, including 10.11.4, which is the latest version available at the time this was written.
-
Why aren't my phone contacts visible in the app?This feature is available in HandsFree 2.3 and up. Updating to the latest version will show the contacts from both the Mac and the phone. Also, on the phone it ay be necessary to allow access to the Contacts - to do this open the Settings -> Bluetooth then press the gear icon next to the computer that it's paired with and make sure the checkbox for Contacts is checked.
-
How do I uninstall HandsFree 2?It's fairly simple. First off, quit HandsFree 2, then drag the app icon to the trash.
The only other files that may be installed are the Address Book plugins. They can be removed easily by going to the Finder, clicking the Go menu (while holding the Option key at the same time) and choosing "Library". Once that opens, go to the "Address Book Plug-Ins" folder and move the following two files to the trash:
HandsFreeABDialer.bundle
HandsFreeABSMS.bundle -
Why is there no sound from my Bluetooth headset?Initially, we thought it would be possible to use a Bluetooth headset paired to the Mac with HandsFree 2 for the audio (in and out). Unfortunately, when this is used with the app, there is no audio from the headset.
We looked into this and asked Apple for help on figuring out what's going on. Their explanation is that macOS cannot send audio over both SCO (which is used between the Mac and the phone for audio) and A2DP (which is used between the Mac and the headset for audio).
For a proper solution, use either the built-in speaker/microphone combo or a USB headset (this works really well). -
Is AppleScript supported?Yes, as of HandsFree 2.5, AppleScript is supported to control some of the features of the app.
To view the AppleScript dictionary, open the Script Editor app and choose "Open Dictionary..." from the File menu. Then choose HandsFree 2 and in the window that appears, choose the "HandsFree Suite" row.
It will look like this: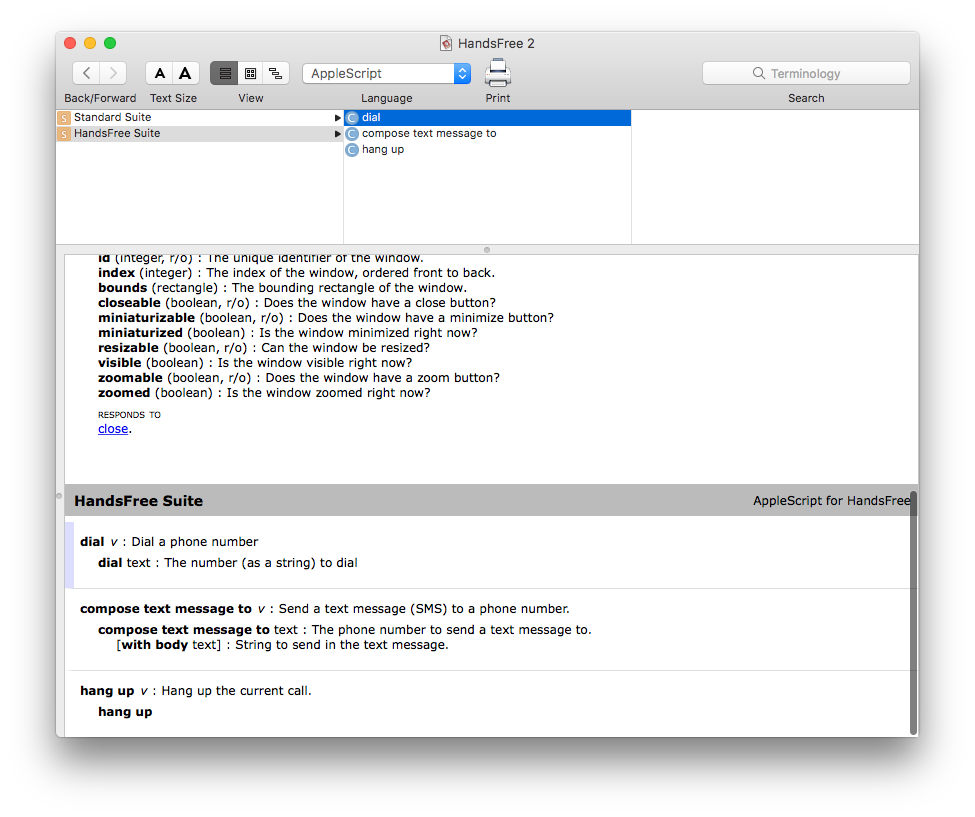
For example, to open HandsFree 2, dial a number, wait 10 seconds, then hang up use a script like this:
tell application "Finder"
open application file "HandsFree 2.app" of folder "Applications" of startup disk
end tell
tell application "HandsFree 2"
dial "6135601000"
delay 10
hang up
end tell
To tell HandsFree 2 to compose a text message, use a script like this:
tell application "HandsFree 2"
compose text message to "6135601000" with body "This is a test SMS from my Mac."
end tell -
How do I use the Address Book (Contacts) app plugin?HandsFree 2 includes a plugin for the Address Book / Contacts app.
For the App Store version, the plugin must be installed manually since Apple won't allow it to be done automatically. For the website version, it will install it by itself. To install it, click the menubar icon and choose More -> Install Address Book Plugin.
In the Address Book / Contacts app, click on the phone type next to the number you'd like to dial.
Then choose "Call with HandsFree.
-
HandsFree
-
Which phones is it compatible with?The great news is it doesn't require a specific phone (ex: an iPhone). As long as the phone has Bluetooth 2.0 or higher, it will work with HandsFree. Almost all iOS, Android, Windows Phone and BlackBerry phones should work.
Currently, the only issue we've seen is between a 2011 MBA and an iPhone 5S. -
Will I get a notification if my phone is in silent/vibrate mode?Absolutely. As a bonus, you can choose whether or not a ring is played for incoming calls on your Mac if you'd like to keep it silent as well.
-
How do I search through my contacts?Use the in-menu quick search to find your contact without having to scroll through a long list.
-
How do I connect to my phone?First off, make sure that Bluetooth is turned on for both the Mac and the phone.
Then, put the phone into “discoverable” mode by going to the Bluetooth preferences on the phone. Then open HandsFree and in the dialog to connect to the your phone, you should see it there.
Choose it and follow the instructions to complete the pairing. -
I can't see any contacts, what's wrong?It's possible that HandsFree was denied access to the contacts when it requested it.
You can double check by going to Security & Privacy preferences, click the “Privacy” tab, then the “Contacts” icon on the left side. There should be a checkbox next to HandsFree like this: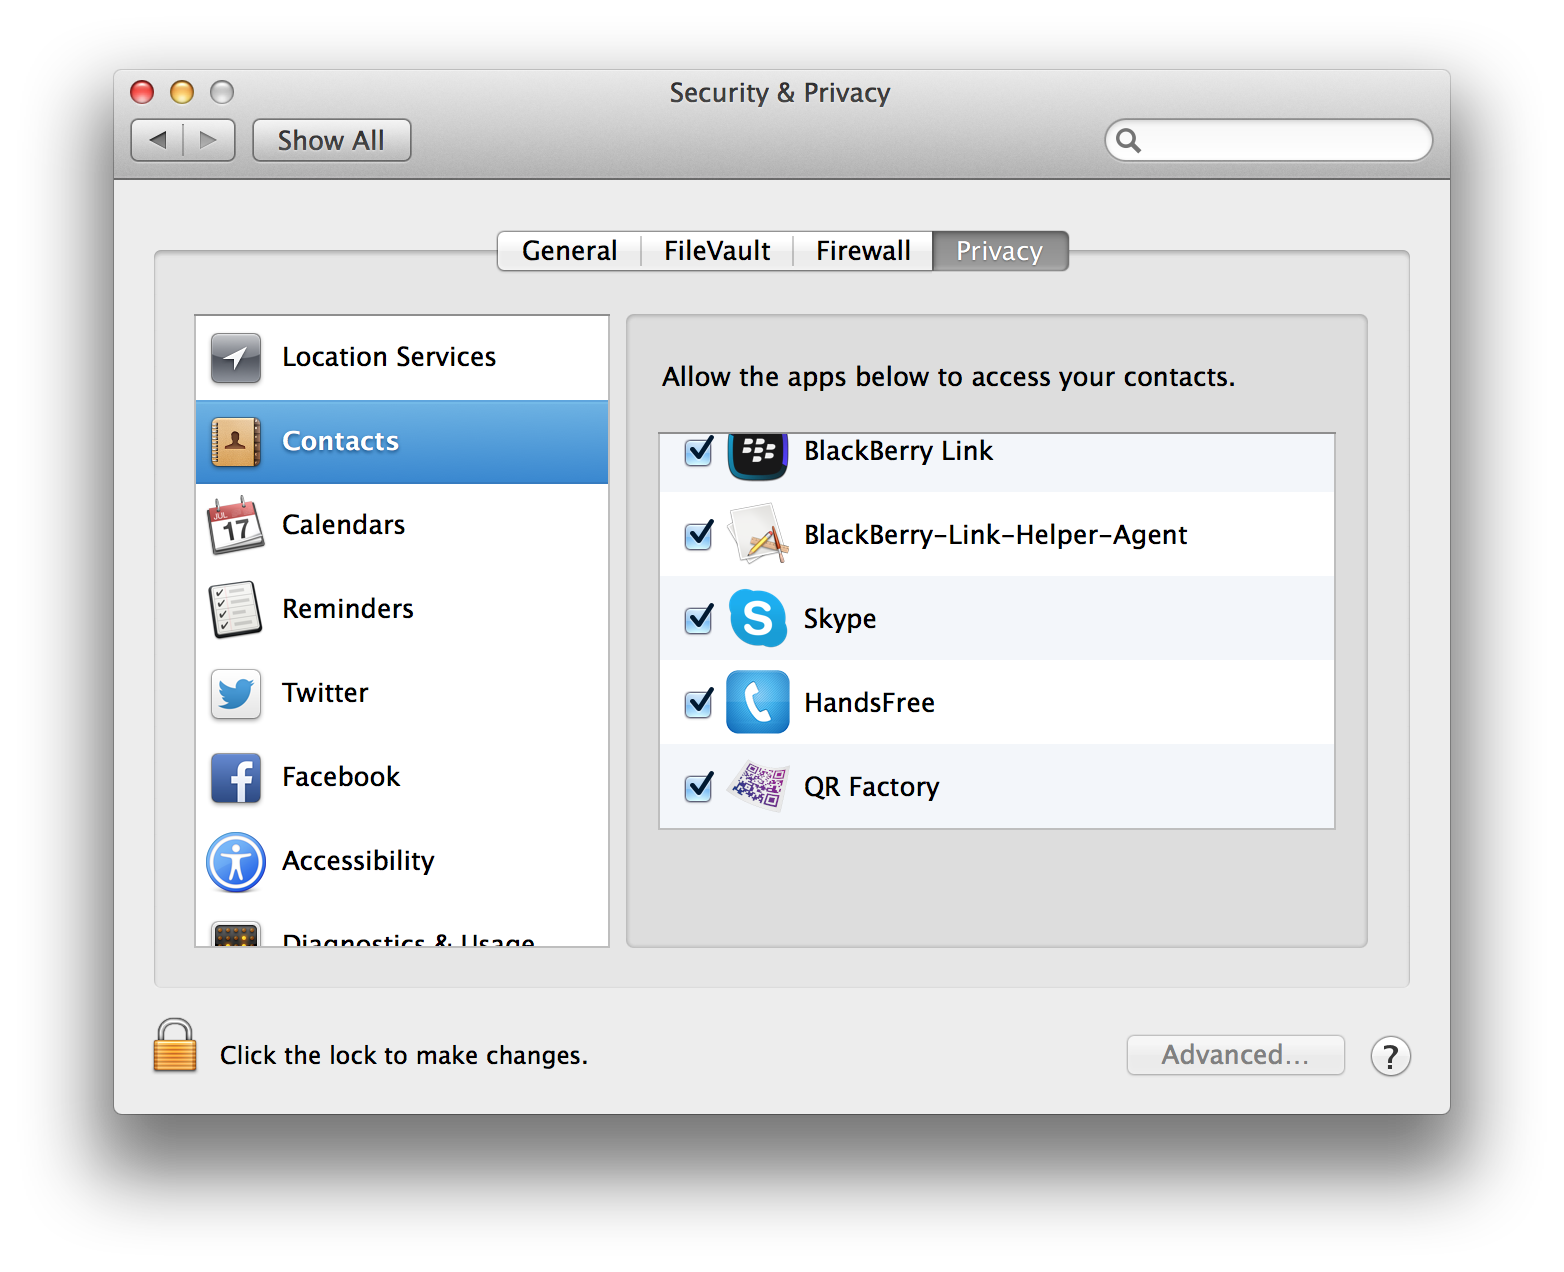
-
For some customers the voice quality is poor. Why is this?For a small number of customers, the voice quality has echoes or static. If this occurs please make sure the phone isn't too far away from the Mac since there is a limit of how far a Bluetooth connection will work properly.
If it still occurs, please email support@tunabelly.com so we can help get this resolved. -
Can I dial a number by highlighting it?Yes! Just highlight the number in almost any Mac app, right click and choose "Services" --> "Dial using HandsFree".
-
The app sometimes crashes when connecting to the phone or answering a call.These types of crashes are all related and are a bug in Apple’s Bluetooth framework. We have filed a bug report with them to get this fixed.
-
The audio sometimes has static or crackling noises. What's going on?There are random audio issues on some Macs. You may or may not experience this. If you do, the audio will have static or crackling sounds. We have filed both a bug report with Apple and have asked for Developer Technical Support (DTS) from them. We're actively working with them to resolve this.
If this does happen on your Mac and you'd like to help in fixing this, you can email us a Bluetooth Reporter package by Option-clicking on the Bluetooth icon in the menu bar then choosing "Create Diagnostic Report on Desktop...". Once the file is created, please email it to us at support@tunabelly.com so we can forward that on to the DTS team at Apple. -
It keeps disconnecting from my phone. How can I fix this?The first thing to check is to make sure that your phone isn't too far away from the Mac. Bluetooth has a fairly short range (30 feet or so) and it affected by solid objects like walls. So try moving the phone closer to the Mac, like on the same table, in your pocket or a few feet away.
Second thing to try is to restart both the Mac and the phone. This type of issue can occur when the Bluetooth stack gets messed up and after rebooting one or both devices it resolves itself.
If that doesn't resolve the disconnection issue, please create a Bluetooth Reporter package by Option-clicking on the Bluetooth icon in the menu bar then choosing "Create Diagnostic Report on Desktop...". Once the file is created, please email it to us at support@tunabelly.com so we can investigate what's going on. -
Temperature Gauge
-
Is the trial on the website the same as the Mac App Store version?No.
The trial is for TG Pro, which is a separate app. The pro version adds full fan control, hardware diagnostics, a full status menu and more. Learn more about TG Pro. -
Does it support both Celsius and Fahrenheit?Yes.
-
Can the fan speeds be controlled?We would love to add this into the current version although it would get rejected by Apple since it requires administrative privileges. So, we've added it to TG Pro, which contains full manual and automatic fan control.
-
Can the temperatures be exported?Yes. You can export the data to CSV format by going to the "Log" tab in the preferences, and turning on the "Log to File" checkbox along with "Use CSV Format".
-
My Mac is running really hot. Is this normal?Usually it is. On some of the MacBook Pro models, the CPU temperatures can get all the way up to 100C. When this happens, an intensive app (or apps) should be running and the fans should be running at full speed.
One way to try and reduce the temperature is to make sure there is enough ventilation around the Mac. If it's a laptop, you can try using a laptop stand to elevate it off the table.
If the fans aren't running or you think something is wrong with it, please get it checked out by a professional repair shop (such as independent ones or the Apple Store). -
My fans are always running at full speed. Is this normal?Yes, this is normal if the internal temperatures of the Mac are getting hot enough that they need to be cooled down. This occurs when applications use either the CPU or GPU intensively, such as gaming, rendering, watching HD movies, etc.
-
What does "Ambient Air" mean?This is the temperature around the motherboard in your Mac. Depending on where it is, it can either be hotter or cooler than the room temperature.
-
How can I see the maximum recorded temperatures?Move the mouse cursor over the row for the sensor you'd like to see. Wait a second and you'll see a tooltip with the temperature.
-
What does the number under the fan name mean?It's the current RPM (revolutions per minute) for that fan. The higher the number, the faster it is spinning.
-
I can't see the status icon in the menu bar.This can happen if the current application that's running (like the Finder or Safari) have a lot of menus, leaving a small amount of space for status icon on the right of the menu bar. It will usually occur when lots of other apps have status icons, leaving no room for Temperature Gauge. If you find this happening, try turning off the icon (and using just text) by going to the preferences and unchecking "Show Application Icon" and checking "Use Smaller Font".
-
I see a weird sensor name.This can happen when new Mac models are released and Temperature Gauge needs to be updated to use the proper sensors for that particular model. If you see this, please let us know by sending a screenshot (Cmd-Shift-3) and the name of your Mac model to support@tunabelly.com
-
Can I set alerts on specific sensors?The current version supports showing an alert if any sensor goes above the user defined temperature. We're working on adding in support so that you can set alert temperatures for each individual sensor.
-
Why do I only have a Right Heatsink? Is the other missing?No, everything is good. Depending on your Mac model, it might only show the Right Heatsink since that's the only heatsink (a piece of metal with fins that's used to dissipate heat) temperature sensor available.
-
Why doesn't it show my GPU temperature?This can be one of two reasons:
1) If you have a MBP 15" with both discrete and integrated graphics (GPU), it's possible that Temperature Gauge won't show it if it was launched when the integrated graphics were being used. For now, if you see this, try restarting Temperature Gauge.
2) If you have a MacPro, the GPU is on a separate PCIe card, and any temperature sensors on the card are not returned by the normal methods of getting the list of all sensors.
We're working on what the solution would be for both of these issues. -
I can't download Temperature Gauge from the Mac App StoreIf you've purchased Temperature Gauge and you need to re-download it and are having trouble with the Mac App Store not installing it, please try this:
- Remove all versions of TG and trash them. The best way to find them is to use Spotlight to search for "Temperature Gauge". If it finds any versions, hold down the Command key and double click on a search result and that will show it in the Finder, which makes it easy to drag to the trash.
- Restart your Mac.
- Download TG 4.1 from the Mac App Store by going to the Purchases tab, then clicking the "Install" button next to Temperature Gauge.
Once this is done, make sure to upgrade to TG Pro for free. TG Pro has full fan control, support for all the newest Mac models as well as all the latest improvements and fixes. -
I'm getting a message to re-download Temperature Gauge from the Mac App StoreThis message can appear due to Apple allowing their Mac App Store security certificate to expire before they issued a new one. For more information, see http://techcrunch.com/2015/11/12/all-mac-store-apps-stopped-working-due-to-expired-security-certificate/
-
Balance Lock
-
Why does the System Preferences still show the balance not centered?There is a bug in the System Preferences sound preference pane where if the audio balance (pan) is changed by an app, it doesn't always update. If you see this:

and you see this in System Preferences: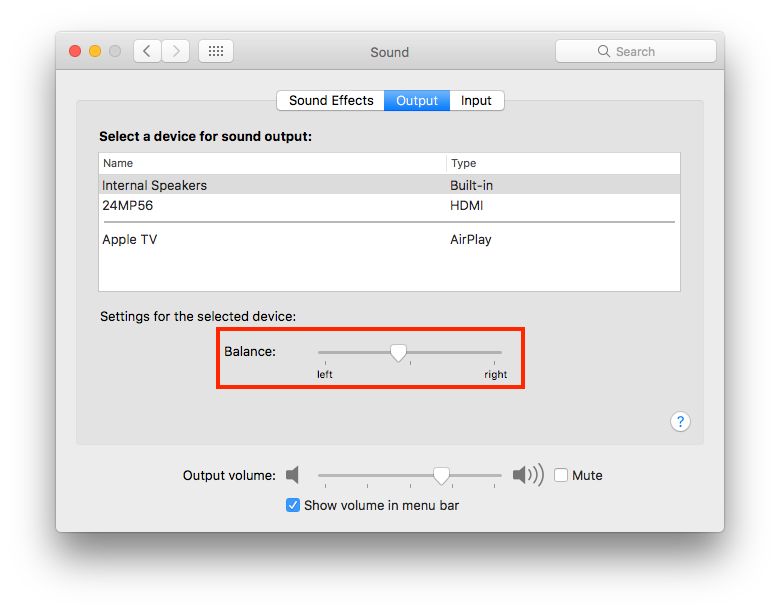
then either quit and re-open System Preferences or Open the Audio MIDI Setup app and check if both volumes are the same (which shows the balance is centered):