Folder Tidy Tutorial
Get the most out of your tidies
Translate this page:
This tutorial will guide through the different features of Folder Tidy. If you don't already have it, download the full version or check it out on the Mac App Store.
The main goal of Folder Tidy is to go through all the files in a folder and sort them into organized subfolders. For example, a messy Desktop could be cleaned up with all the loose photos moved into a folder labeled Pictures, all the spreadsheets into Spreadsheets and so on. It can be used with the built-in rules (almost 20 are included) or with custom rules based on powerful predicates.
The main goal of Folder Tidy is to go through all the files in a folder and sort them into organized subfolders. For example, a messy Desktop could be cleaned up with all the loose photos moved into a folder labeled Pictures, all the spreadsheets into Spreadsheets and so on. It can be used with the built-in rules (almost 20 are included) or with custom rules based on powerful predicates.
On Sale - SAVE 50%
Getting Started
Folder Tidy was designed to be as easy as possible yet flexible or advanced users. The first steps are to set up the folder to tidy and where to store the organized files.
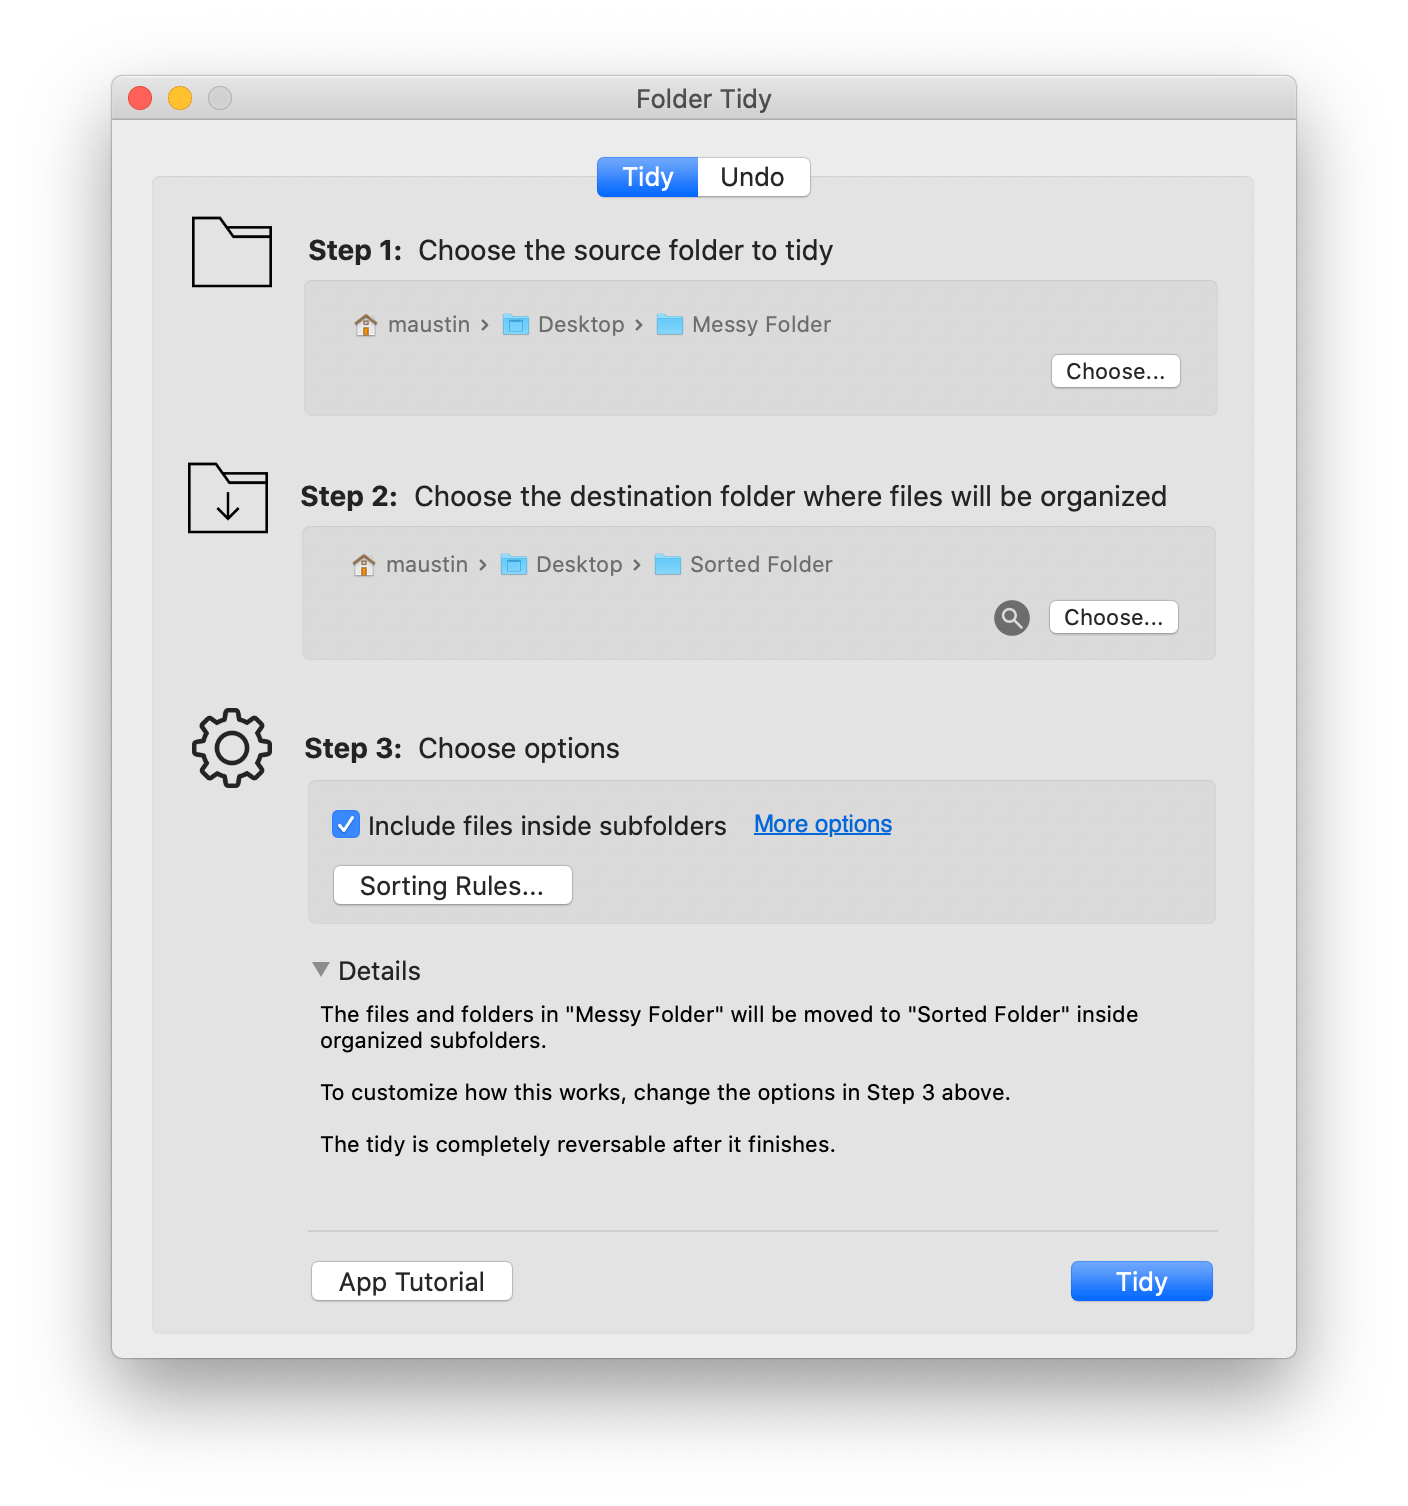
There are three steps needed in order to run a tidy. Each one is explained in detail below this screenshot, which is what the app will look like the first time it's opened.
There are three steps needed in order to run a tidy. Each one is explained in detail below this screenshot, which is what the app will look like the first time it's opened.
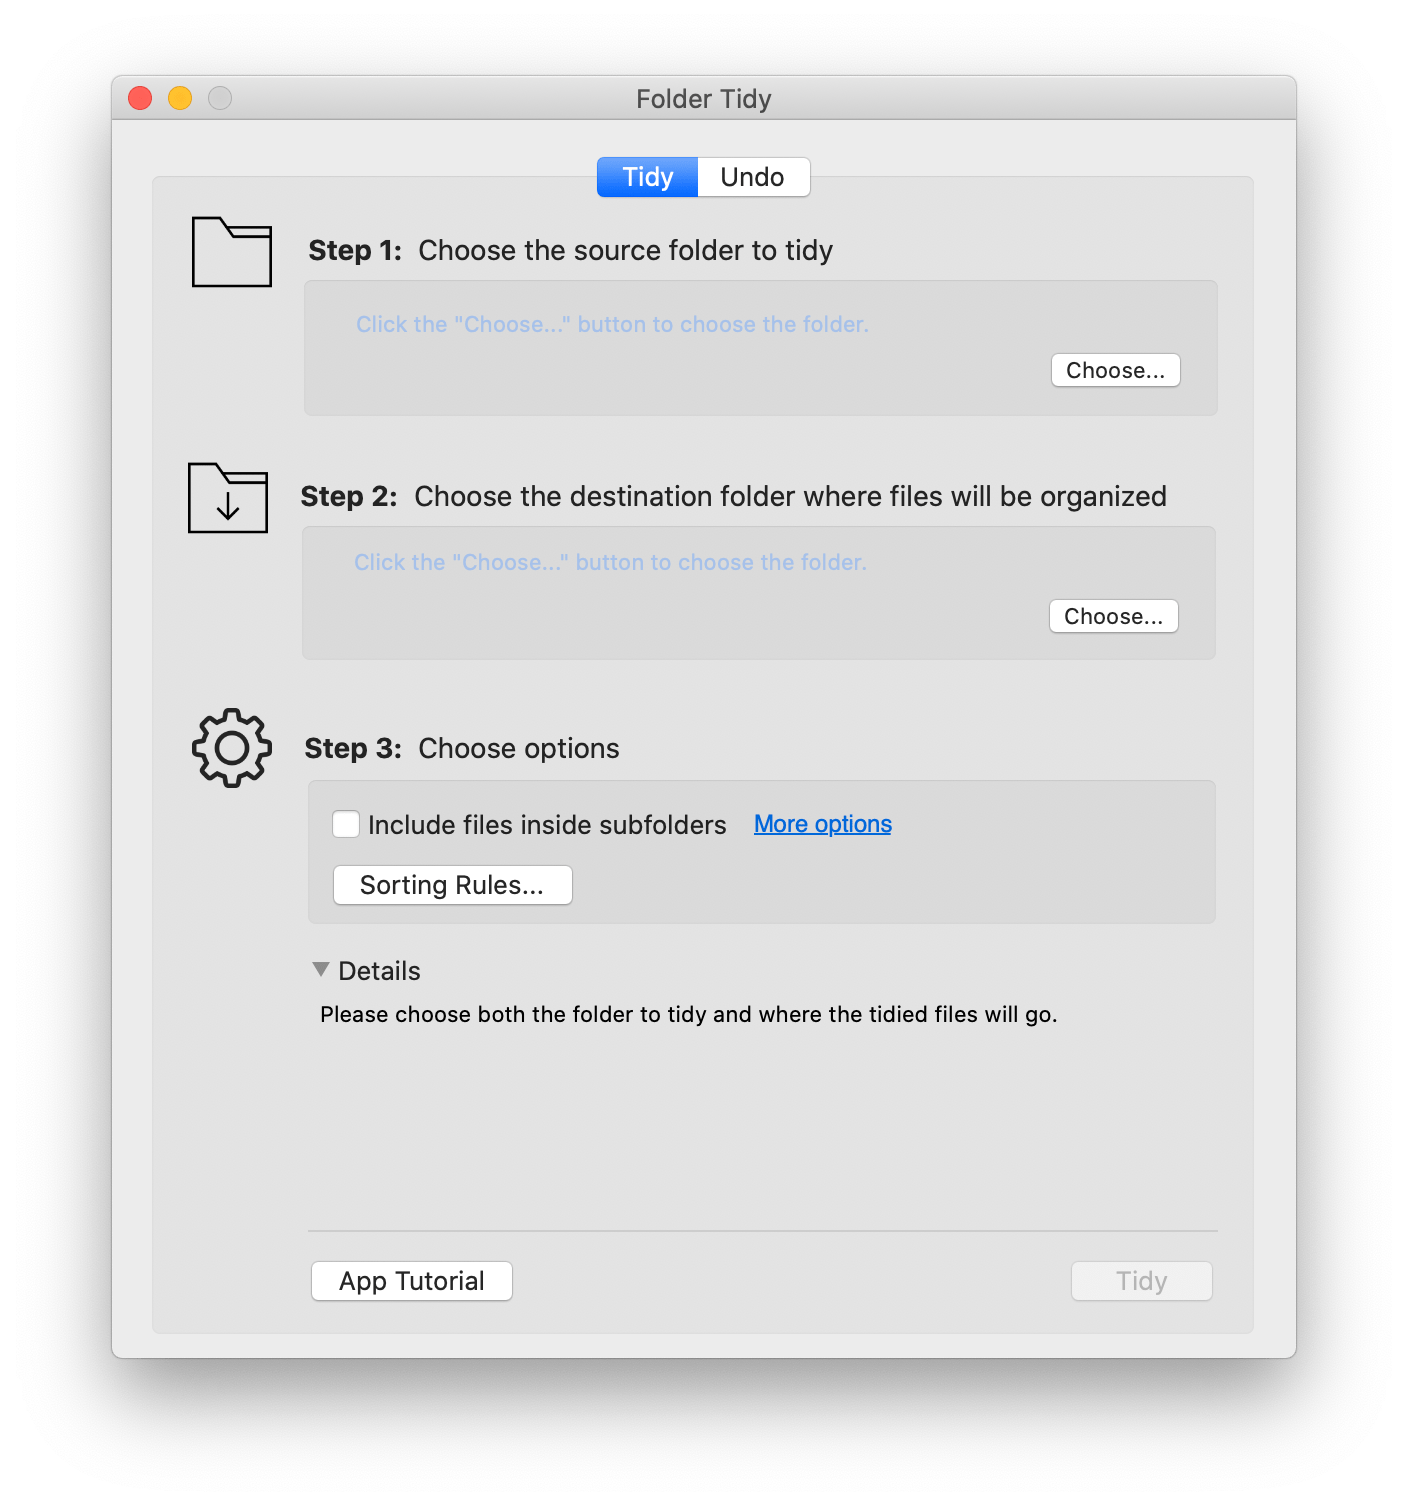
Step 1: First, choose which folder to tidy. That can be done by either clicking the "Choose…" button or dragging and dropping the folder from the Finder onto the light blue text. It can be any folder as long as the logged in user on the Mac has permissions to read the folder. This will be known as the "source folder".
Step 2: The next action is to choose which folder will store the sorted files. It can also be any folder as long as the logged in user on the Mac has permissions to write to it. Choosing is exactly the same as in the previous step. This will be known as the "destination folder".
Step 3: The final step is to decide which options to use for the tidy. By default it will not move files inside of subfolders and will have most of the built-in rules enabled. To allow it to recursively search through more than one level of folders, click the "Include files inside subfolders" checkbox.
To access more options like this, click the "More options" link.
Misc options

Here's what each option does in detail:
Hide all applications before running the tidy - This will hide every running application so the Finder is visible right before the tidy is run. This can be helpful if you have the folders open in the Finder and would like to see the files move.
Show tidied folder in the Finder - Once the tidy is finished, the destination folder will be opened and shown in the Finder.
Include files and folders that are labeled in the Finder - If this option is enabled, files and folders that have a label in the Finder will be included in a tidy. It can be handy to turn this off if the source folder has labels for all the important files and you'd like to move the rest to sorted folders.
Include files inside subfolders - By turning this option on, Folder Tidy will recursively go through all sub folders that exist inside the source folder and include them in the tidy. So for example, if Folder A --> Folder B --> Photo 1.png exists and Folder A is the source folder, then "Photo 1.png" will be moved to the appropriate place inside the destination folder.
Include folders that are empty - This option if enabled will ensure that even empty folders are included in the tidy. This is relevant since Folder Tidy has a default rule for moving all folders into a folder labelled "Folders" inside the destination folder. Whoa, that's a lot of folder references.
Skip contents of bundles - This option when enabled will allow Folder Tidy to look inside bundles such as applications or frameworks and move the files out and into sorted folders. Generally this isn't a good idea since modifying an application or framework will render it useless. This is why it's off by default.
Create top level folder with the current date and time - If this option is enabled, a folder will be created inside the tidied folder with the name of the source folder plus the current date and time. For example: "Messy Folder Files From Jul 11, 2015, 5.03.15 PM". This allows doing a tidy every day and having the files sorted not only by file type and rules, but also grouped together by when they were tidied.
Exclude Files & Folders
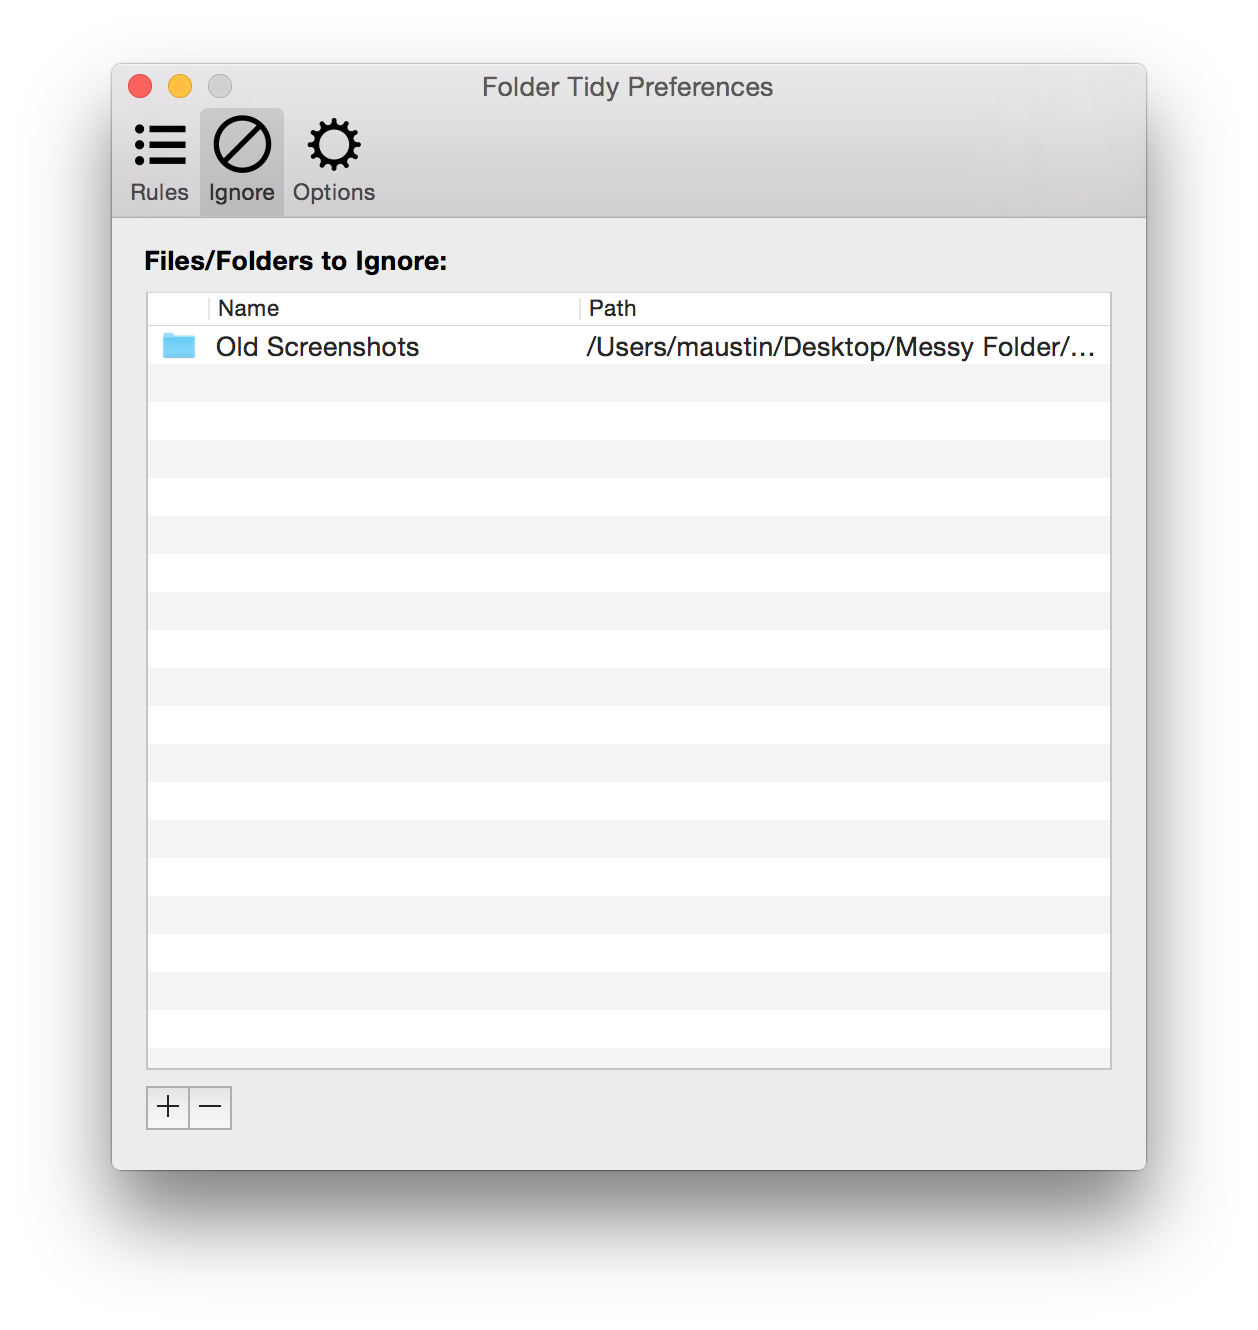
Sometimes there will be files or folders that Folder Tidy should ignore and not move, which is exactly what this list is for. Either drag the file or folder to ignore into the list, or use the plus button at the bottom right to choose. To remove an existing entry, simply click it once to highlight then either press the delete key or the minus button.
Tidy rules

The main feature of Folder Tidy is how it uses the rules to decide how the files get organized during a tidy.
A rule tells Folder Tidy which files will be moved and where they should go. For example, one of the built-in rules is labelled "Applications". This rule looks for all files from the source folder that are of the type application - this would include normal apps as well as command line apps. It would then move those matching files to a subfolder in the destination folder labelled "Applications".
Here are a few tips for using the rules effectively:
There are two different types of rules: Built-in, and Custom, both of which are described in more detail below.
A rule tells Folder Tidy which files will be moved and where they should go. For example, one of the built-in rules is labelled "Applications". This rule looks for all files from the source folder that are of the type application - this would include normal apps as well as command line apps. It would then move those matching files to a subfolder in the destination folder labelled "Applications".
Here are a few tips for using the rules effectively:
- Each rule can be enabled or disabled by using the checkbox next to it. To quickly turn all rules on or off use the "Turn All On" or "Turn All Off" buttons in the bottom right of the window.
- Rules can be reordered by dragging them.
- If there is a lock icon next to a rule that means it's a built-in rule and cannot be edited or removed.
- To edit a custom rule, simply double click it or click it once and choose the "Edit" button at the bottom left of the window.
There are two different types of rules: Built-in, and Custom, both of which are described in more detail below.
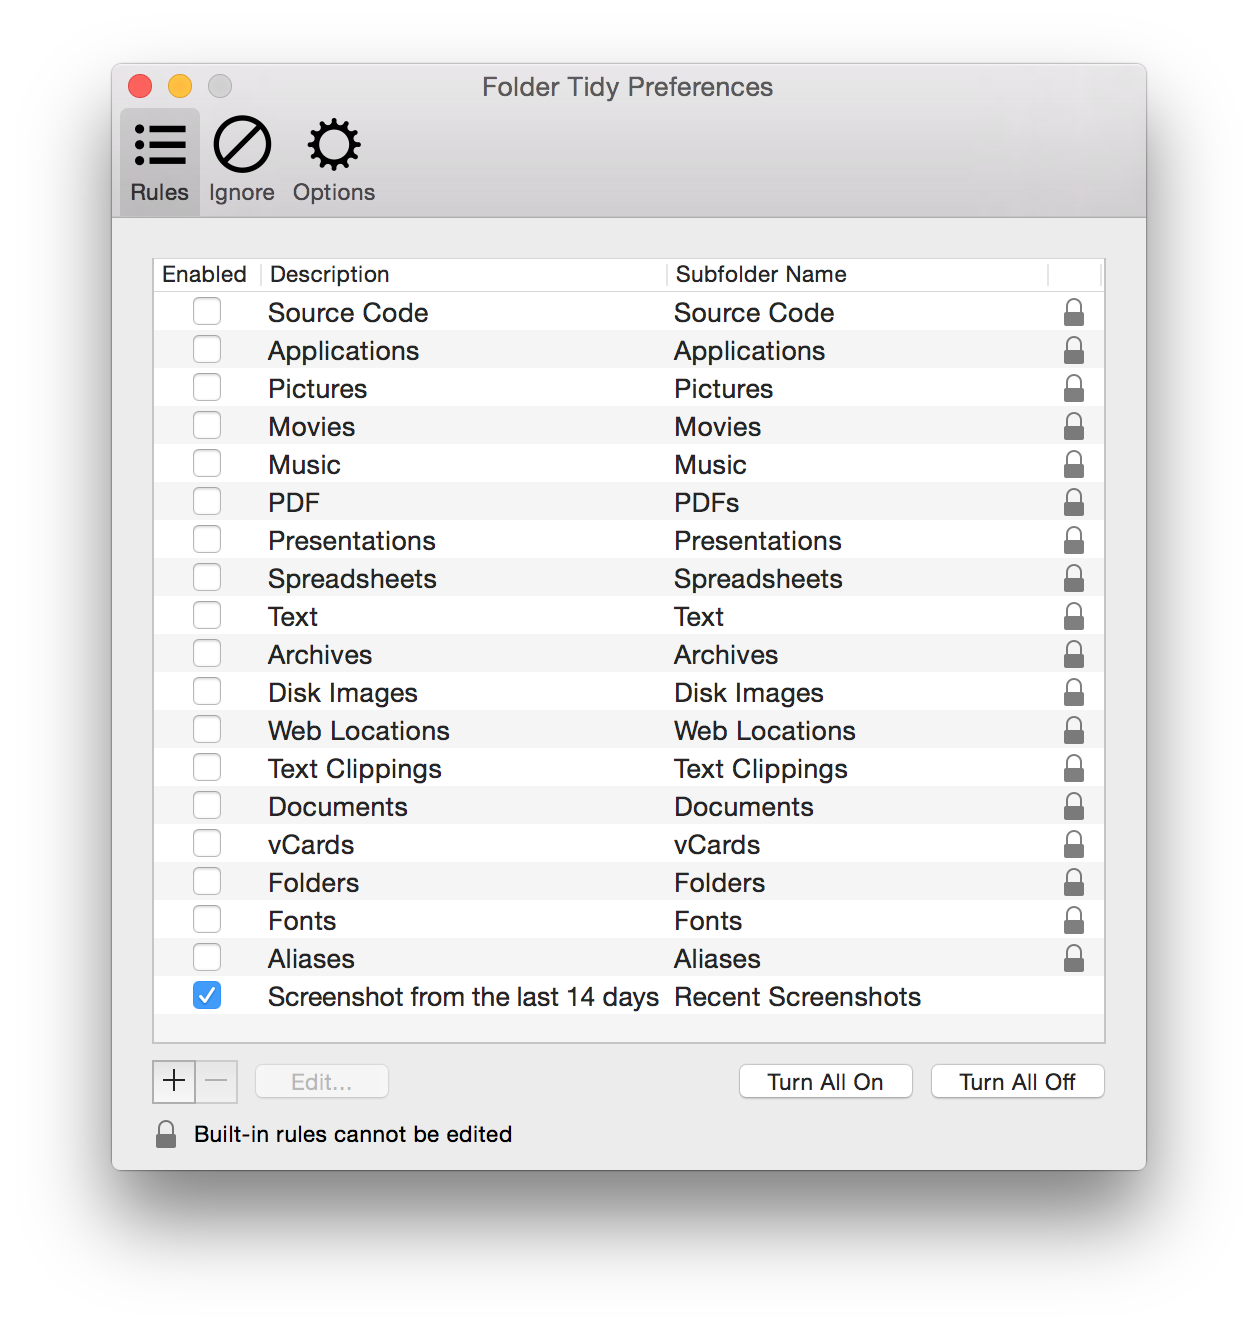
Built-in rules
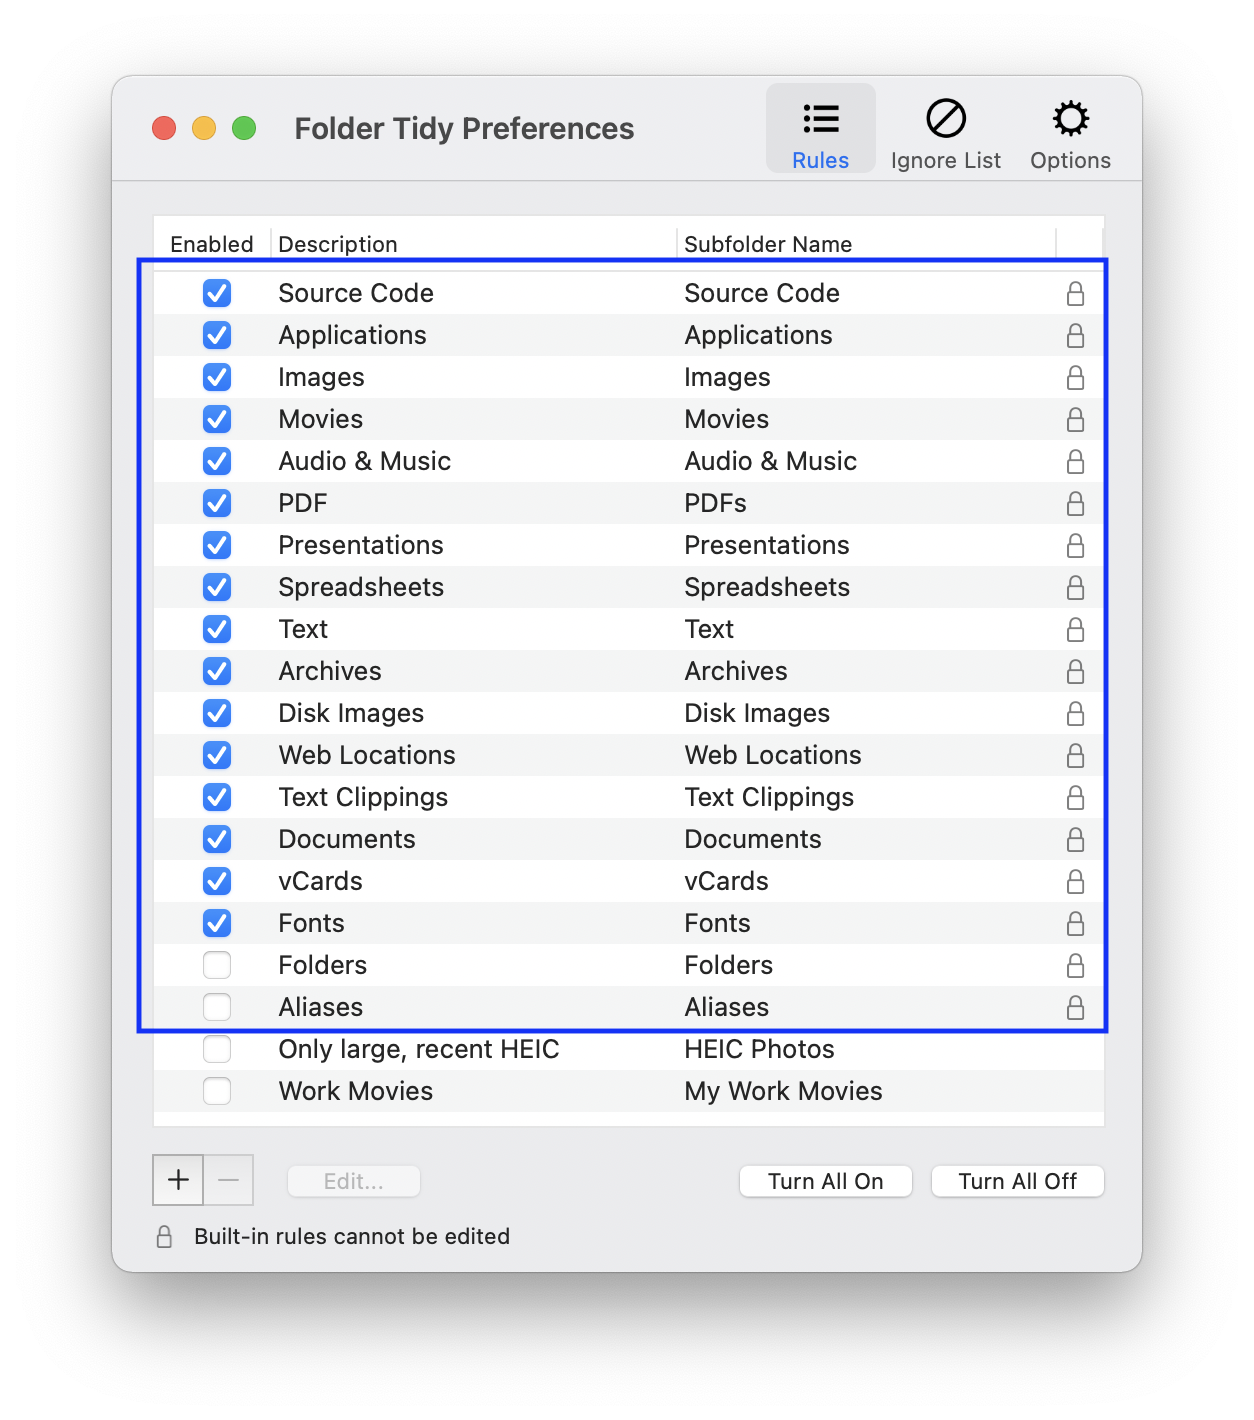
The built-in rules are all enabled by default with the exception of Folders and Aliases since those are generally less commonly used. Each rule has a lock icon to the right, which designates that it's not editable. The reason they aren't editable is because quite a few of the rules have a large number of predicates to ensure they only find the correct file types and showing this would be very tricky.
So to make it easier, they can't be modified, although they can be enabled or disabled by clicking the checkbox to the left of the rule. They can also be reordered by dragging and dropping them.
So to make it easier, they can't be modified, although they can be enabled or disabled by clicking the checkbox to the left of the rule. They can also be reordered by dragging and dropping them.
Custom rules
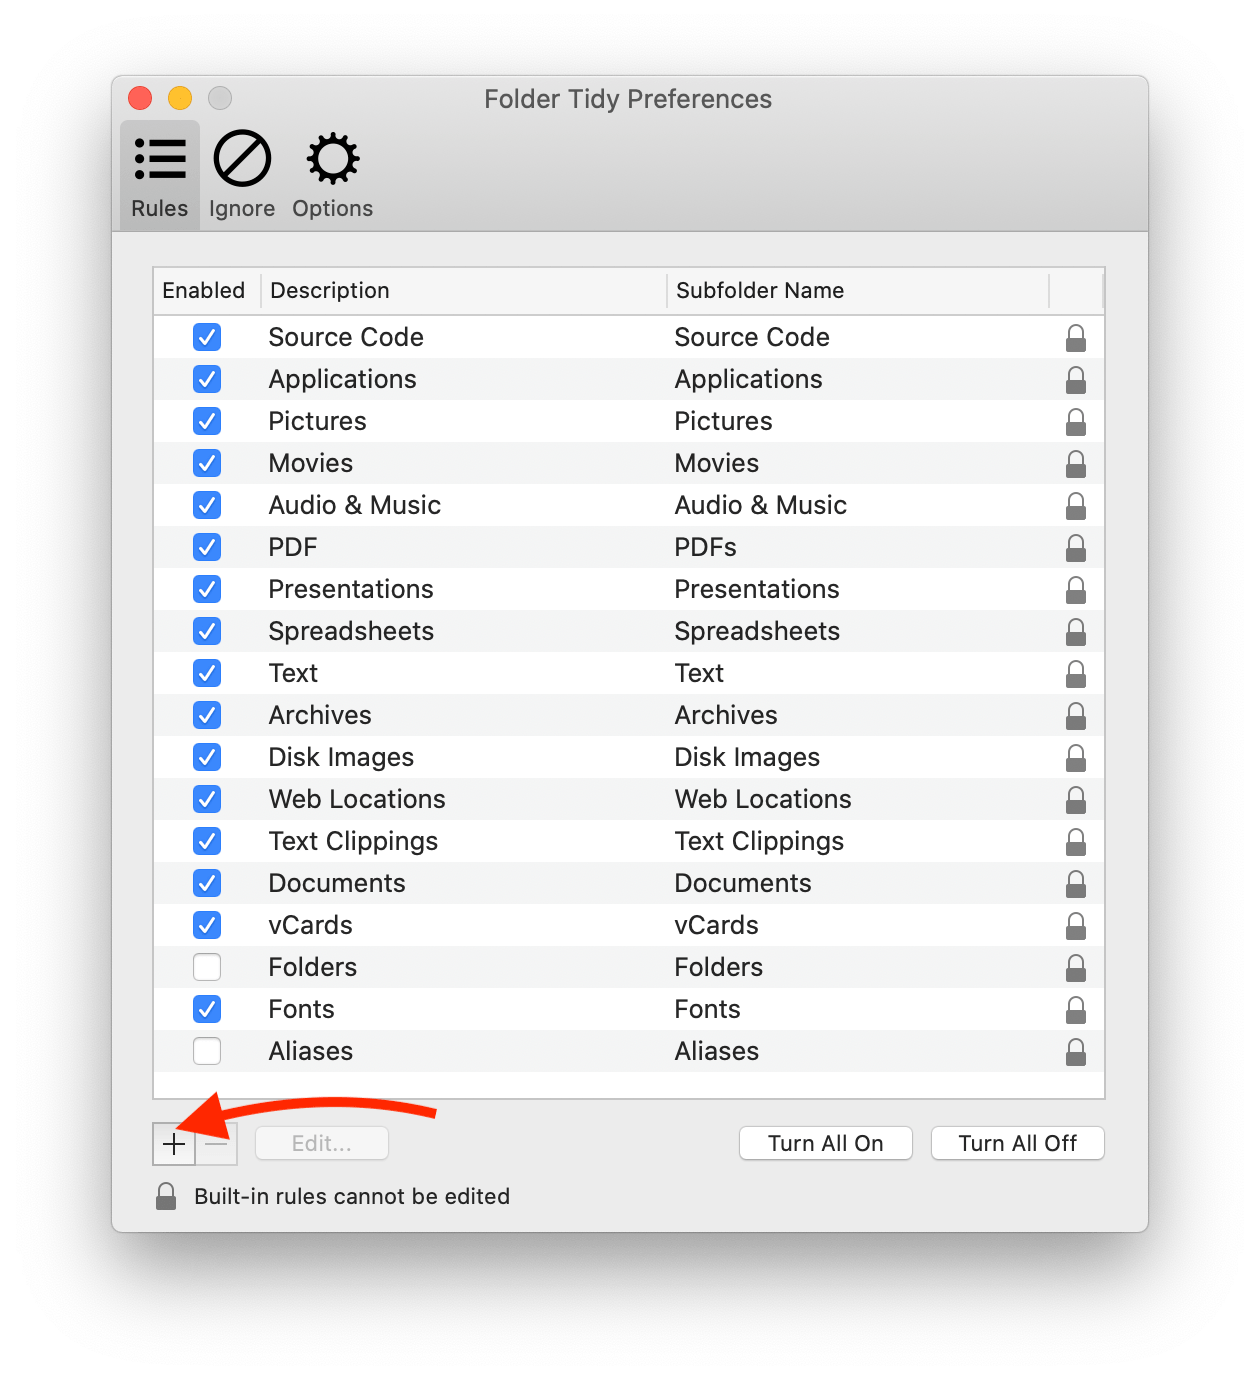
To start creating a custom tidy rule, click the plus button as indicated in the screenshot above.
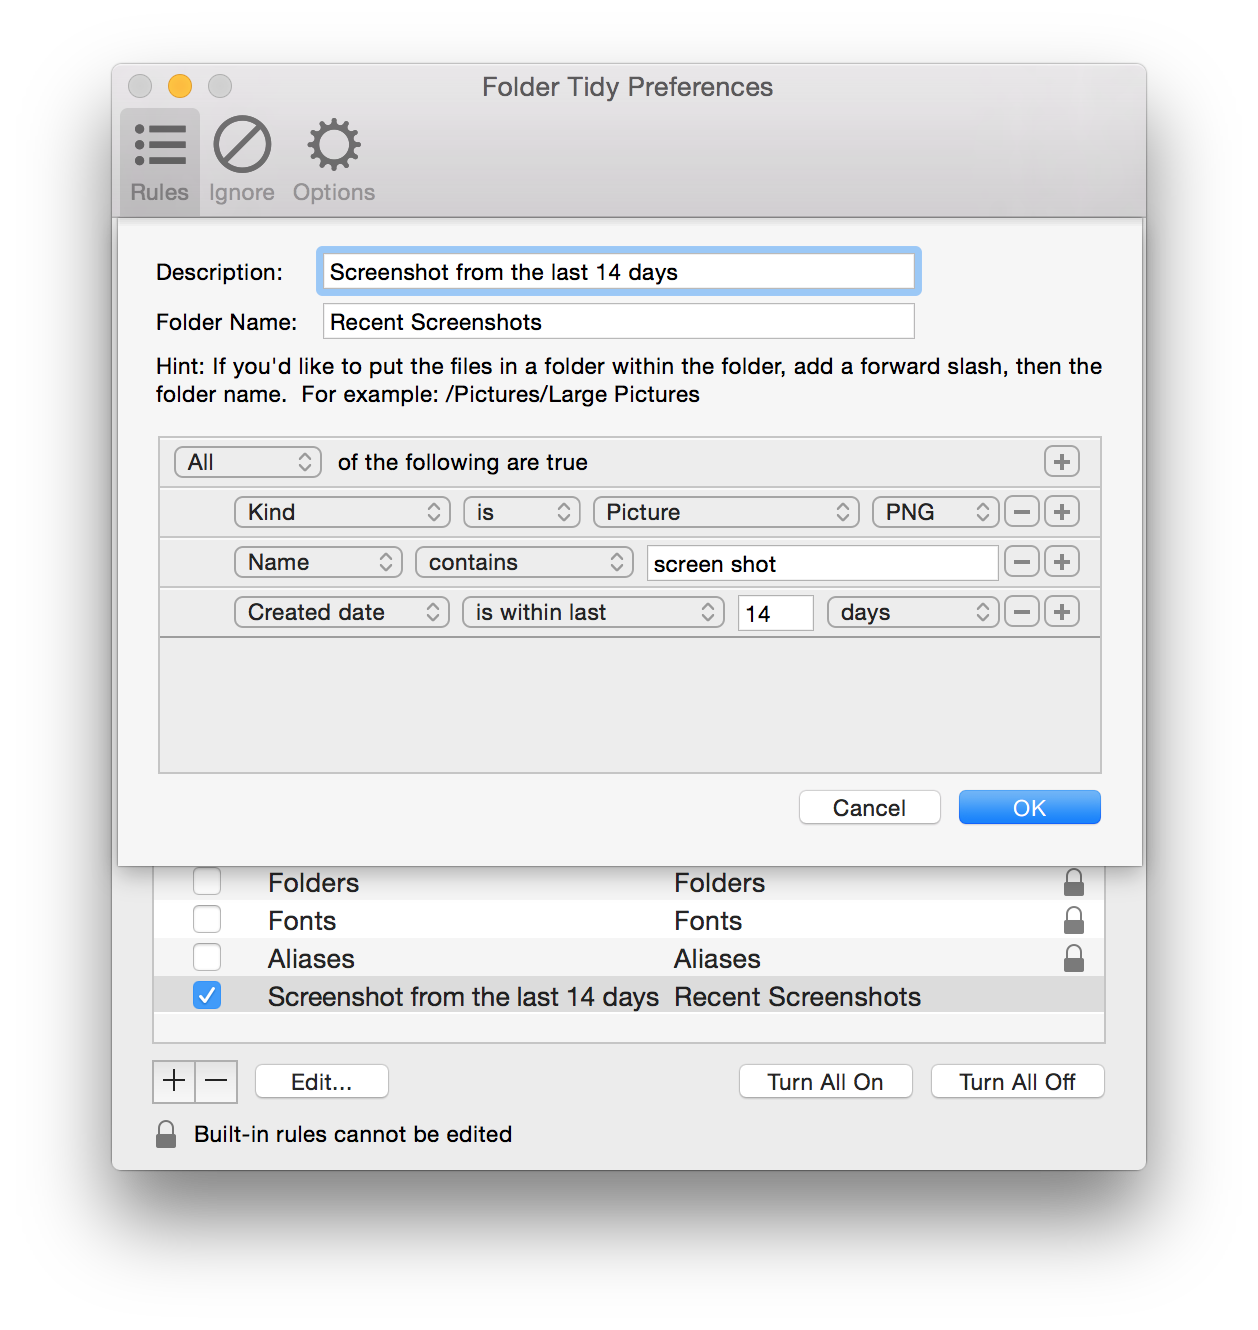
This is an example of a custom rule. Let's go through the different parts:
1 - Description: This is what will be displayed for this rule under the Description column with all the other rules.
2 - Folder Name: The name of the folder that will be created to store all the files that match the rule's predicate. It's possible to include multiple folders in this if you'd like to have the files moved to a subfolder. For example, you might want to have multiple rules for photos and they all go to "Tidied Photos", and you'd like this one to go into "Tidied Photos/Vacation" then use that as the folder name.
3 - Rule Editor: This is the main part of a custom rule. The predicates that are created here form the basis of a complete rule. It's very similar to creating a search in Finder. You can combine predicates where all, some or none of them have to be true in order to move a particular file.
In this case, we've created three predicates that must all be true in order to move a file to the "Recent Screenshots" folder: the file must be a PNG picture, it must have the word "screenshot" somewhere in the name and it must be at most 14 days old.
Performing a tidy
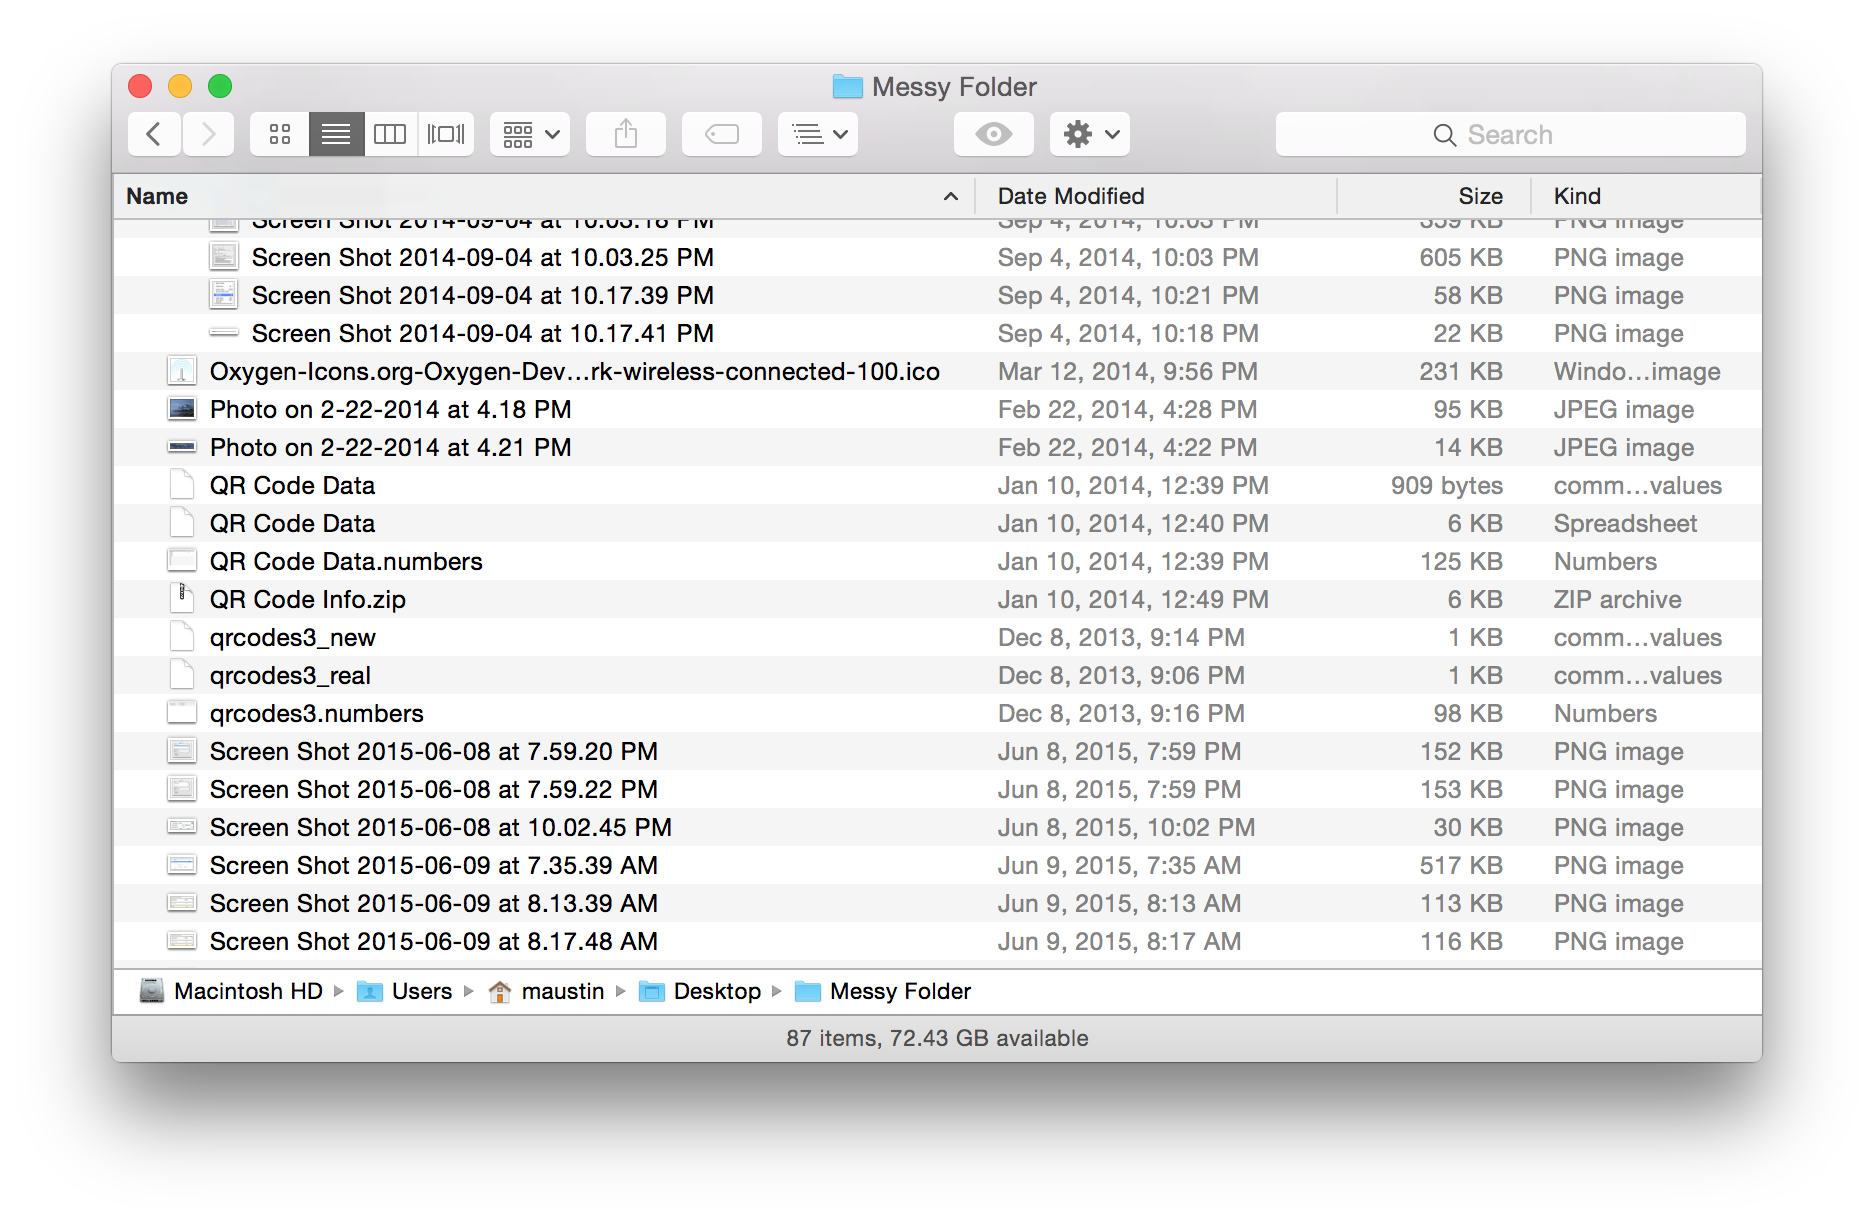
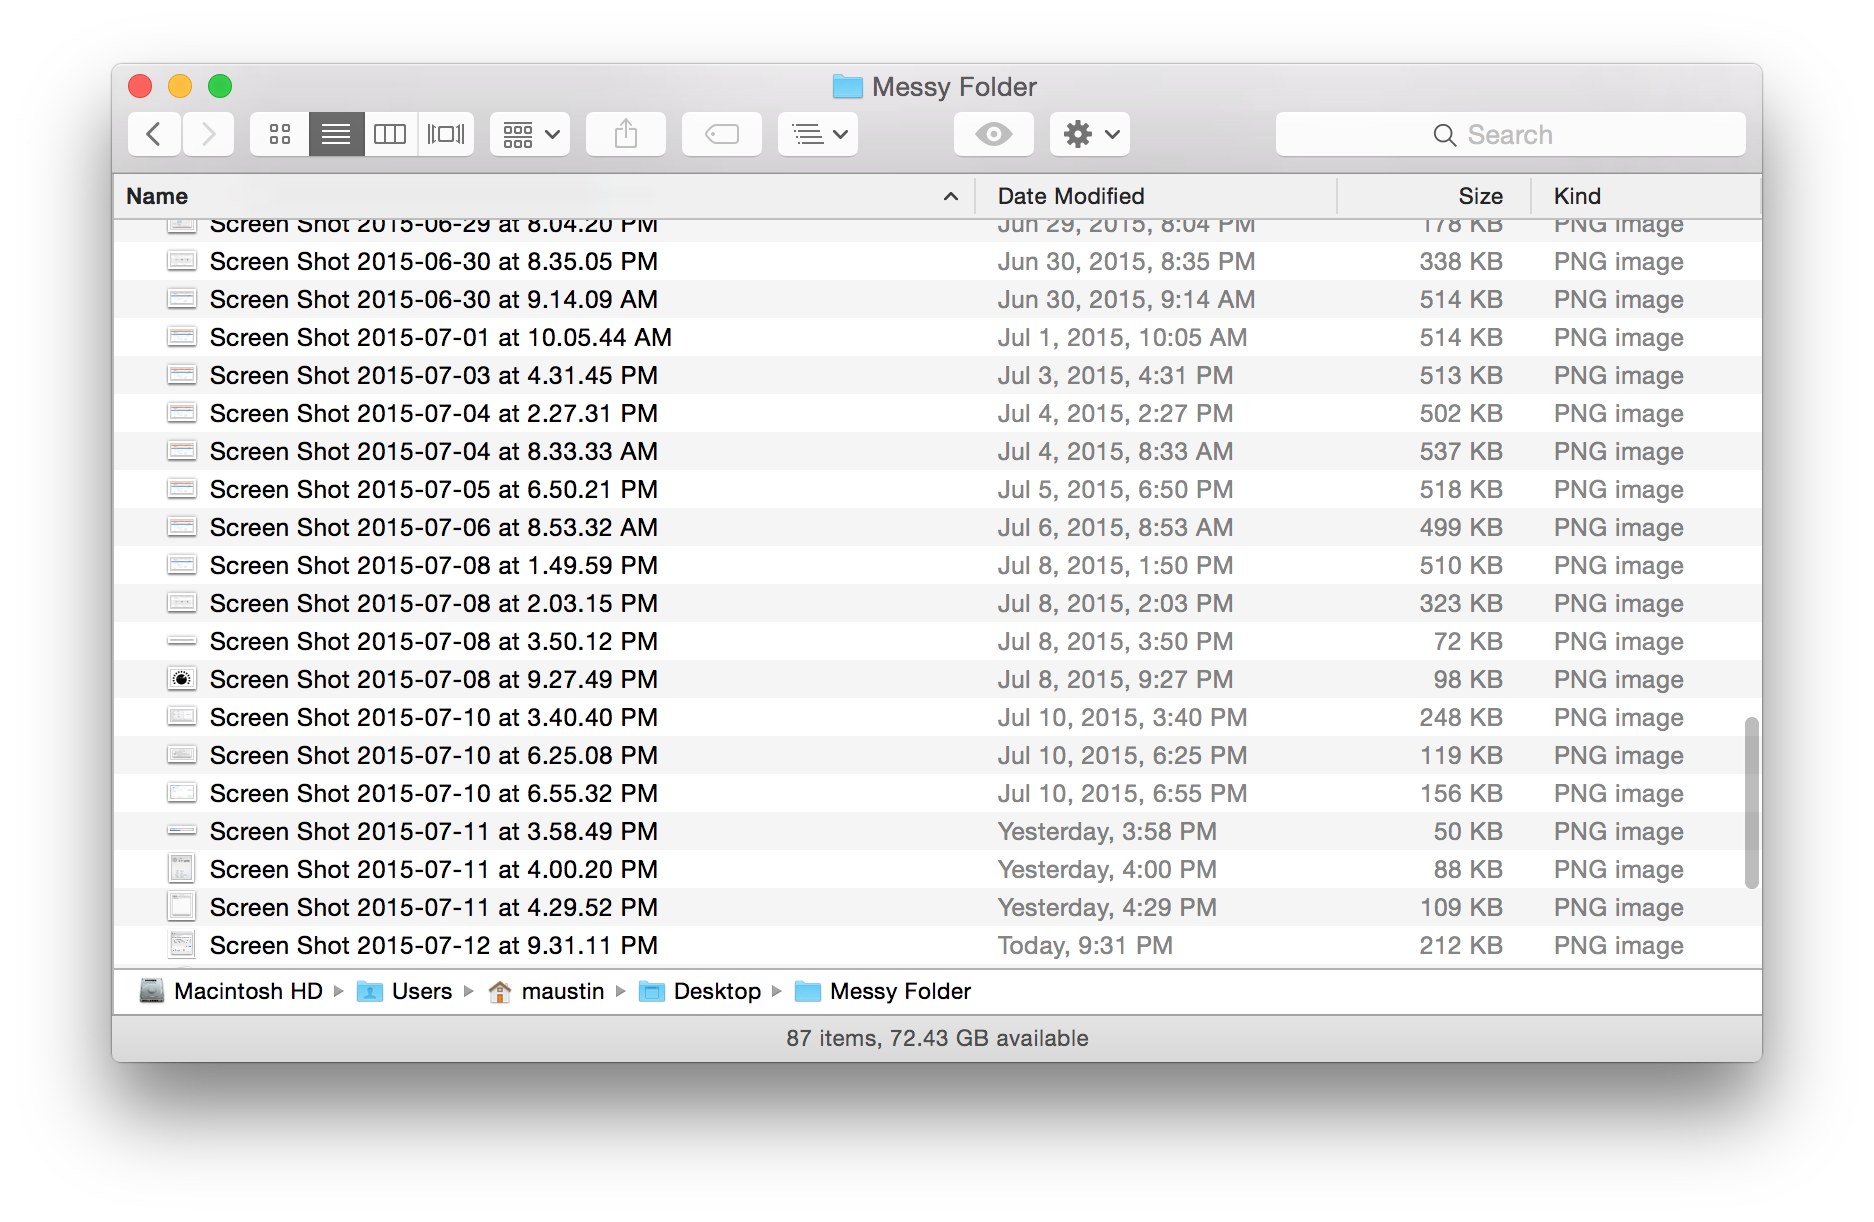
Both the source and destination folders have been chosen in Step 1 and Step 2. In this example, Folder Tidy will organize the files from the "Messy Folder" into the "Sorted Folder", both of which are on the Desktop. The option to include files in subfolders has also been enabled to allow the app to find any screenshots no matter which folder or subfolder they are located in.
In this example, only one rule has been enabled, which is a custom rule for moving screenshots into a folder named "Recent Screenshots". When running a tidy, any number of built-in and custom rules can be enabled although for simplicity, we'll do just the one here.
In this example, only one rule has been enabled, which is a custom rule for moving screenshots into a folder named "Recent Screenshots". When running a tidy, any number of built-in and custom rules can be enabled although for simplicity, we'll do just the one here.
Before the tidy
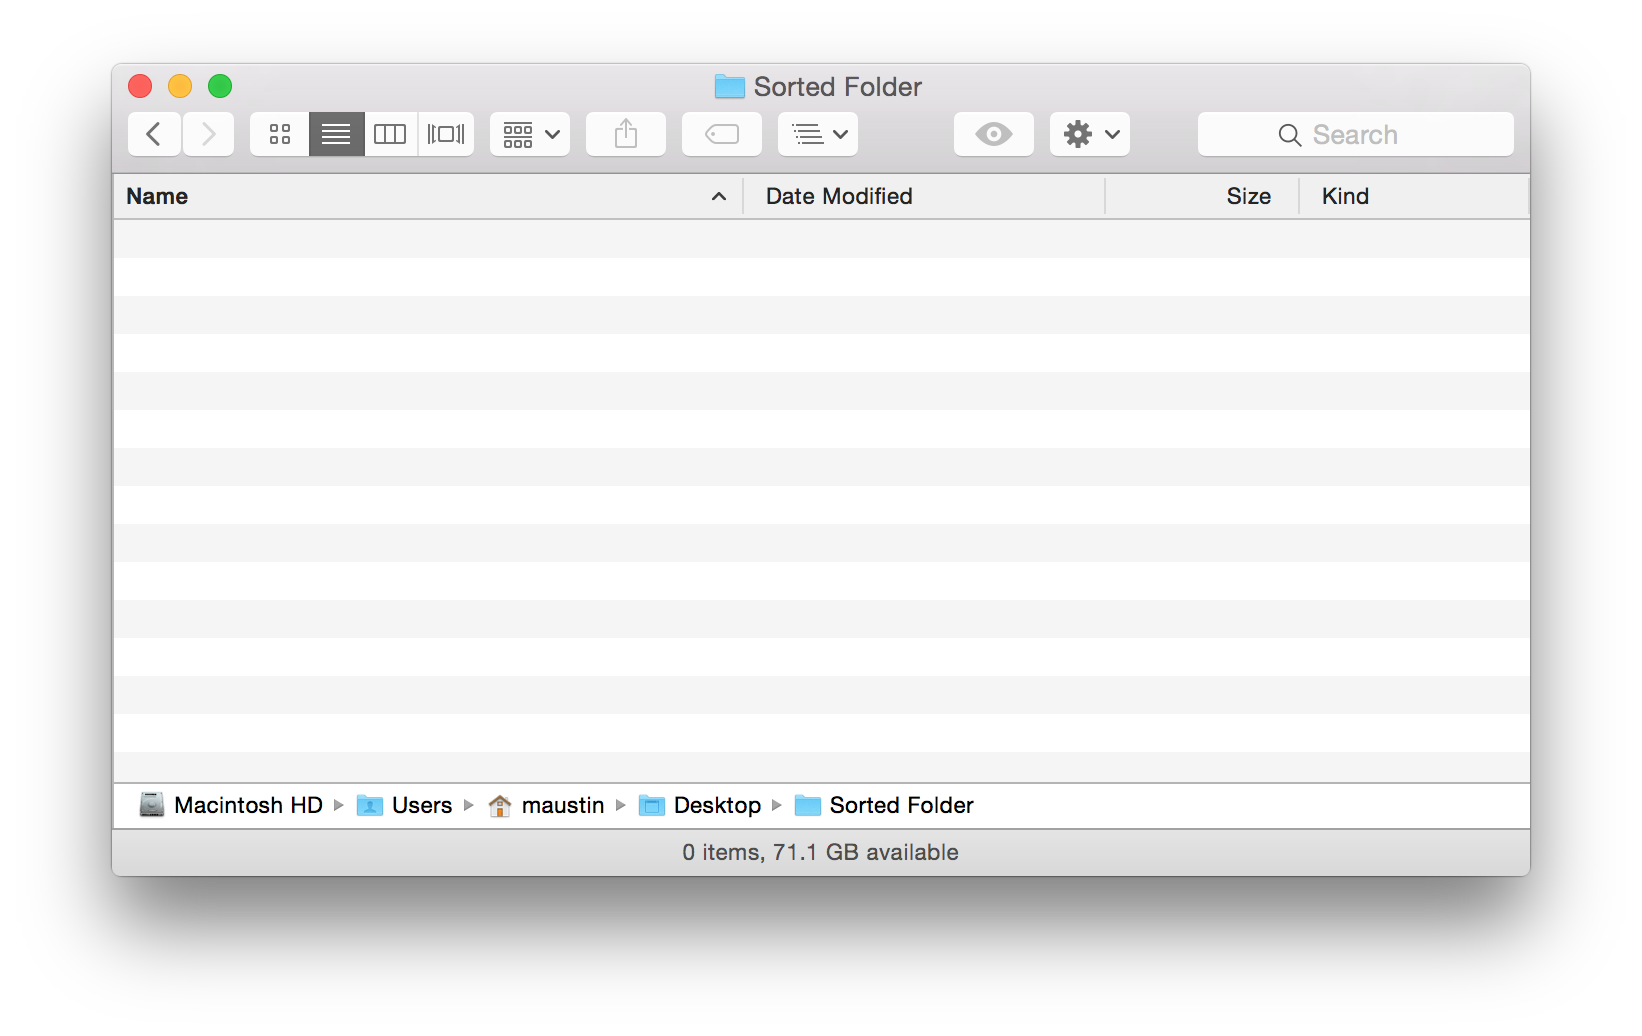
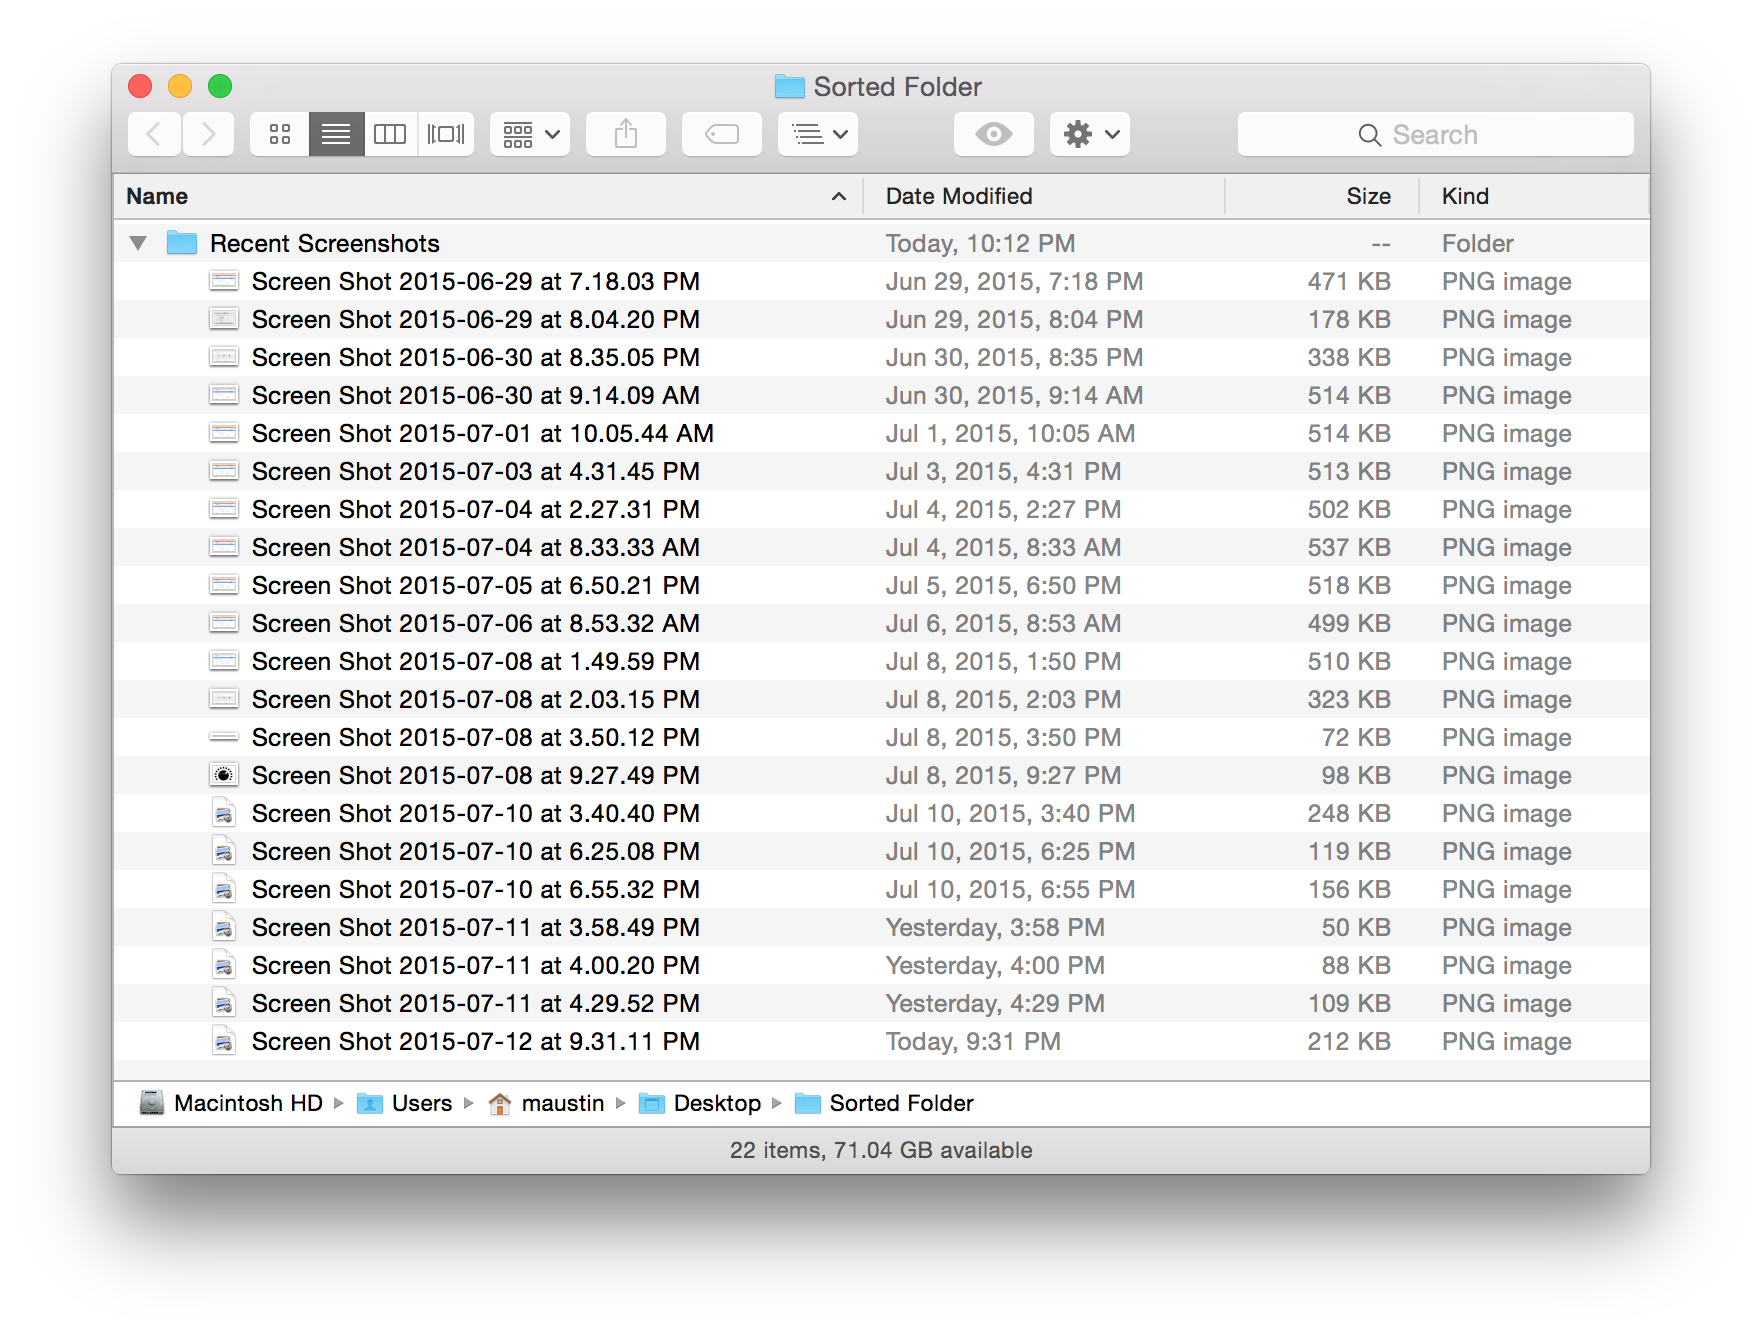
After the tidy
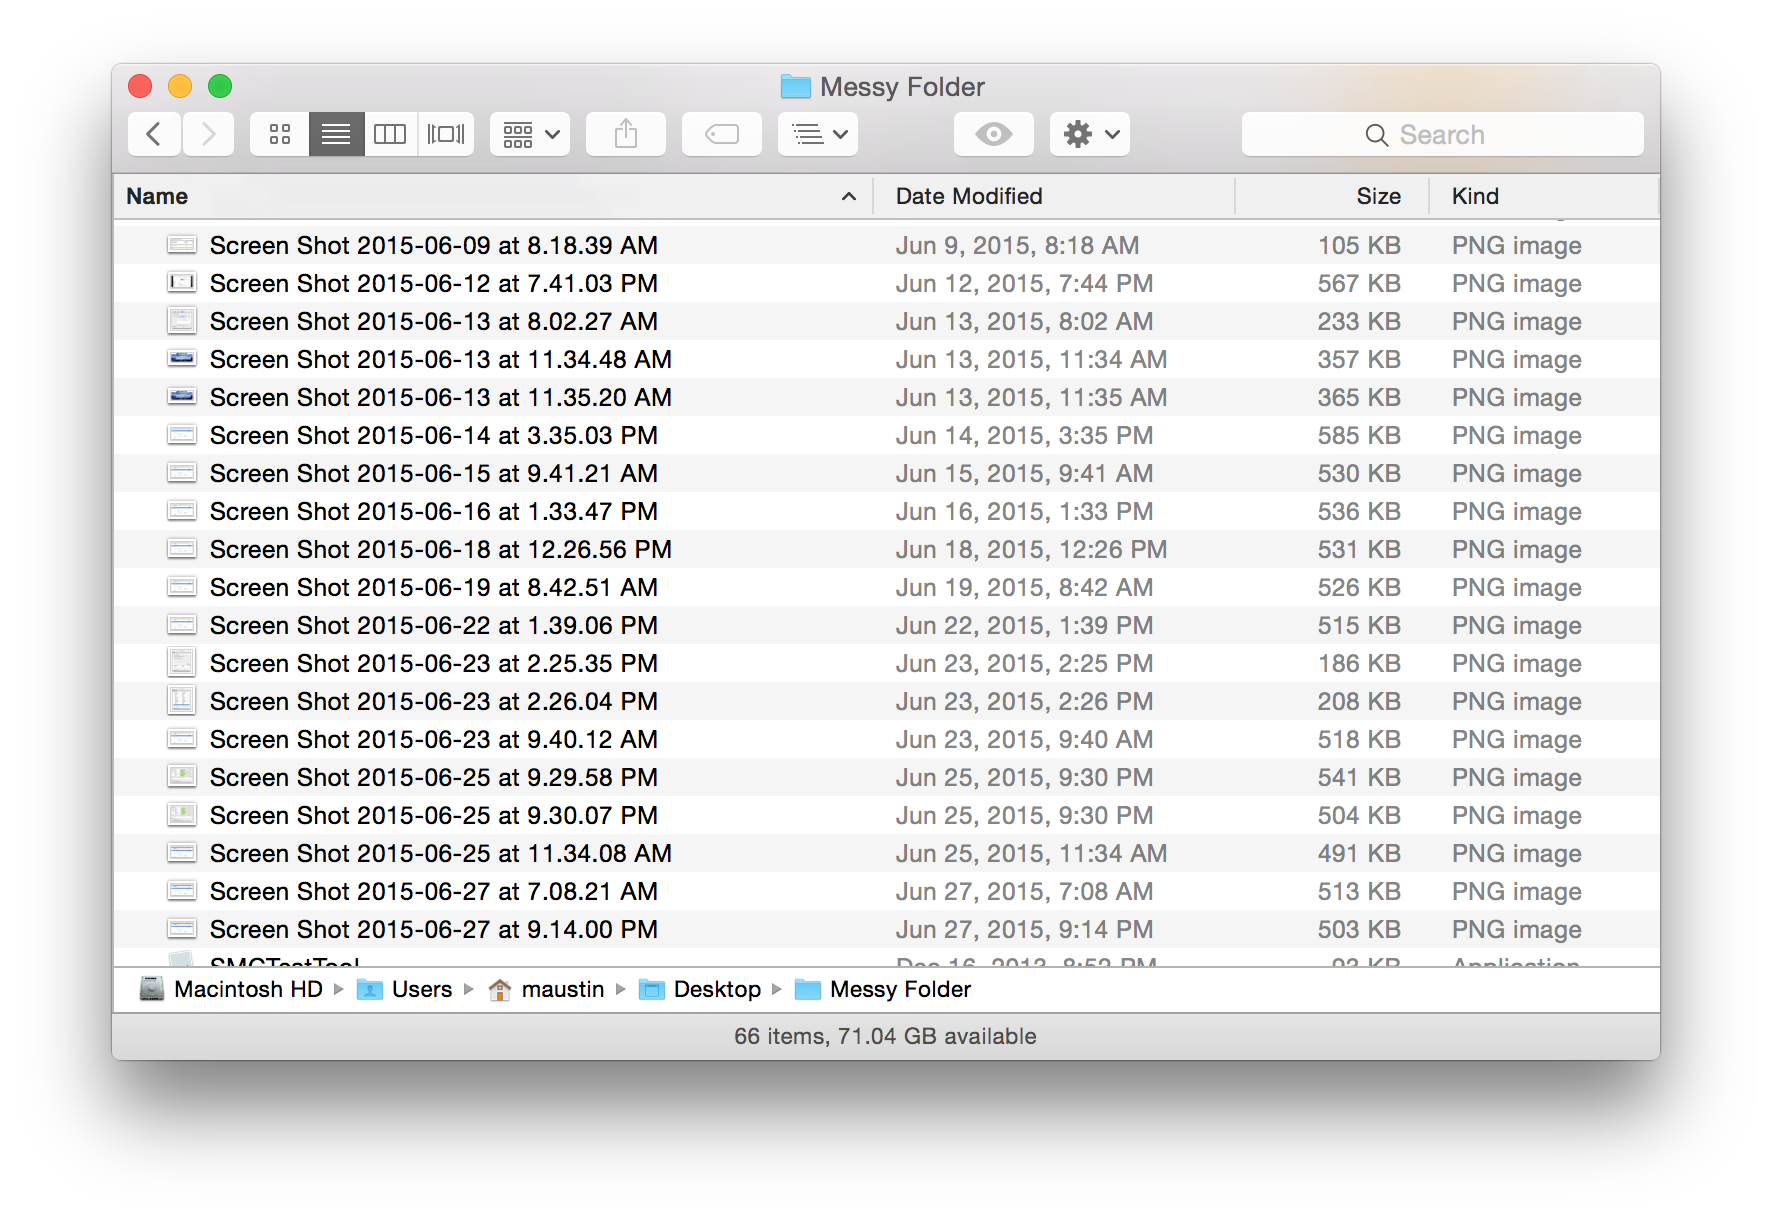
The tidy has finished. Notice how only the files that matched the custom rule got moved from the "Messy Folder" into a new folder labeled "Recent Screenshots" inside "Sorted Folder".
It's almost like magic!
It's almost like magic!
Undoing a tidy
Once a tidy has finished, there is an option to immediately undo it and move all files back to their original locations, or it can be done at a later time even after quitting Folder Tidy.
When an undo is used, Folder Tidy will go through the list of every single file that was moved for that particular tidy and attempt to move them all back to restore the original folder structure. It uses the standard macOS file functions and will only remove a file once the move back has been confirmed as working without any errors.
It will also attempt to remove the subfolders that were created in the destination folder, provided that they are now empty (if there are other files in a folder, it will not remove it).
This feature is very handy to experiment with different rules and options to see what works best.
Now
To undo a tidy right after it finishes, simply click the "Undo Tidy" button in the window. It will then move all the files and folders back to their original locations.
After this is finished, the app can be quit or a new tidy started.
After this is finished, the app can be quit or a new tidy started.


All the files have been moved out of "Sorted Folder" and were put back to their original locations in "Messy Folder".
Later
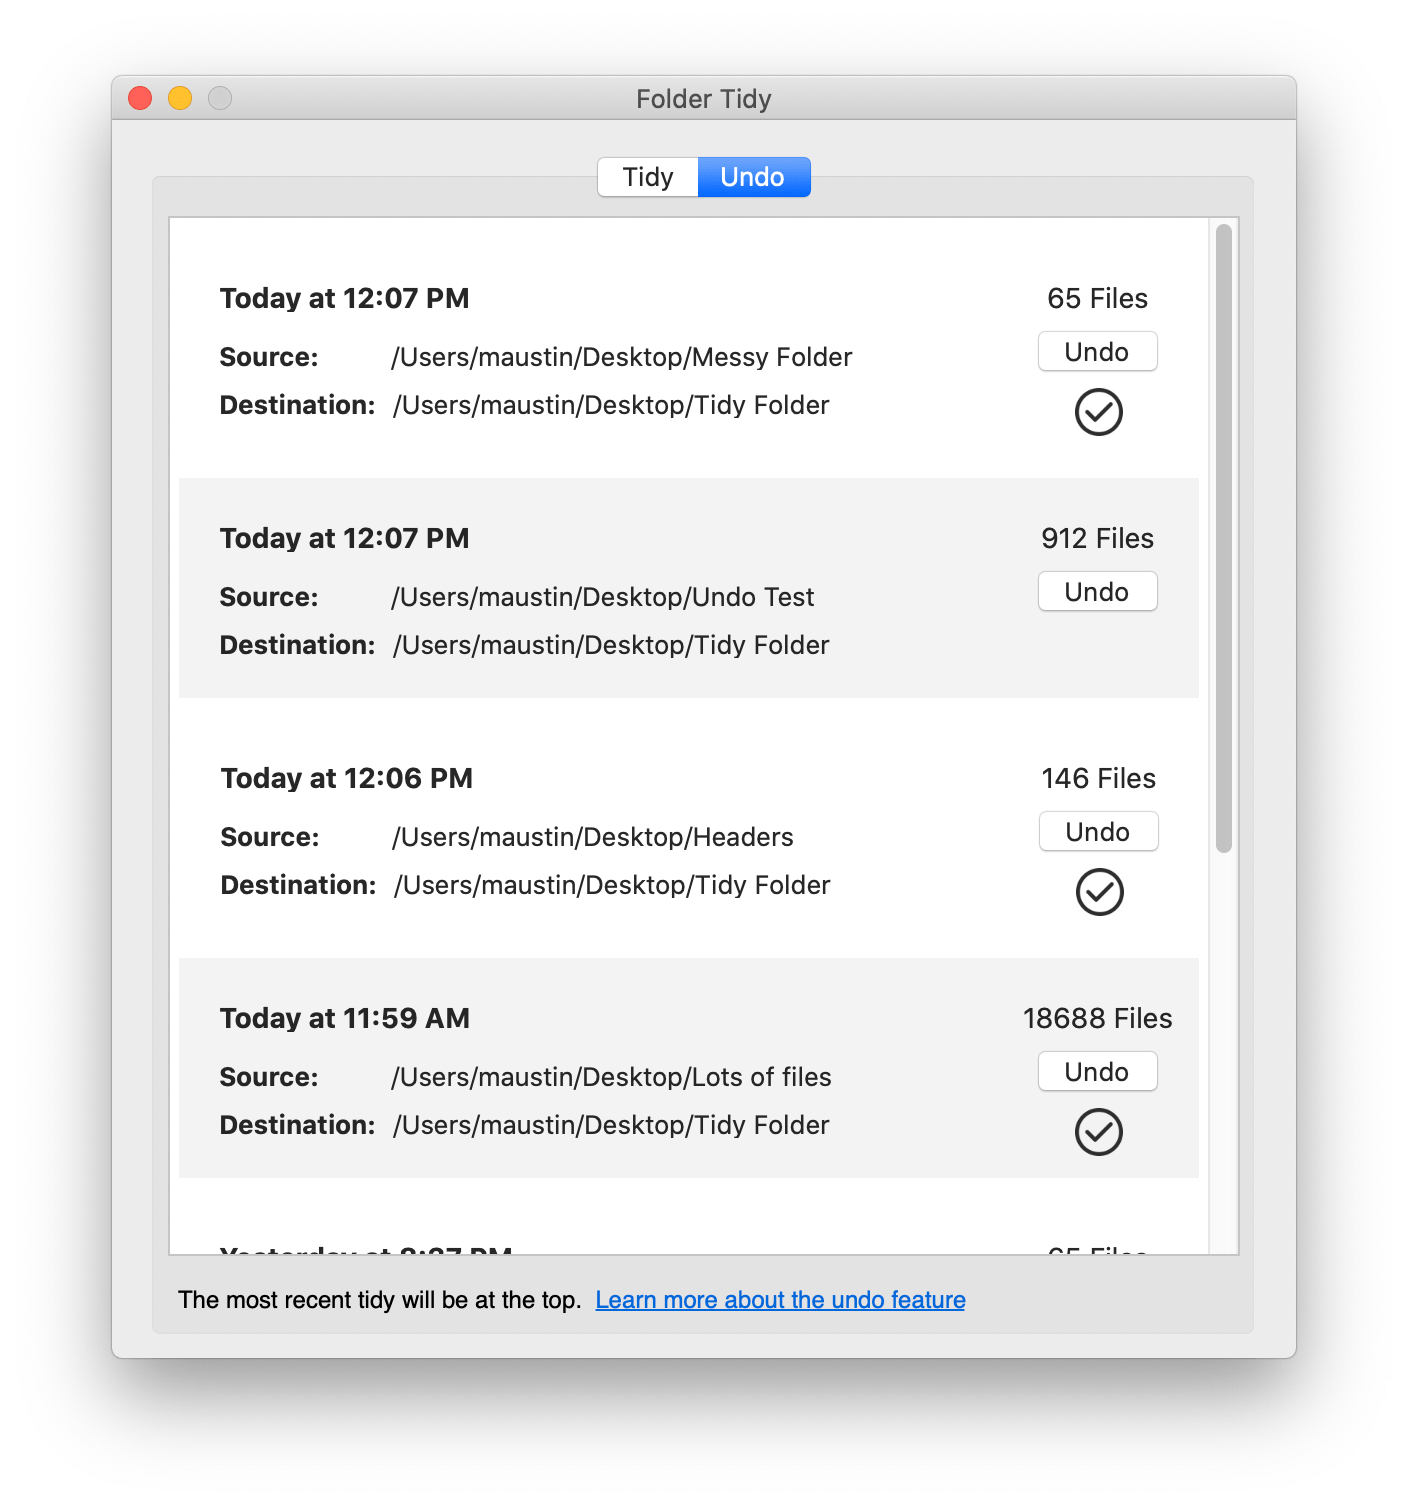
Starting with Folder Tidy 2.8, there is a new feature to undo previous tidies even after the app has been quit or a new tidy started. They are all saved and shown in a list under the "Undo" tab in the main window. To undo a previous tidy, click the "Undo" button for the one to revert.
For undos that have been successfully run, they have a circle with a checkmark in the middle.
For undos that have been successfully run, they have a circle with a checkmark in the middle.
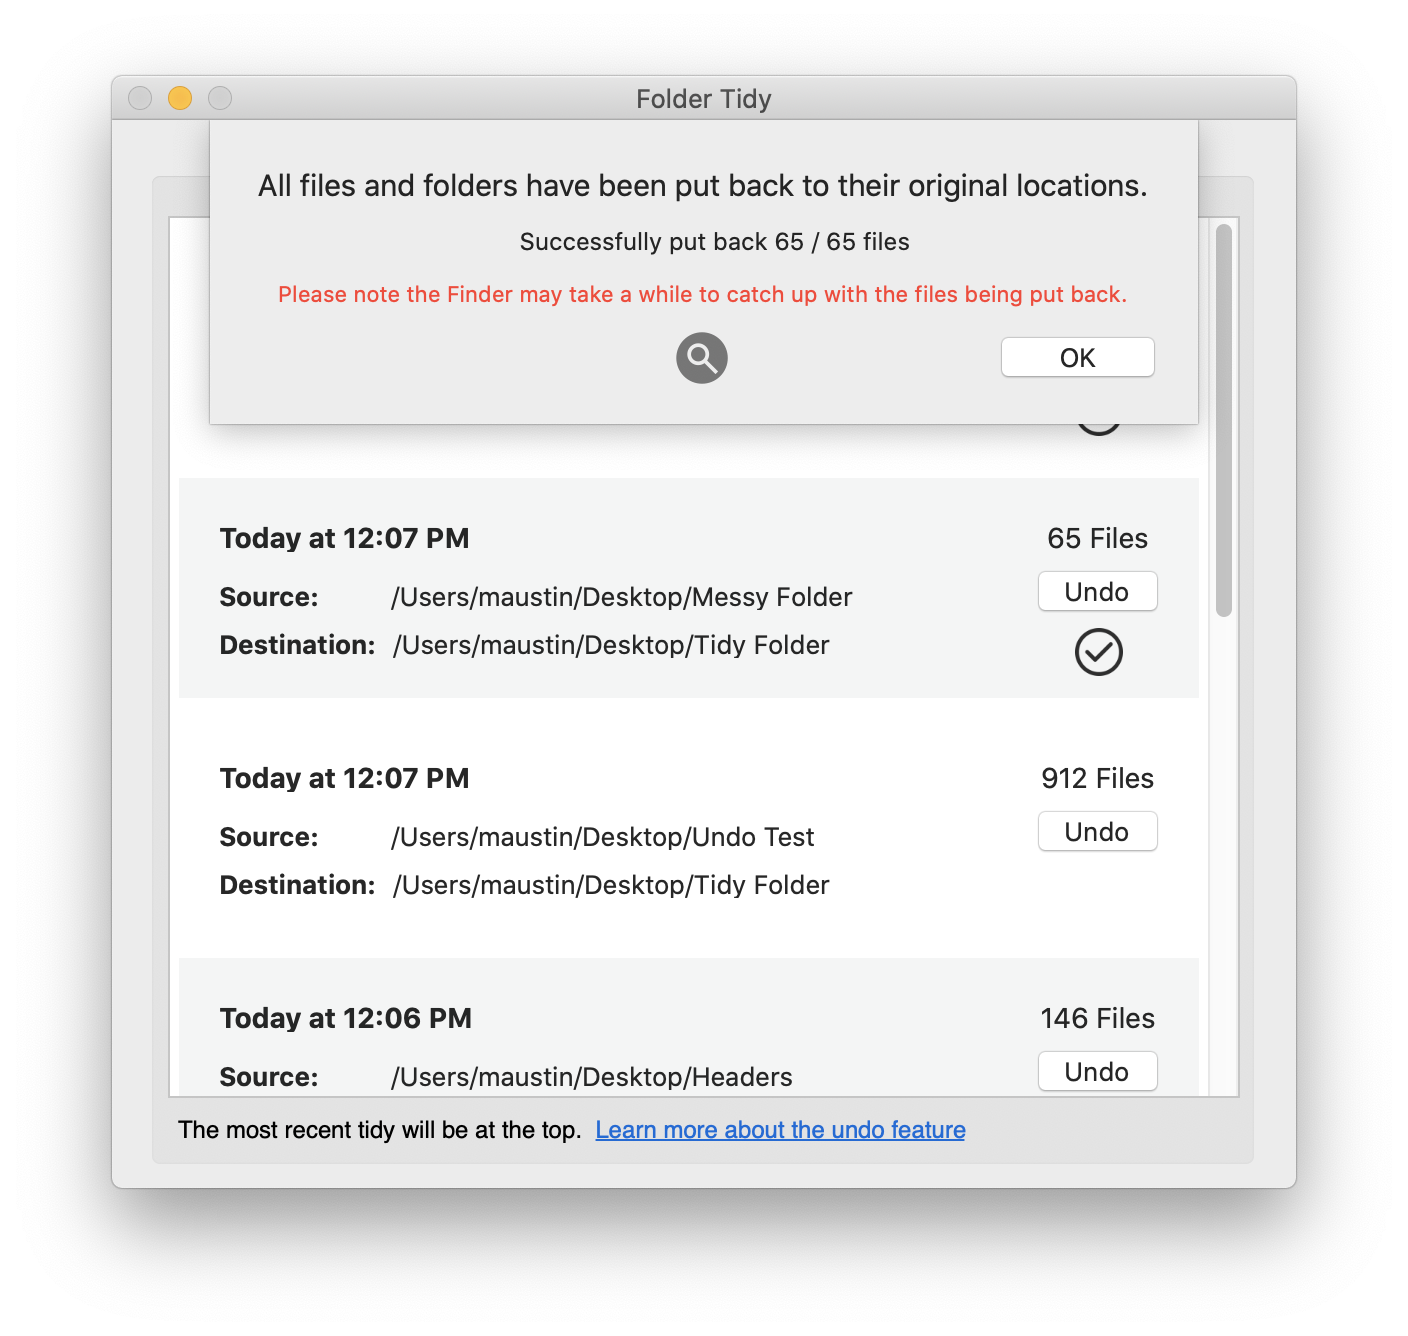
Once it's finished, it will display a dialog similar to the one used for immediately undo with the results and an option to reveal the source folder in the Finder.
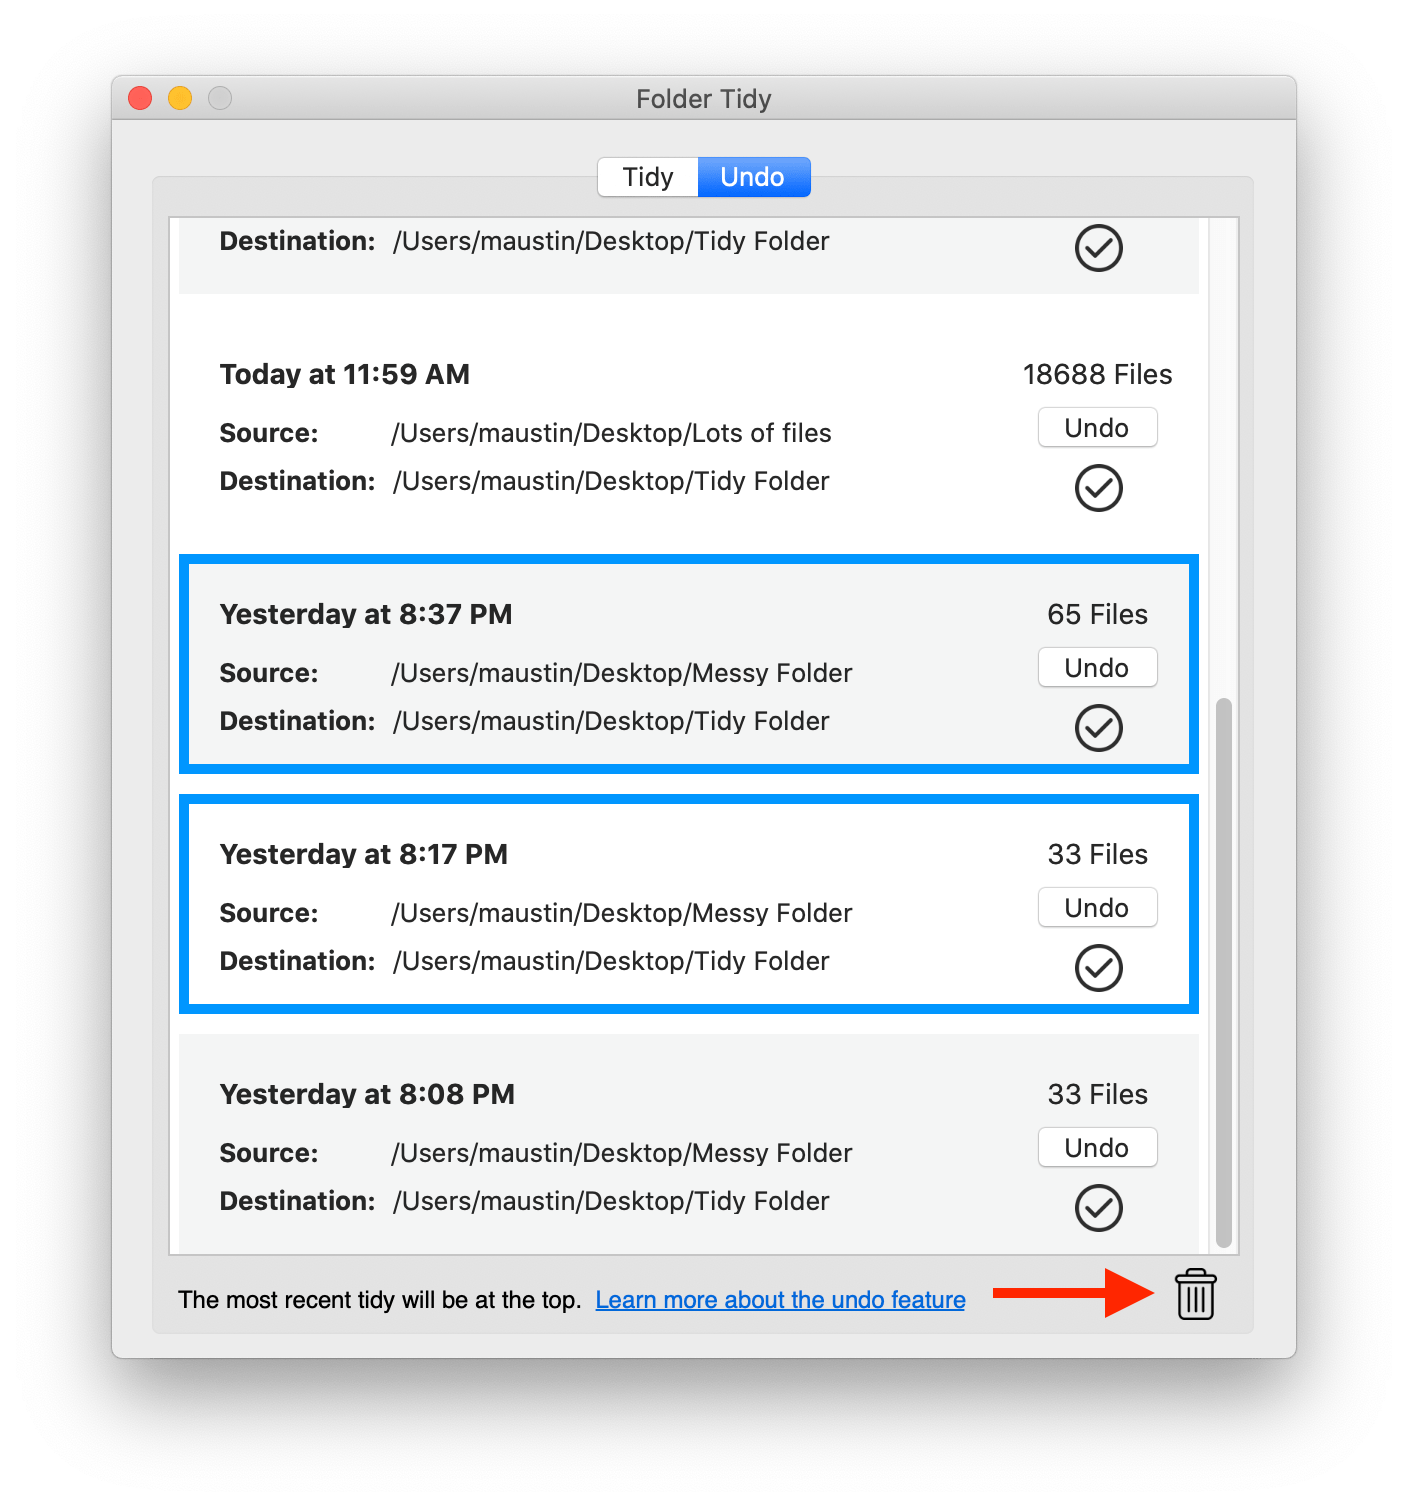
To delete old undos that are no longer needed, simply choose which ones, then click the trash can icon in the lower right of the window. This will move the undo files to the trash (and not delete them) just in case they are still needed and this was by accident. If you need to restore an undo file that's in the trash, move it to back to the following folder based on which version you have:
Website: /Users/YOUR_USERNAME/Library/Application Support/Folder Tidy/Undos/
App Store: /Users/YOUR_USERNAME/Library/Containers/com.tunabellysoftware.cleanmydesktop/Data/Library/Application Support/Folder Tidy/Undos/
Website: /Users/YOUR_USERNAME/Library/Application Support/Folder Tidy/Undos/
App Store: /Users/YOUR_USERNAME/Library/Containers/com.tunabellysoftware.cleanmydesktop/Data/Library/Application Support/Folder Tidy/Undos/
What to do if no files are moved
In rare cases, after a tidy is finished it will show that zero files have been moved.
In this scenario, the number one reason for Folder Tidy being unable to move any files is if the folder they are inside isn't indexed by Spotlight. Folder Tidy uses Spotlight as a reliable and efficient way to determine which files to move since reading the information from each file individually would take an exponentially longer time.
This can usually be from one of two reasons:
(1) One of the parent folders is being ignored for indexing by Spotlight. To quickly check if a folder isn't indexed, open the System Preferences, click the Spotlight icon and then the Privacy tab. Make sure the folder or drive isn't included in the list, otherwise Folder Tidy will be unable to tidy any files from those folders.
(2) Try rebuilding the Spotlight index on the Mac.
If neither of these help to resolve it, please feel free to email our support team anytime.
FAQ
If you still have some questions, please check out the FAQ for Folder Tidy and if the answer isn't there, please feel free to email us anytime at support@tunabelly.com
Folder Tidy