QR Factory
How to create multiple QR codes using a CSV file
This page will guide how to create a batch of QR codes using the multiple codes feature of QR Factory. Whether it's to create a batch of URL codes with text at the bottom for inventory, or for Person codes to use on business cards, it can handle it all. Follow along the next sections to learn how to setup the CSV file that will store the information about what to include in the QR codes and how they should appear.
QR Factory reads the information from a CSV file, which is composed of rows and columns separated by commas. Each row represents a QR code to create and each column has the information that is needed on what type of code to create, what the contents should be and how it should appear.
Preflight
The very first step is to make sure that QR Factory for either macOS or iPadOS is downloaded and open. It doesn't matter which platform is used since they have the same underlying code to create multiple codes. If it's your first time using it, you can start a free 1 week trial which allows unlimited access to the app with all features enabled. Feel free to cancel the subscription before the week is over if you decide it's not the right app for you, otherwise thank you for your support, we really appreciate it!
The next step is to have a spreadsheet app available so it's easy to create and edit a CSV file. The usual ones are either Numbers or Excel although any app that can create spreadsheets and export in the CSV format will work. In the following sections, we will be referring to the first two apps just to make it easier to follow along.
Now everything is setup to begin.
Setup the CSV file
Since QR Factory loads a CSV file to create multiple codes, it's important that it's formatted correctly. Although if there happens to be an issue with the formatting, it will display a helpful dialog with instructions on how to resolve it.
To get started, choose one of the two options:
- Create a new spreadsheet in either Numbers or Excel.
- Choose a pre-filed example file for various QR code types.
Option A: Create a new spreadsheet
For this option, create a brand new empty spreadsheet in either Excel or Numbers. In fact, it can be any spreadsheet app, as long as it's capable of exporting a CSV file (we'll get to that in the next version).
Next, add a column for each content and appearance option that is needed. Fill in the column name with appropriate Title value. For each content and appearance option, the title to use is shown with it. For example, for the file name option, the title for that column would be 'Filename".
Note: Make sure that the required columns are added, or the QR codes will not be generated properly.
Once all the columns have been added along with a row for each code with the values filled in, it's time to export it all to a CSV file.
Option A: Start with example file
Download one of the example files or either Excel or Numbers:
Open it up and add or modify the column names according to the QR code's contents and presentation. Most of the columns that are needed for most cases are already included the examples, however if there is one that is needed, just create a new column (in Excel or Numbers) and label it for the option that's required. For instance, if the QR code
For instance, the example file will have a column labeled "FileType" and depending on what's at column for a particular row determines which file type the code will be.
For each code that needs to be created, add one row and fill in the details for each column. Once that's done, move onto exporting the CSV file.
Option B: Start with a new file
For this option, create a brand new empty spreadsheet in either Excel or Numbers. In fact, it can be any spreadsheet app, as long as it's capable of exporting a CSV file (we'll get to that in the next version).
Next, add a column for each content and appearance option that is needed. Fill in the column name with appropriate Title value. For each content and appearance option, the title to use is shown with it. For example, for the file name option, the title for that column would be 'Filename".
Note: Make sure that the required columns are added, or the QR codes will not be generated properly.
Once all the columns have been added along with a row for each code with the values filled in, it's time to export it all to a CSV file.
Option C: Use vCard values for columns
For creating vCard (Person) codes, it's possible to skip all the normal content columns and uses the appearance columns along with the vCard keys as columns. This allows a faster way to export contacts into CSV files.
To see how this works, we've provided a sample file already in CSV format:
Example vCard columns
Since it's already in the CSV format, it can immediately be used by QR Factory.
Required columns
At a minimum there are two columns that are required, Type and Content. The first tells QR Factory which type of code to create for a particular row, and second is required so it knows what to encode into the QR code. The Type value can be Text, URL, Email, GPS, Phone, Person, WiFi, Calendar, SocialTwitter, SocialFacebook or SEPA. For each type, the content format is displayed under it. Some contents require a key-value system, and some are just plain text.
Key-Value content
For some types, such as Email, the QR code will contain a combination of key values, such as "subject=Please sign documents". Since there's only one Content column, to fit it all in properly, all the key-value sets are combined by putting them all together and separating them by a semicolon. Here's an example of how an Email code content column/row could look like:
email=support@tunabelly.com;subject=Hello;body=Type your email here;cc=example@example.org;bcc=hidden@example.org
Note: Since it's a semicolon that separates each key-value pair, they cannot be used for any of the values or it will mess up the parsing.
Export file as CSV
The last step is before it's ready to be used in QR Factory is to export the spreadsheet into a CSV (Comma Separated Values) file. This means that each value is separated by a comma, which is a standard file format that is easily readable. Here's an example of what it will look like:
Example exported CSV file
If the spreadsheet app is Excel, click the File menu and choose Save As… then change the File Format popup menu to CSV. Save the file and note where it's located.
If the spreadsheet app is Numbers, click the File menu and choose Export To -> CSV. Save the file and note where it's located.
Note: If a comma in required for one of the values (ex: "Company Name, Inc."), add a backslash before the comma. For this example, it would become "Company Name\,Inc.". This is called escaping the comma.
Create multiple QR codes
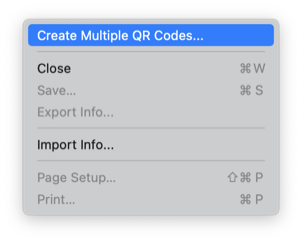
To use the CSV file now in QR Factory, either click the File menu and choose Create Multiple QR codes…
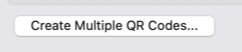
Or click the Create Multiple QR Codes… button in the bottom left of the window.
In the dialog that appears, choose the CSV file, where to save the QR codes, and optionally where folder the icon images are (if they are used). The folder for the icon images is needed because QR Factory may not have access to the images if it doesn't have access to their folder.
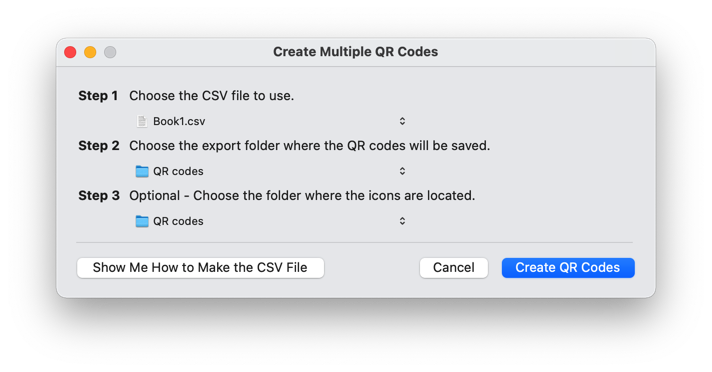
Wait until it's finished and then all the QR codes will be available in the folder chosen in Step 2.
If there are no files in the folder and no error message displayed, please double check that the required columns are present and the format for the other columns is correct.
Tips
Here are a few tips to try if there are any errors or the QR codes are not generated as expected:
- If a comma in required for one of the values (ex: "Company Name, Inc."), add a backslash before the comma. For this example, it would become "Company Name\,Inc.". This is called escaping the comma.
- If a column uses the key-value system, make sure the key-value pairs are separated by a semicolon.
- For the filename column, add the filetype extension to the name. For example, instead of "file1", use "file1.png" if it's in the PNG format.
- The QR codes can be saved in RGB, CMYK or Grayscale color spaces using the ColorSpace column. Please note the only format that supports all three color spaces is TIFF.
- The colors for the PixelColorStart, PixelColorEnd and BackgroundColor columns can now be specified with "rgb(r,g,b)" or "cmyk(c,m,y,k)"
Column Details
Content
These columns describe which type of QR code to create and what the content should be. If there's a Key then that particular column/row combination uses the key-value system, otherwise if it's blank then it's just normal text with no formatting.
Column Name | Key | Value |
Type | Text |
Content | Any text up to 240 characters |
Type | Email |
Content | email | Any email address |
Content | subject | The subject of the email |
Content | body | The body of the email |
Content | cc | Email address to cc (carbon copy) |
Content | bcc | Email address to bcc (blind carbon copy) |
Type | URL |
Content | Any URL including the scheme (ex: http:// or https://) |
Type | GPS |
Content | latitude | Latitude as a decimal number |
Content | longitude | Longitude as a decimal number |
Type | Phone |
Content | type | PhoneNumber or SMS |
Content | number | Any phone number |
Type | Person |
Content | nameTitle | Person's title (ex: Mr, Mrs, Dr, etc) |
Content | firstName | First name |
Content | lastName | Last name |
Content | nickname | Person's nickname |
Content | company | Company name |
Content | jobTitle | Job title |
Content | jobDepartment | Job department |
Content | phoneHome | Home phone number |
Content | phoneMobile | Mobile/cell phone number |
Content | phoneWork | Work phone number |
Content | phoneFax | Fax phone number |
Content | phoneNumberPreferredType | Home, Work, Mobile, or Fax |
Content | email | Email address |
Content | url | Homepage URL |
Content | street | Street address |
Content | city | City |
Content | provinceState | Province or state |
Content | postalZipCode | Postal or zip code |
Content | country | Country |
Content | addressType | Home or Work |
Content | note | Note about the contact. |
Content | cardType | VCARD or MECARD |
Content | encoding | ASCII or Unicode |
Type | WiFi |
Content | ssid | Name of the WiFi network |
Content | password | Password for the WiFi network |
Content | authenticationType | None, WEP, WPA or WPA2 |
Content | hidden | Yes or No |
Type | Calendar |
Content | title | The name of the event |
Content | description | The description (may be interpreted as a note in some scanners) of the event |
Content | location | The location of the event |
Content | start | Start time of the event in format YYYY-MM-DDThh:mm |
Content | end | End time of the event in format YYYY-MM-DDThh:mm |
Content | timeZone | Time zone of the event. Ex: "America/Vancouver" |
Type | SocialTwitter |
Content | Twitter username |
Type | SocialFacebook |
Content | Facebook page name |
Type | SEPA |
Content | bic | BIC (Business Identifier Code) of the beneficiary bank. Maximum of 11 characters. |
Content | name | Name of the beneficiary. Maximum of 70 characters. |
Content | iban | IBAN (International Bank Account Number) of the beneficiary. Maximum of 34 characters. |
Content | euroAmount | Amount in Euros. EUR is an optional prefix that will automatically get filled in if missing. Ex: "EUR10.5". Maximum of 12 characters. |
Content | purposeCode | Purpose of the transfer. Maximum of 4 characters. |
Content | remittanceText | Remittance information. If using a reference, maximum of 35 characters, otherwise 140. |
Content | info | Extra info. Maximum of 70 characters. |
FileName (optional) | The name of the file |
FileType (optional) | PNG, TIFF, PDF or EPS |
ColorSpace (optional) | RGB, CMYK or Grayscale. Please note that the only format that supports all three color spaces is TIFF. |
RotationAngle (optional) | 0, 90, 180 or 270 |
PixelRoundness (optional) | From 0.0 (square) to 1.0 (fully rounded) |
PixelColorType (optional) | Solid, LinearGradient or RadialGradient |
PixelColorStart (optional) | For "Solid", the pixel color. For "LinearGradient and RadialGradient", the start color of the gradient. It must be in one fo the following formats:
|
PixelColorEnd (optional) | For "Solid", this is ignored. For "LinearGradient and RadialGradient", the end color of the gradient. It must be in one fo the following formats:
|
BackgroundColorType (optional) | Solid or Transparent |
BackgroundColor (optional) | For "Transparent", this is ignored. For "Solid", the background colour of the code. It must be in one fo the following formats:
|
ReliabilityLevel (optional) | The amount of deterioration of the code that can occur where it is still readable. Low, Medium, High or Highest. |
AddIcon (optional) | Yes or No |
IconPath (optional) | The full path to the icon file to overlay in the middle of the code. It must reside inside the icons folder that was chosen in the app (because of Mac App Store sandboxing rules). For example: /Users/username/Desktop/Logo.png Pro Tip: To quickly copy the full path to a file, right click on it in the Finder, hold down the Option key and choose "Copy yourfilename as Pathname". |
IconSize (required if IconPath is used) | The percentage (1-100) that the icon should be scaled to. The icon will always retain its original aspect ratio. Note that the icon cannot be scaled to larger than its original size. |
IconWidth (optional if IconPath is used) | This can be used instead of IconSize for the width in pixels that the icon should be scaled to. Note that the icon cannot be scaled to larger than its original size. |
IconHeight (optional if IconPath is used) | This can be used instead of IconSize for the height in pixels that the icon should be scaled to. Note that the icon cannot be scaled to larger than its original size. |
IconBorderPercent (optional) | The percentage (0-100) of the icon's size to use for drawing a border around the icon. The border is used to visually separate the icon and the qr code. Use 0 to draw no border. |
OutputSize (optional) | The output size of the code. It can be between 64 and 4096. Note that the size will always be a square (width and height are the same). |
QR Factory